Square Gutter System Steel
Important information
- Before installation, carefully read these Instructions and follow the installation procedures and guidelines of the Occupational Safety and Health Agency (OSHA). It is recommended to use personal protective equipment when moving and working on the roof. Such equipment includes fall protection measures and personal protective equipment such as gloves, safety glasses, safety helmets and safety harnesses, etc. Avoid contact with sharp edges of metal sheets. Metal sheets and PVC products are recyclable. They should be disposed of at a point for separate collection of waste after the end of the product life cycle.
- Installation of the system by following the instructions below guarantees the correct and reliable operation of the STEEL SAXON STEEL Square Gutter System.
- The STEEL SAXON STEEL Square Gutter System must not be installed at a temp. below 0°C.
- The steel material from which the gutter system is made requires thermal elongation of the system components to be taken into account. Properly designed and installed fittings ensure correct compensation of the temperature of long components.
- The system mounting components (gutter hooks, steel clamp) allow the gutters and drain pipes to move freely.
- It is recommended to store the system in its original packaging and in a shaded place until installation.
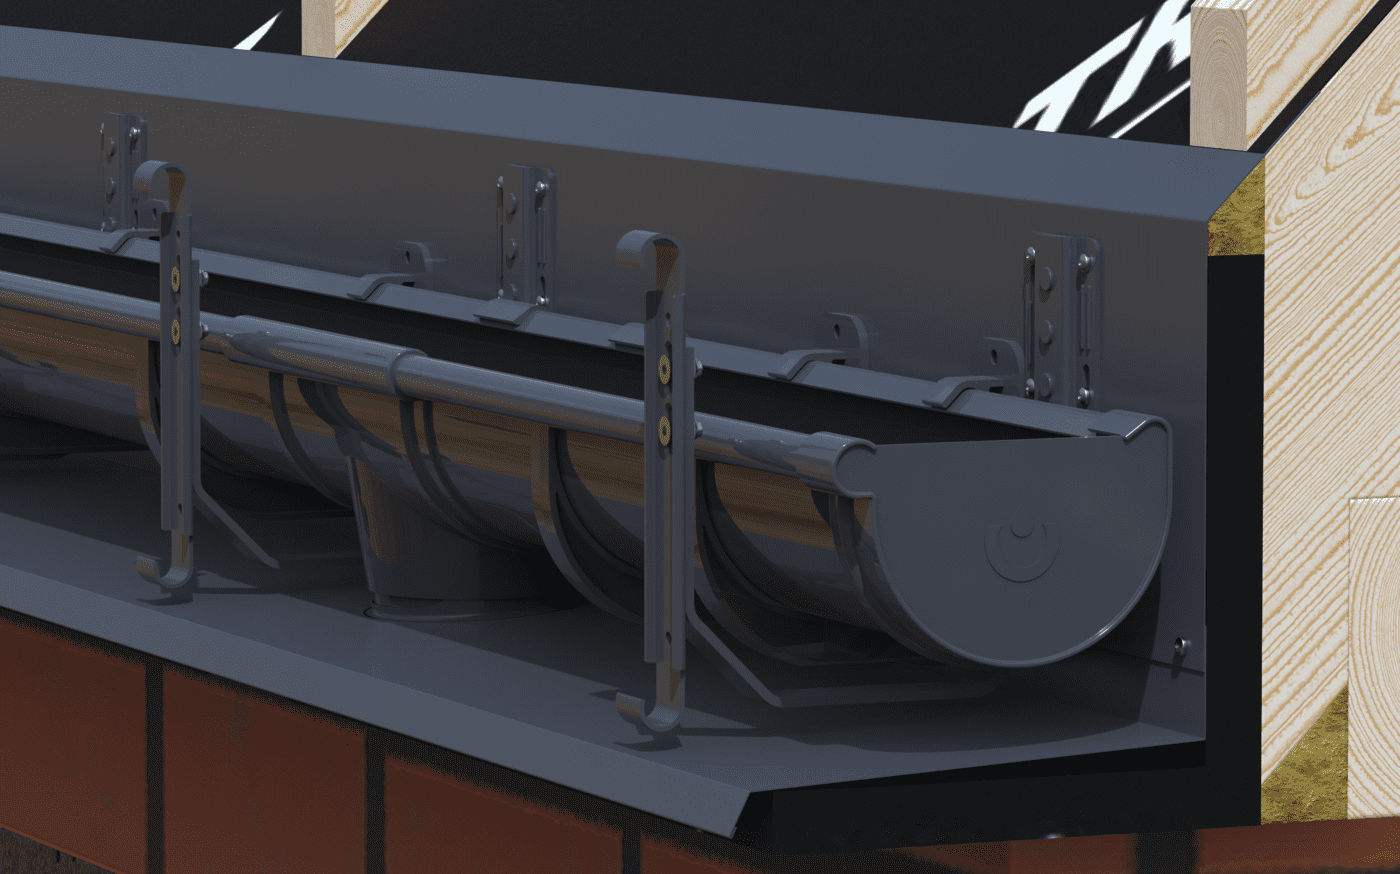
1. Preparation of the roof structure and installation of hooks


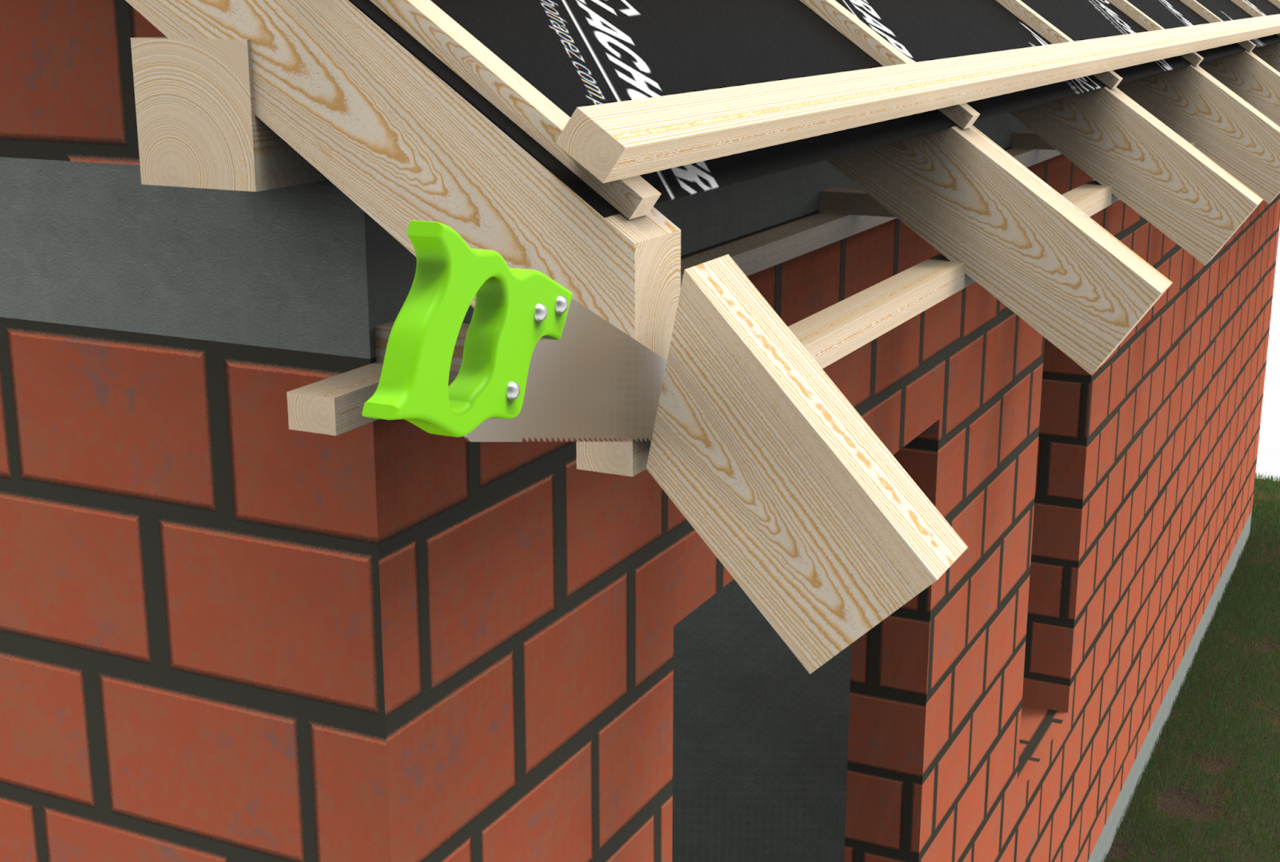
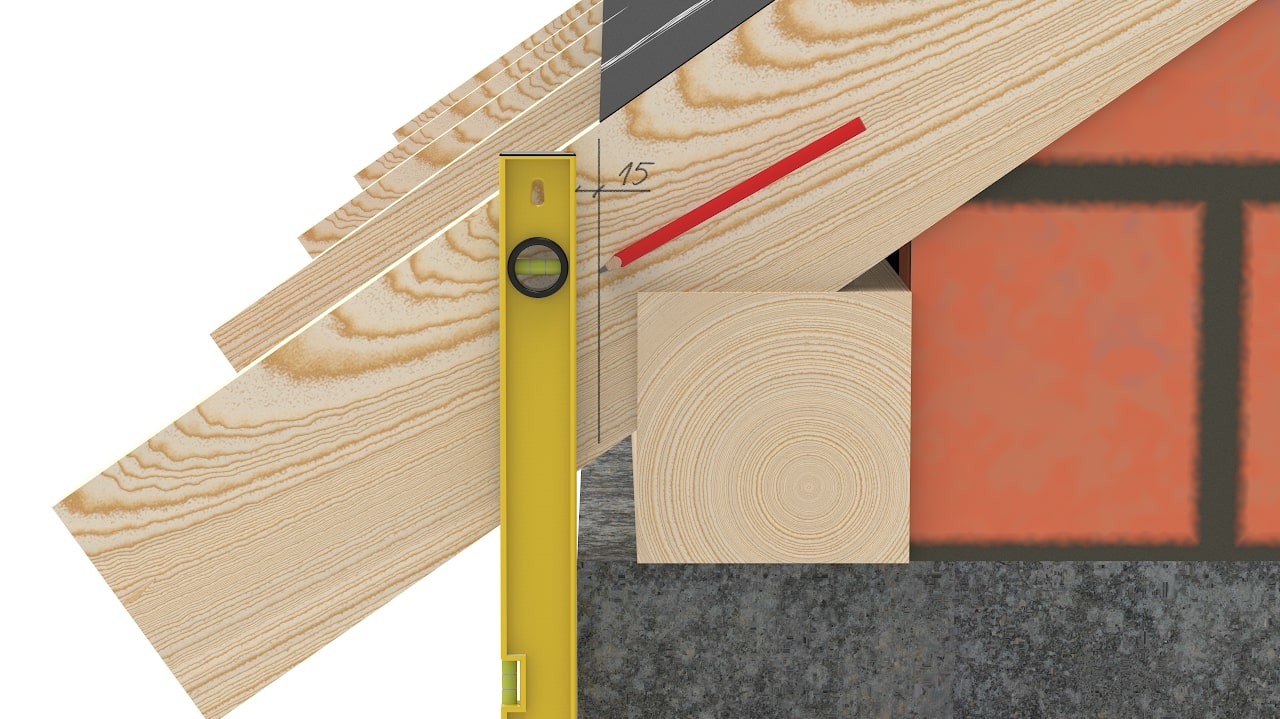
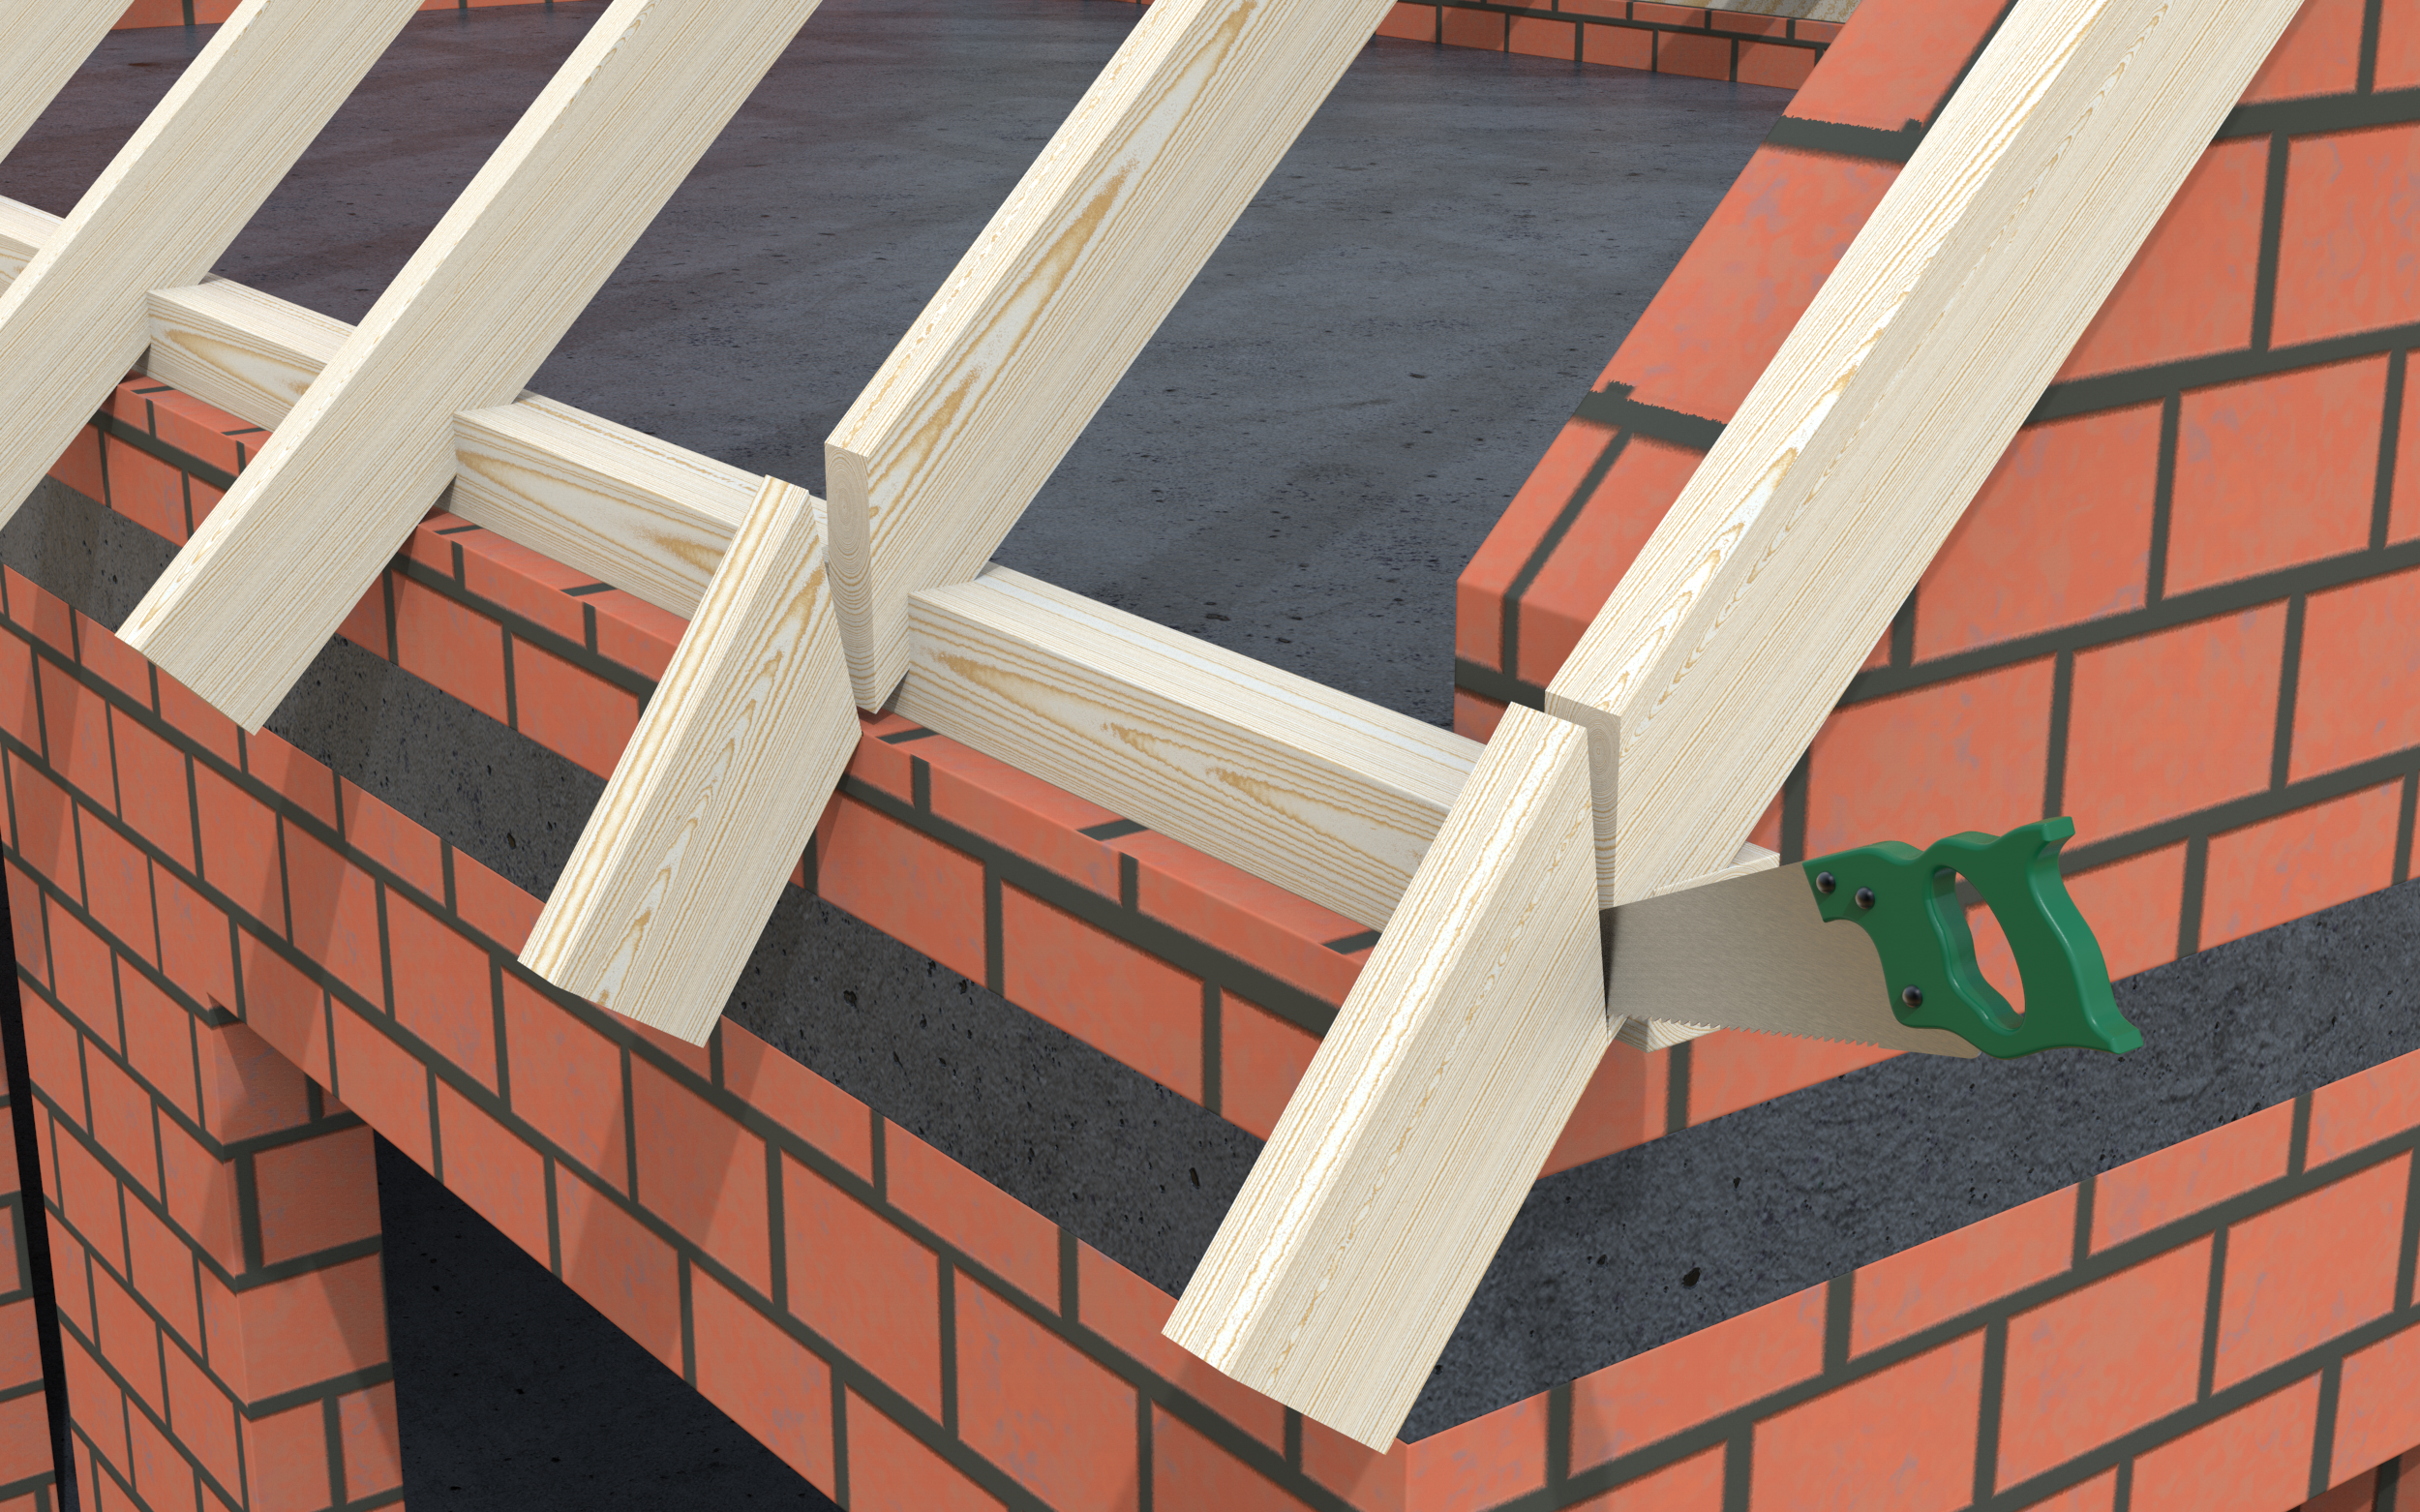
To install the STEEL SGS correctly, cut the rafters to length in the proper manner.
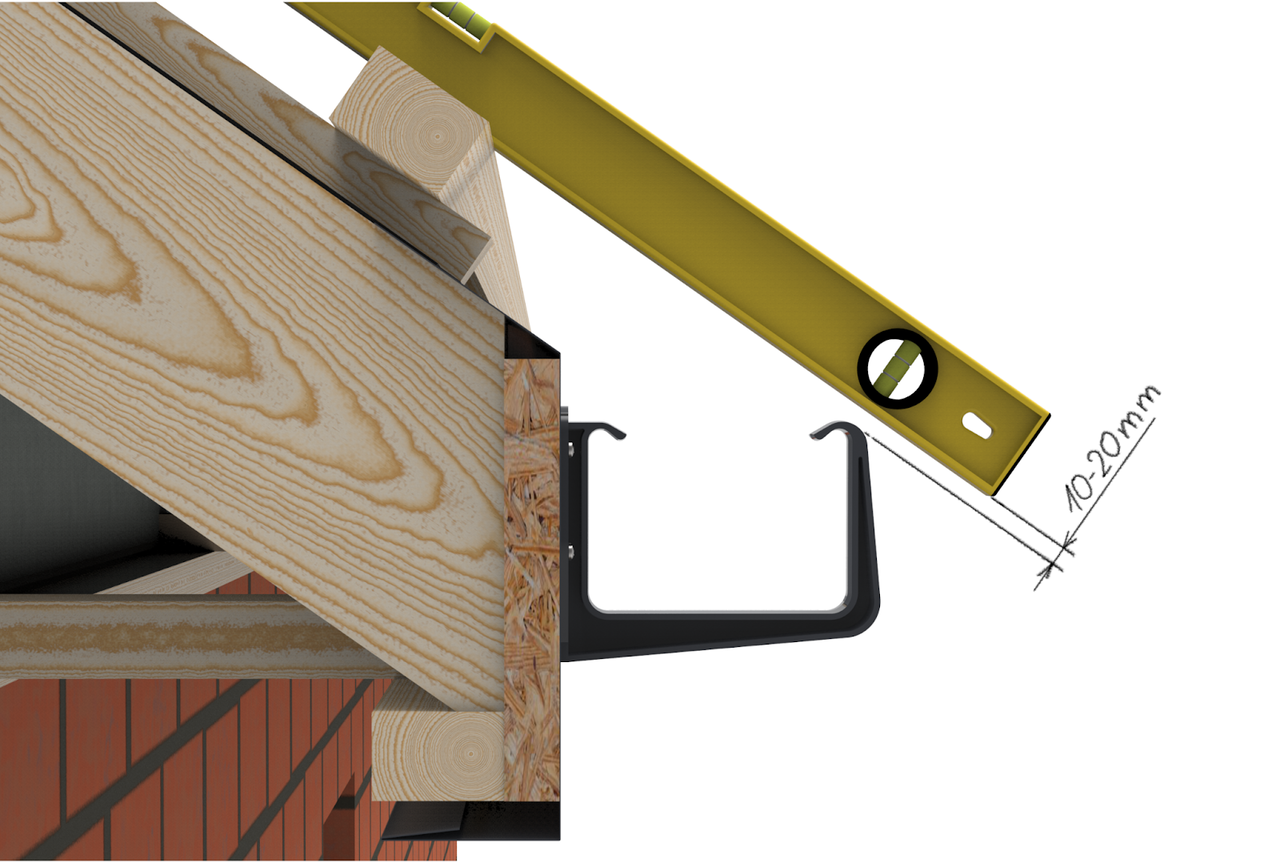
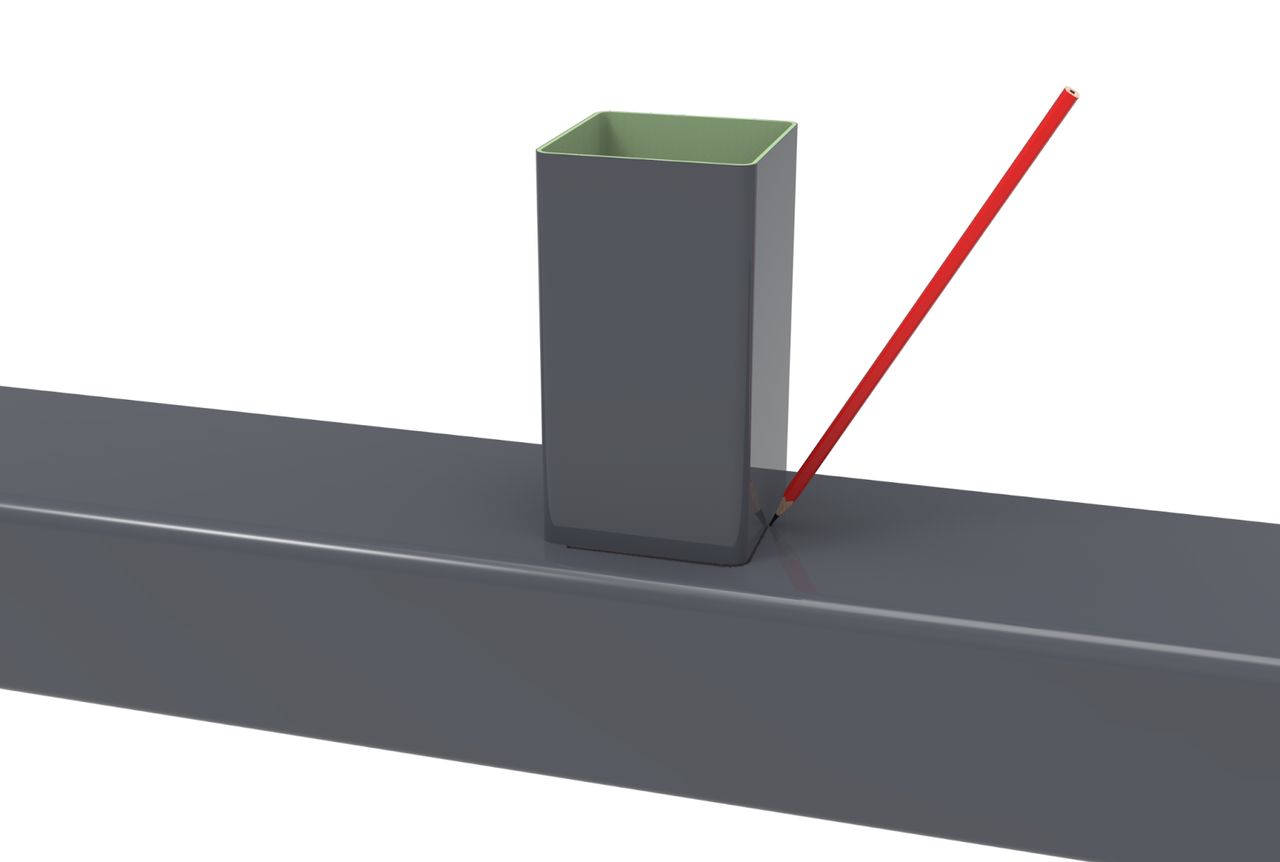
Plan the positioning of the gutter relative to the roof end so that the line marked as its extension is 10–20 mm above the outer edge of the gutter. The above positioning should protect the gutters from the impact of snow sliding down. If it is not possible to follow the above guideline, snow fences must be installed on the roof to reduce the risk of the gutter sustaining damage from snow sliding down.
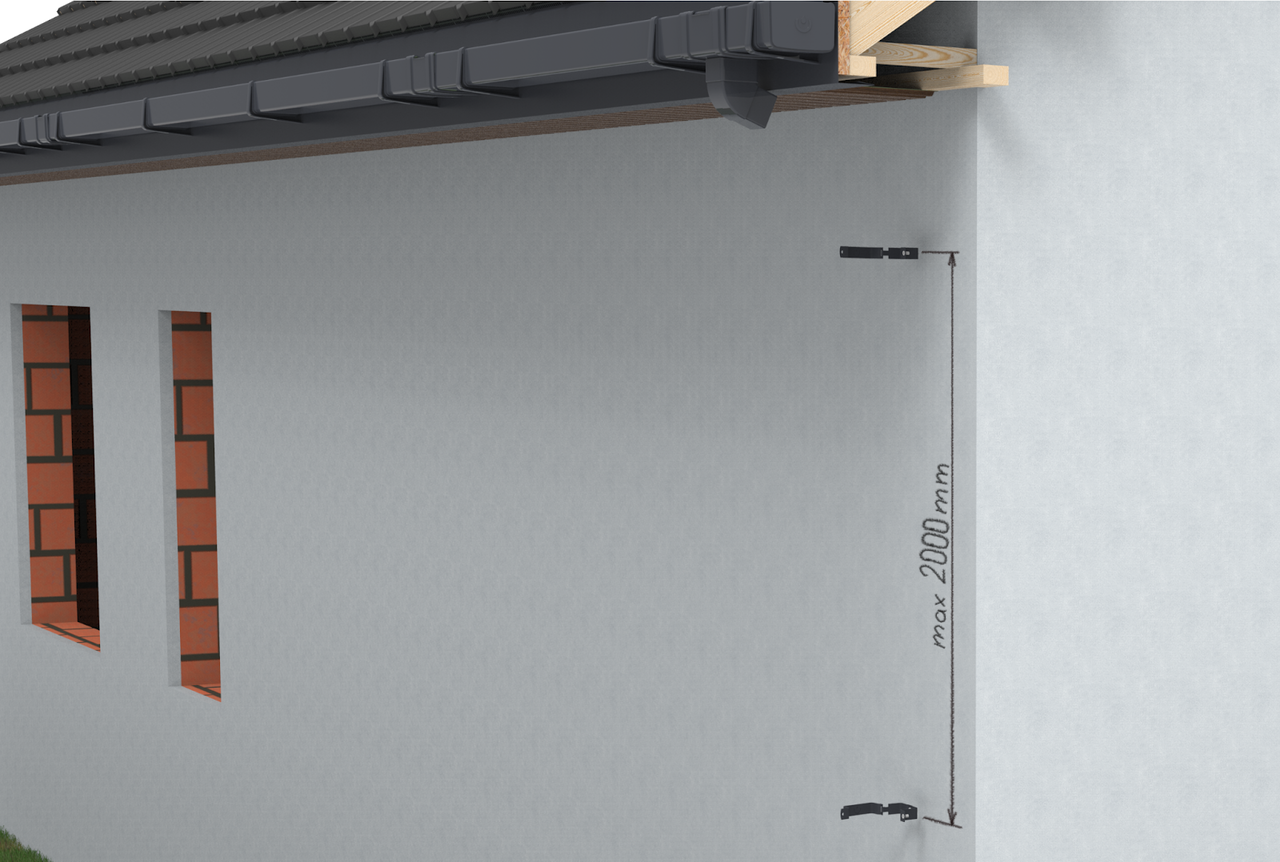
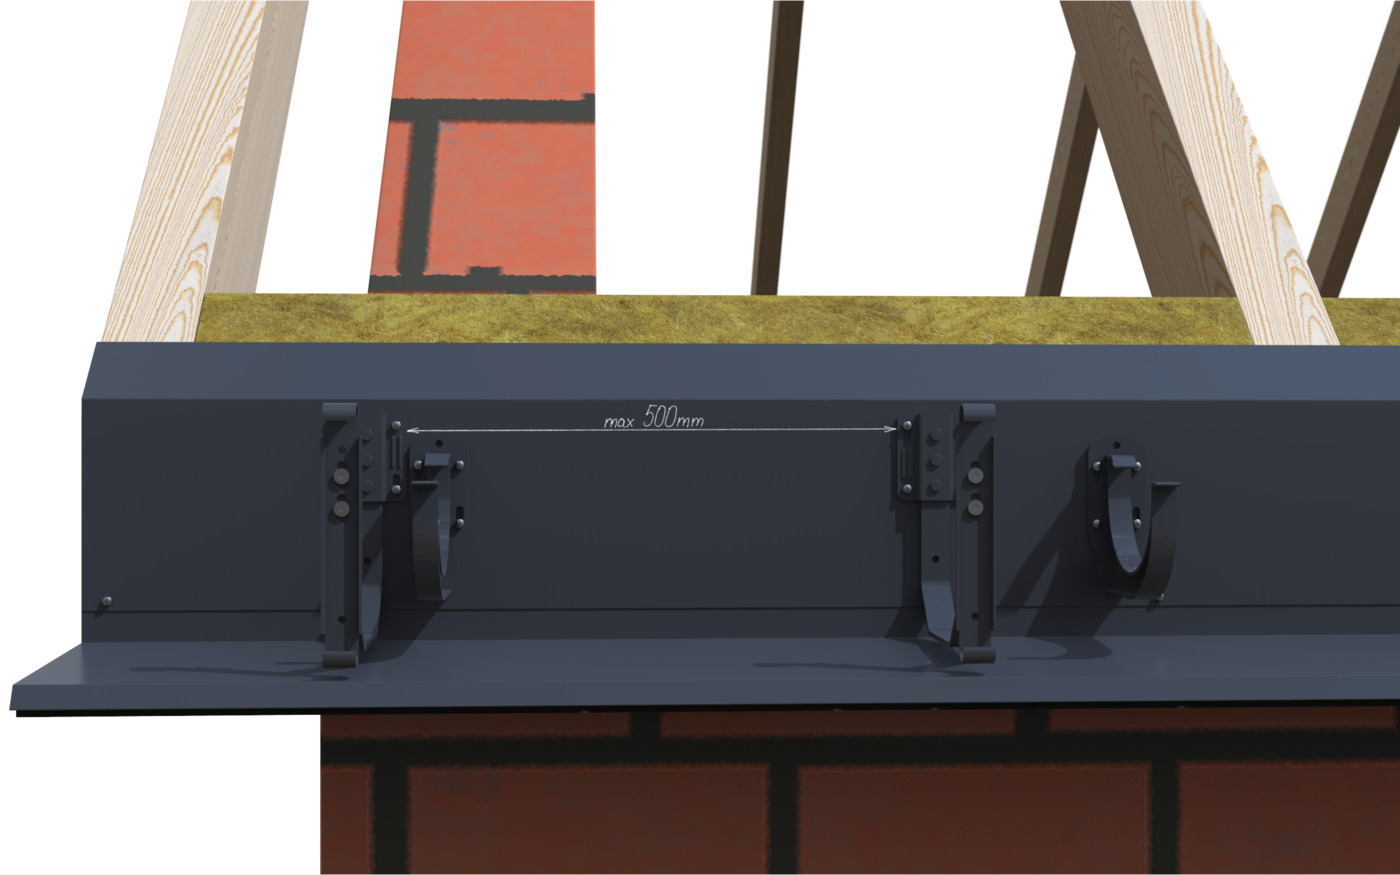
The recommended hook spacing for the STEEL SGS is up to 50 cm.
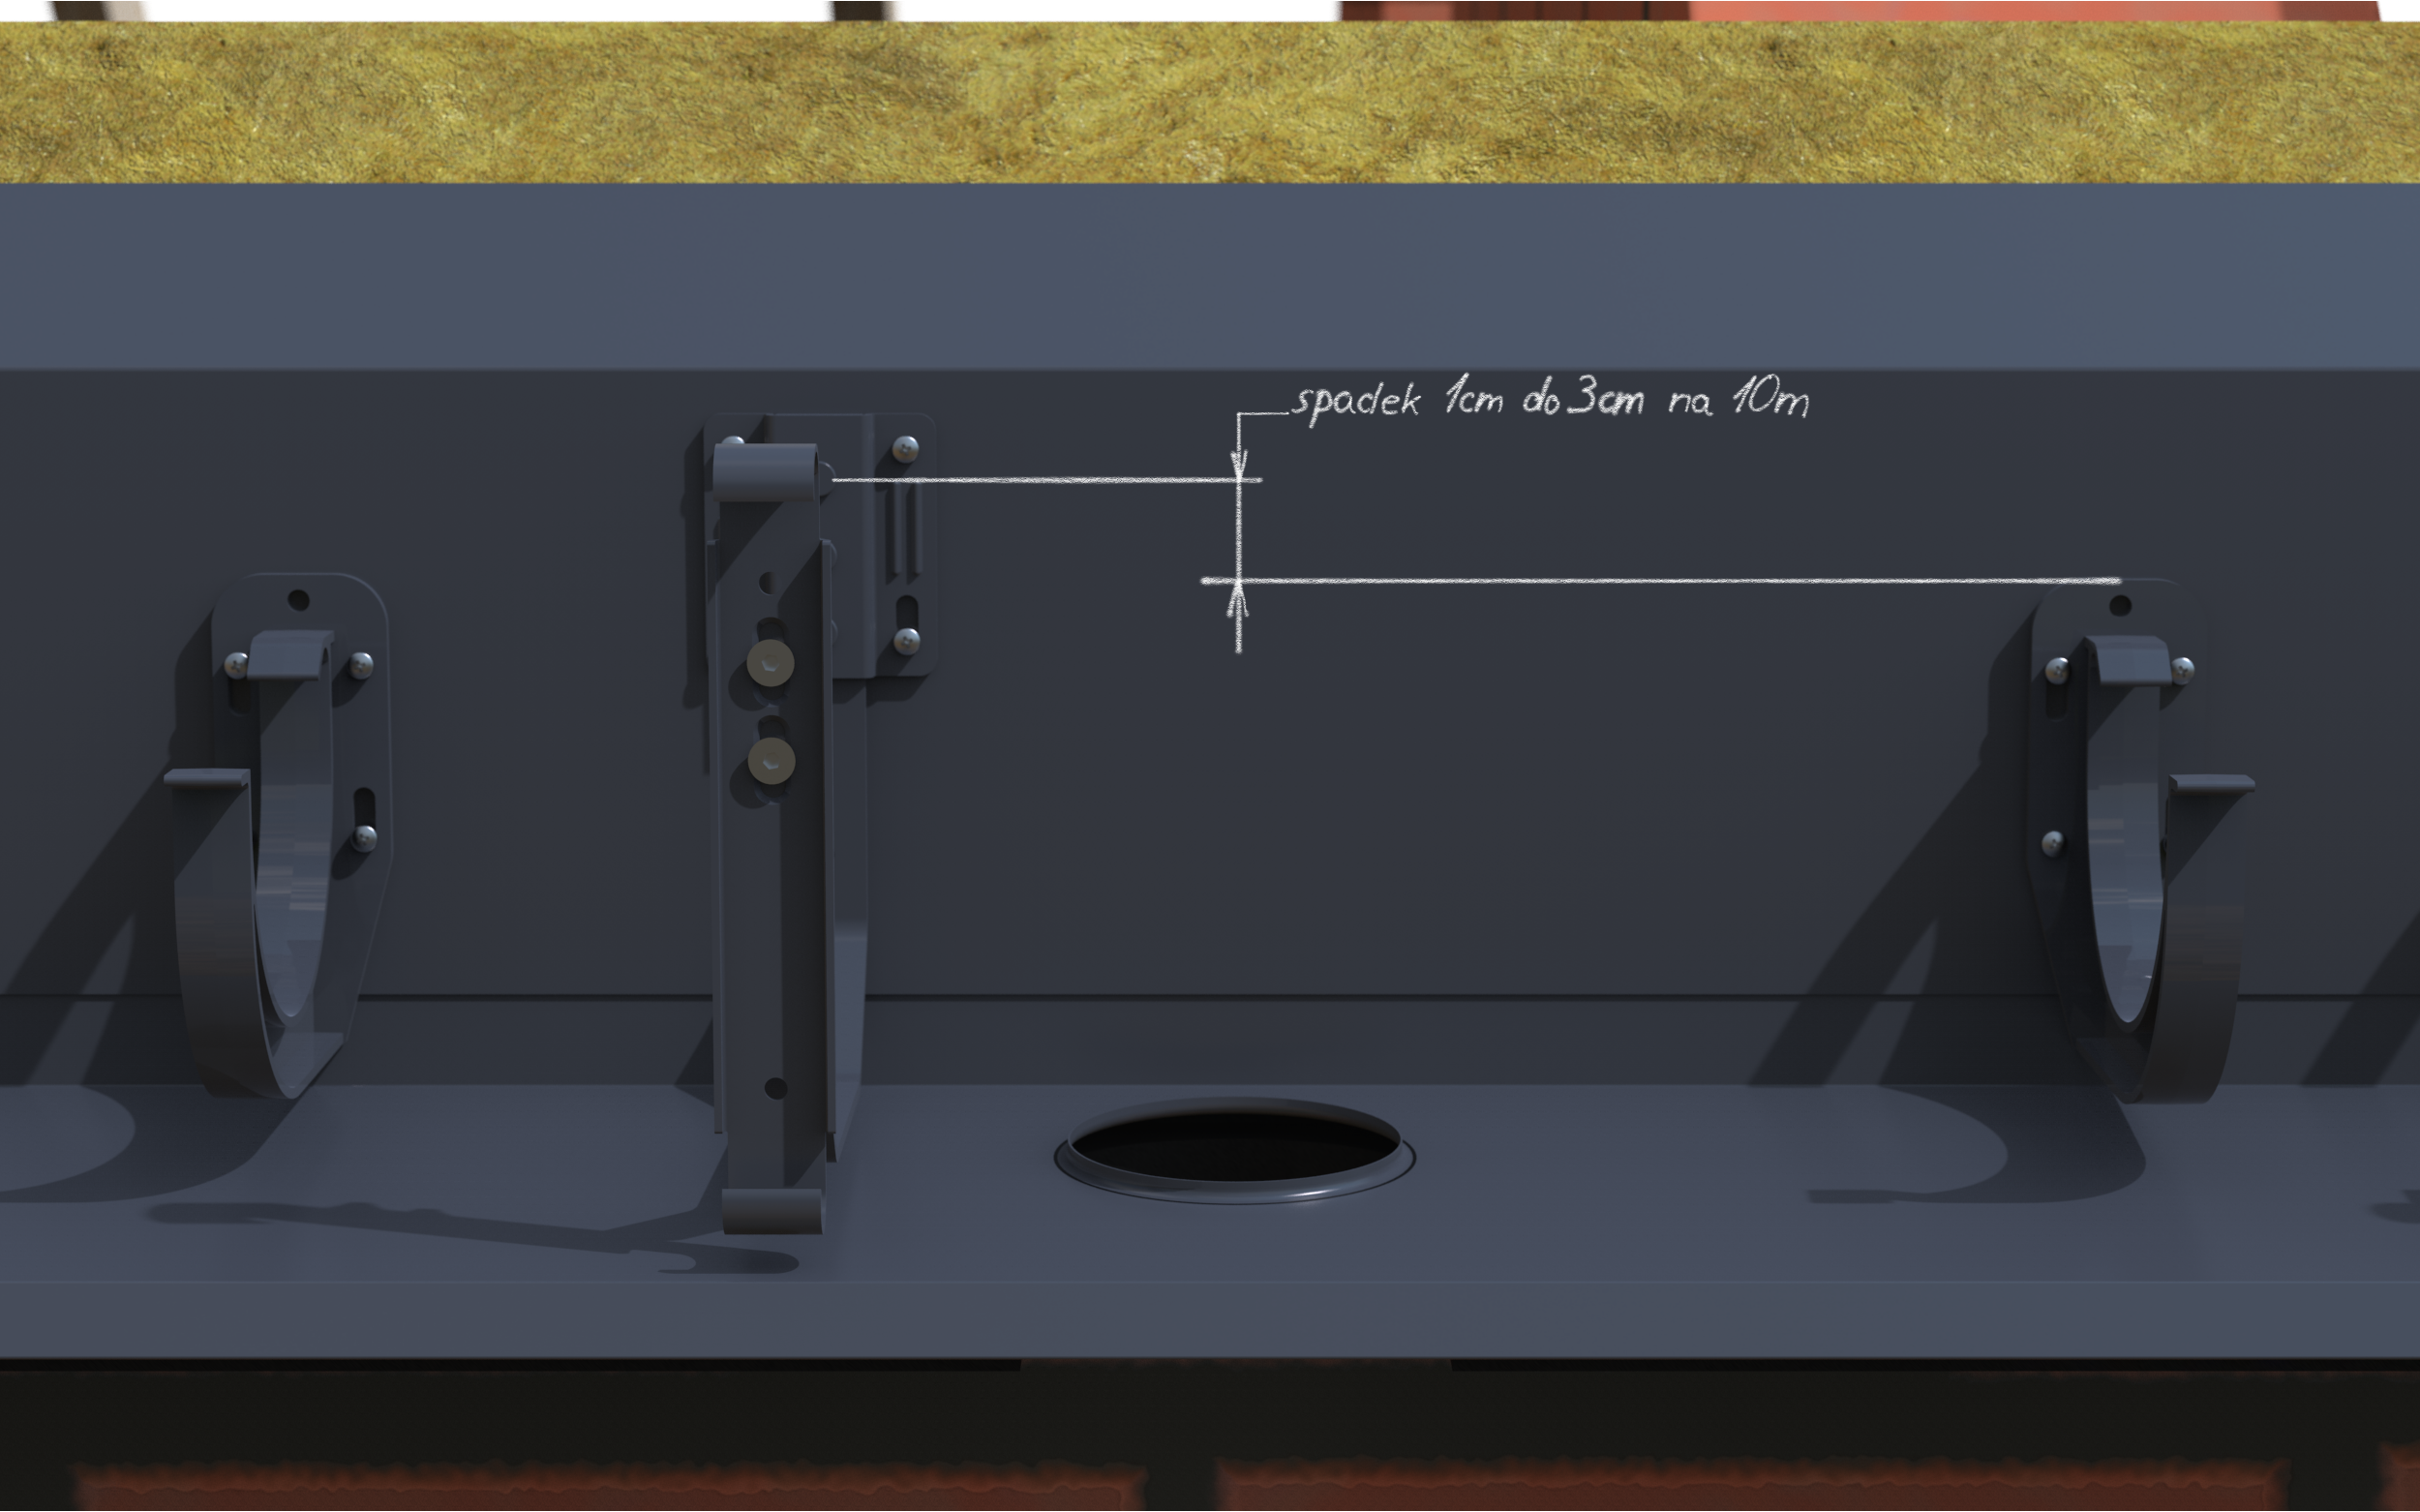
2. Determining the correct gutter slope

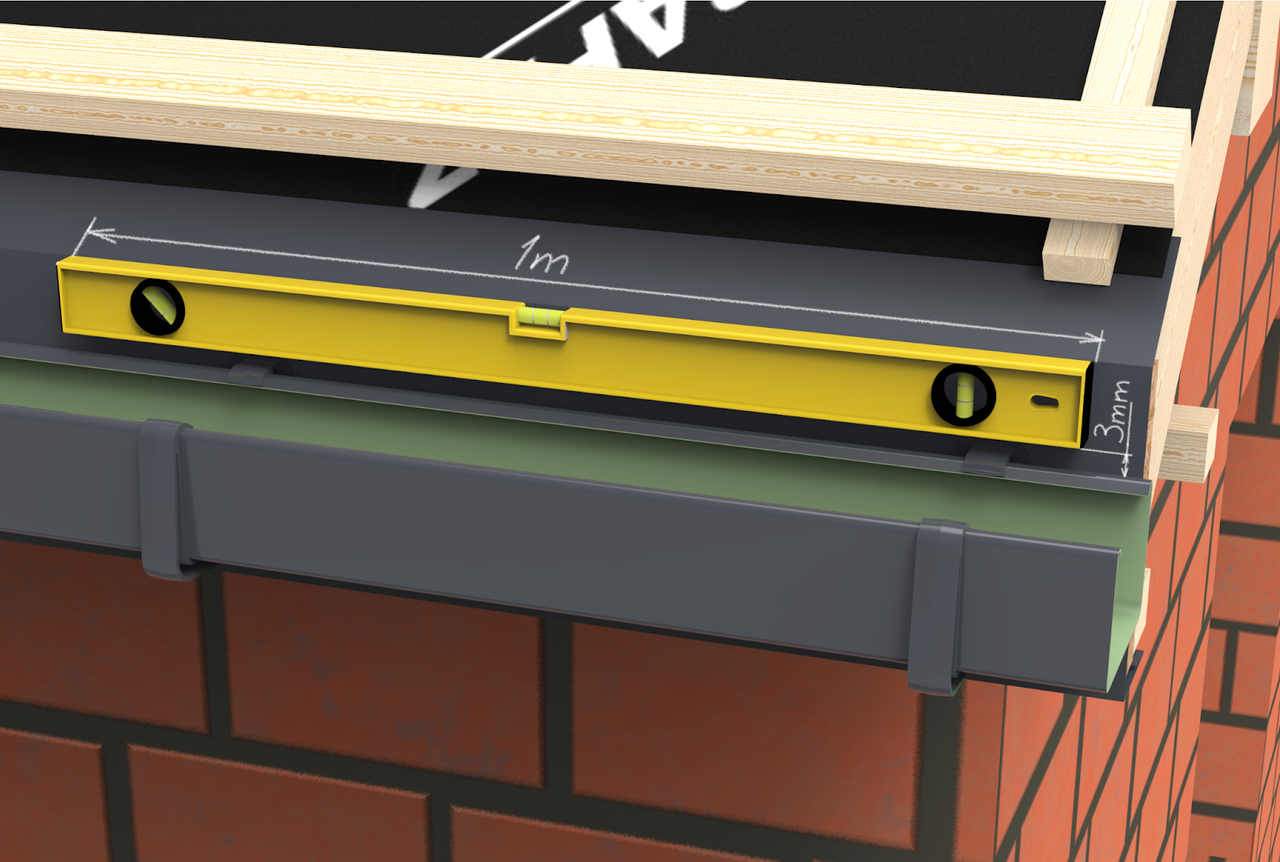
When positioning the hooks for the STEEL SGS, the correct gutter slope must be taken into account. To this end, the gutter must have a slope towards the discharge funnel of approximately 0.3% (i.e. 3 mm per 1 metre of gutter). To achieve the correct slope, the hook furthest away from the funnel must be installed first, followed by the hook next to the discharge funnel. We recommend using string when determining the installation location for the other hooks.
Correctly installed hooks will prevent the system from leaking at the gutter joints.
3. Determination of the position and preparation of the opening for the drainage funnel


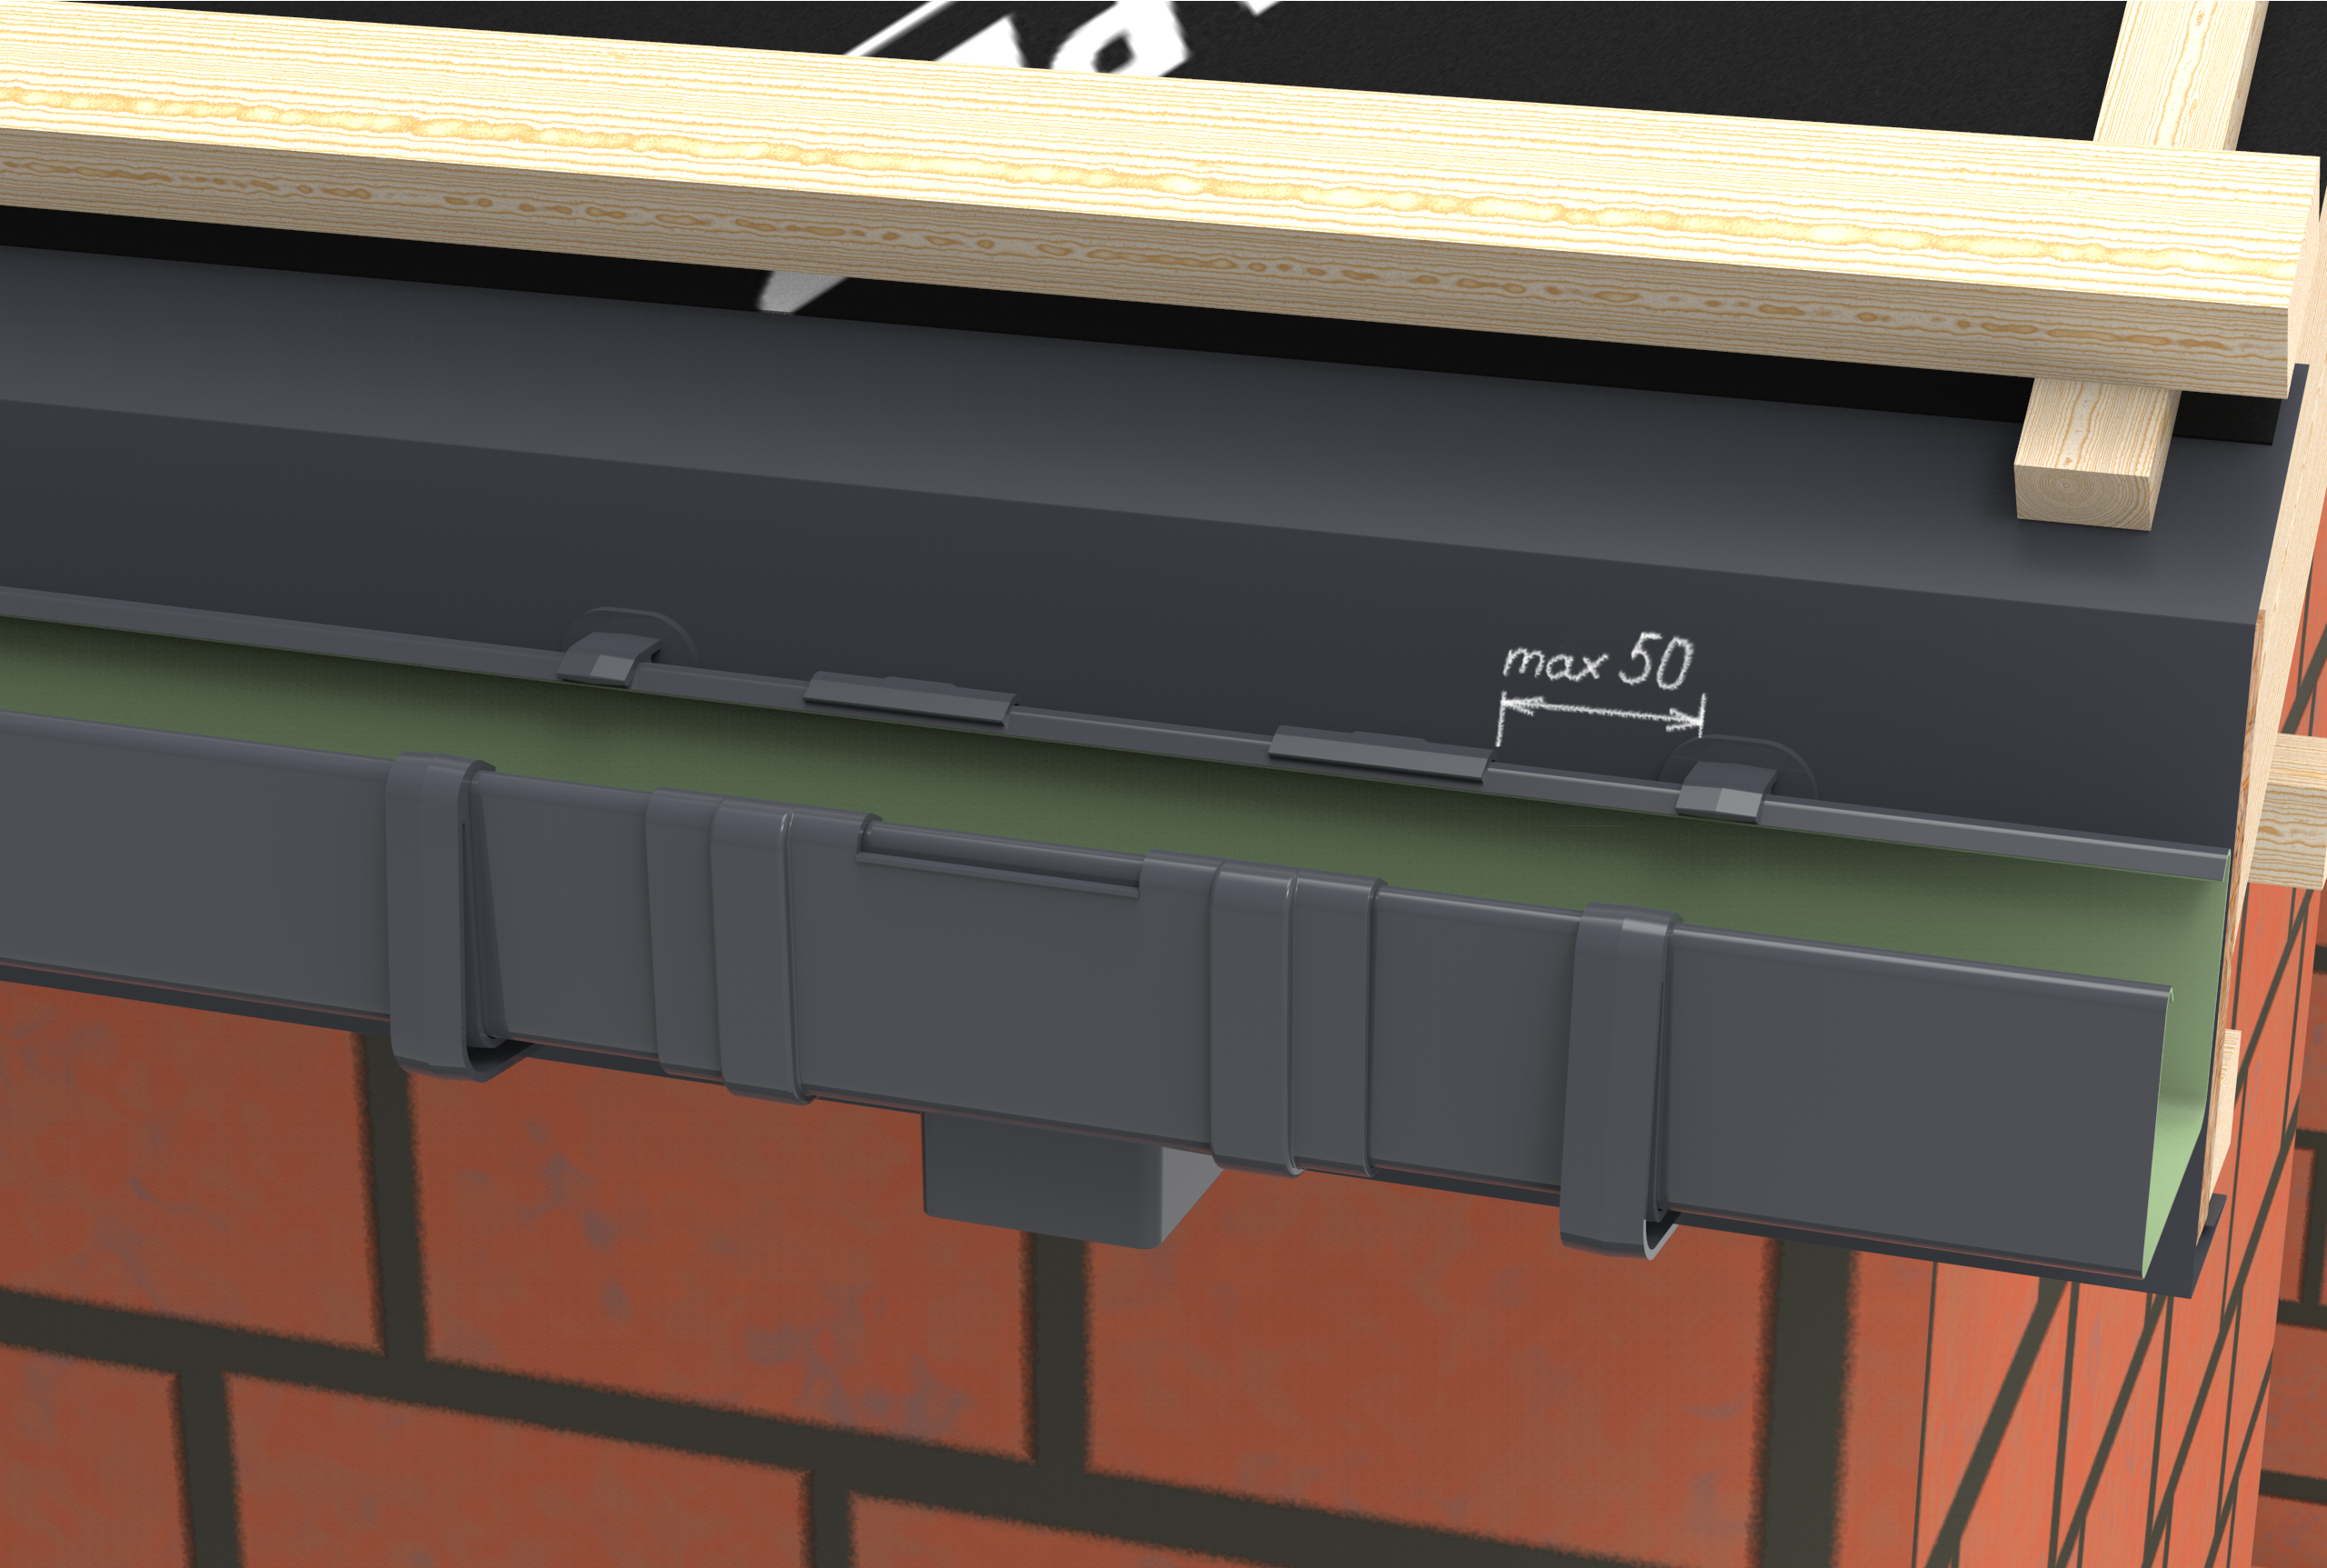
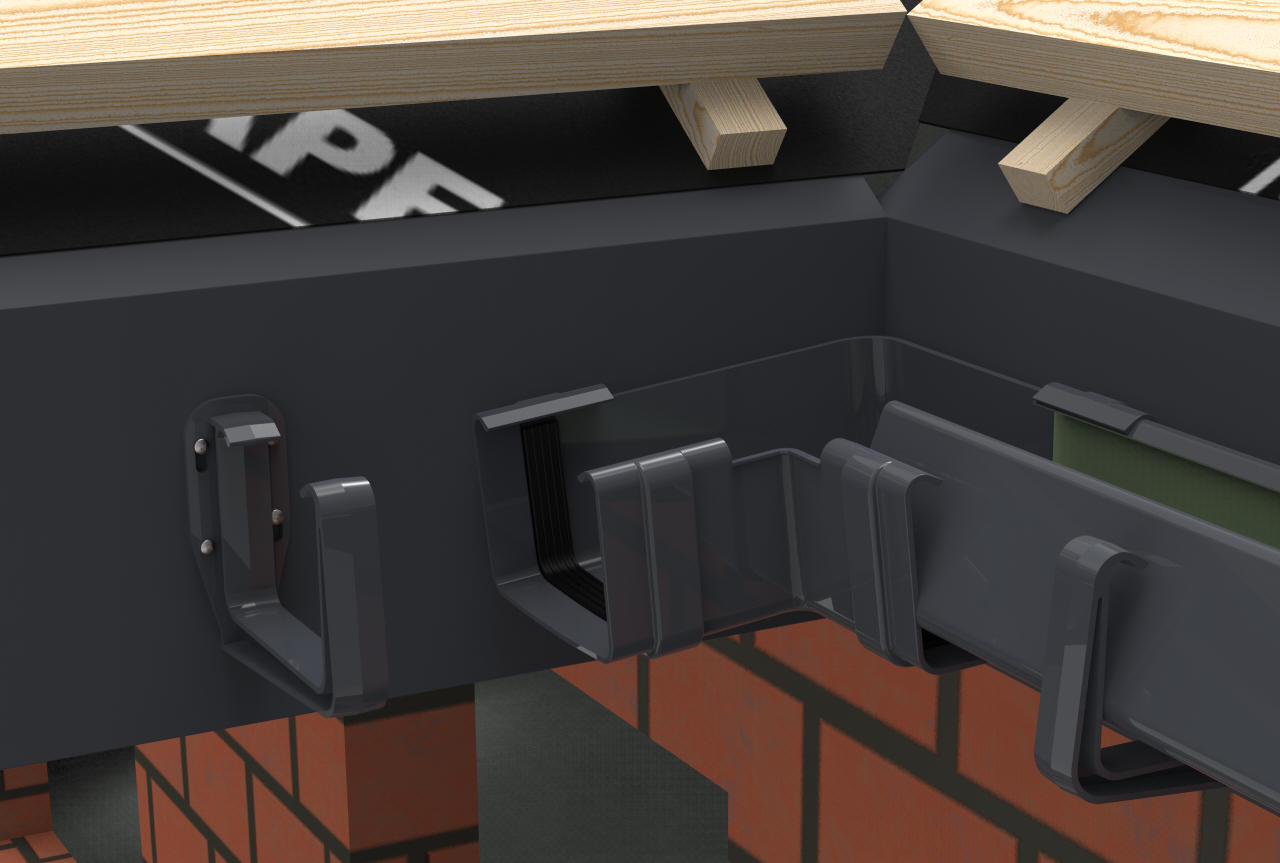
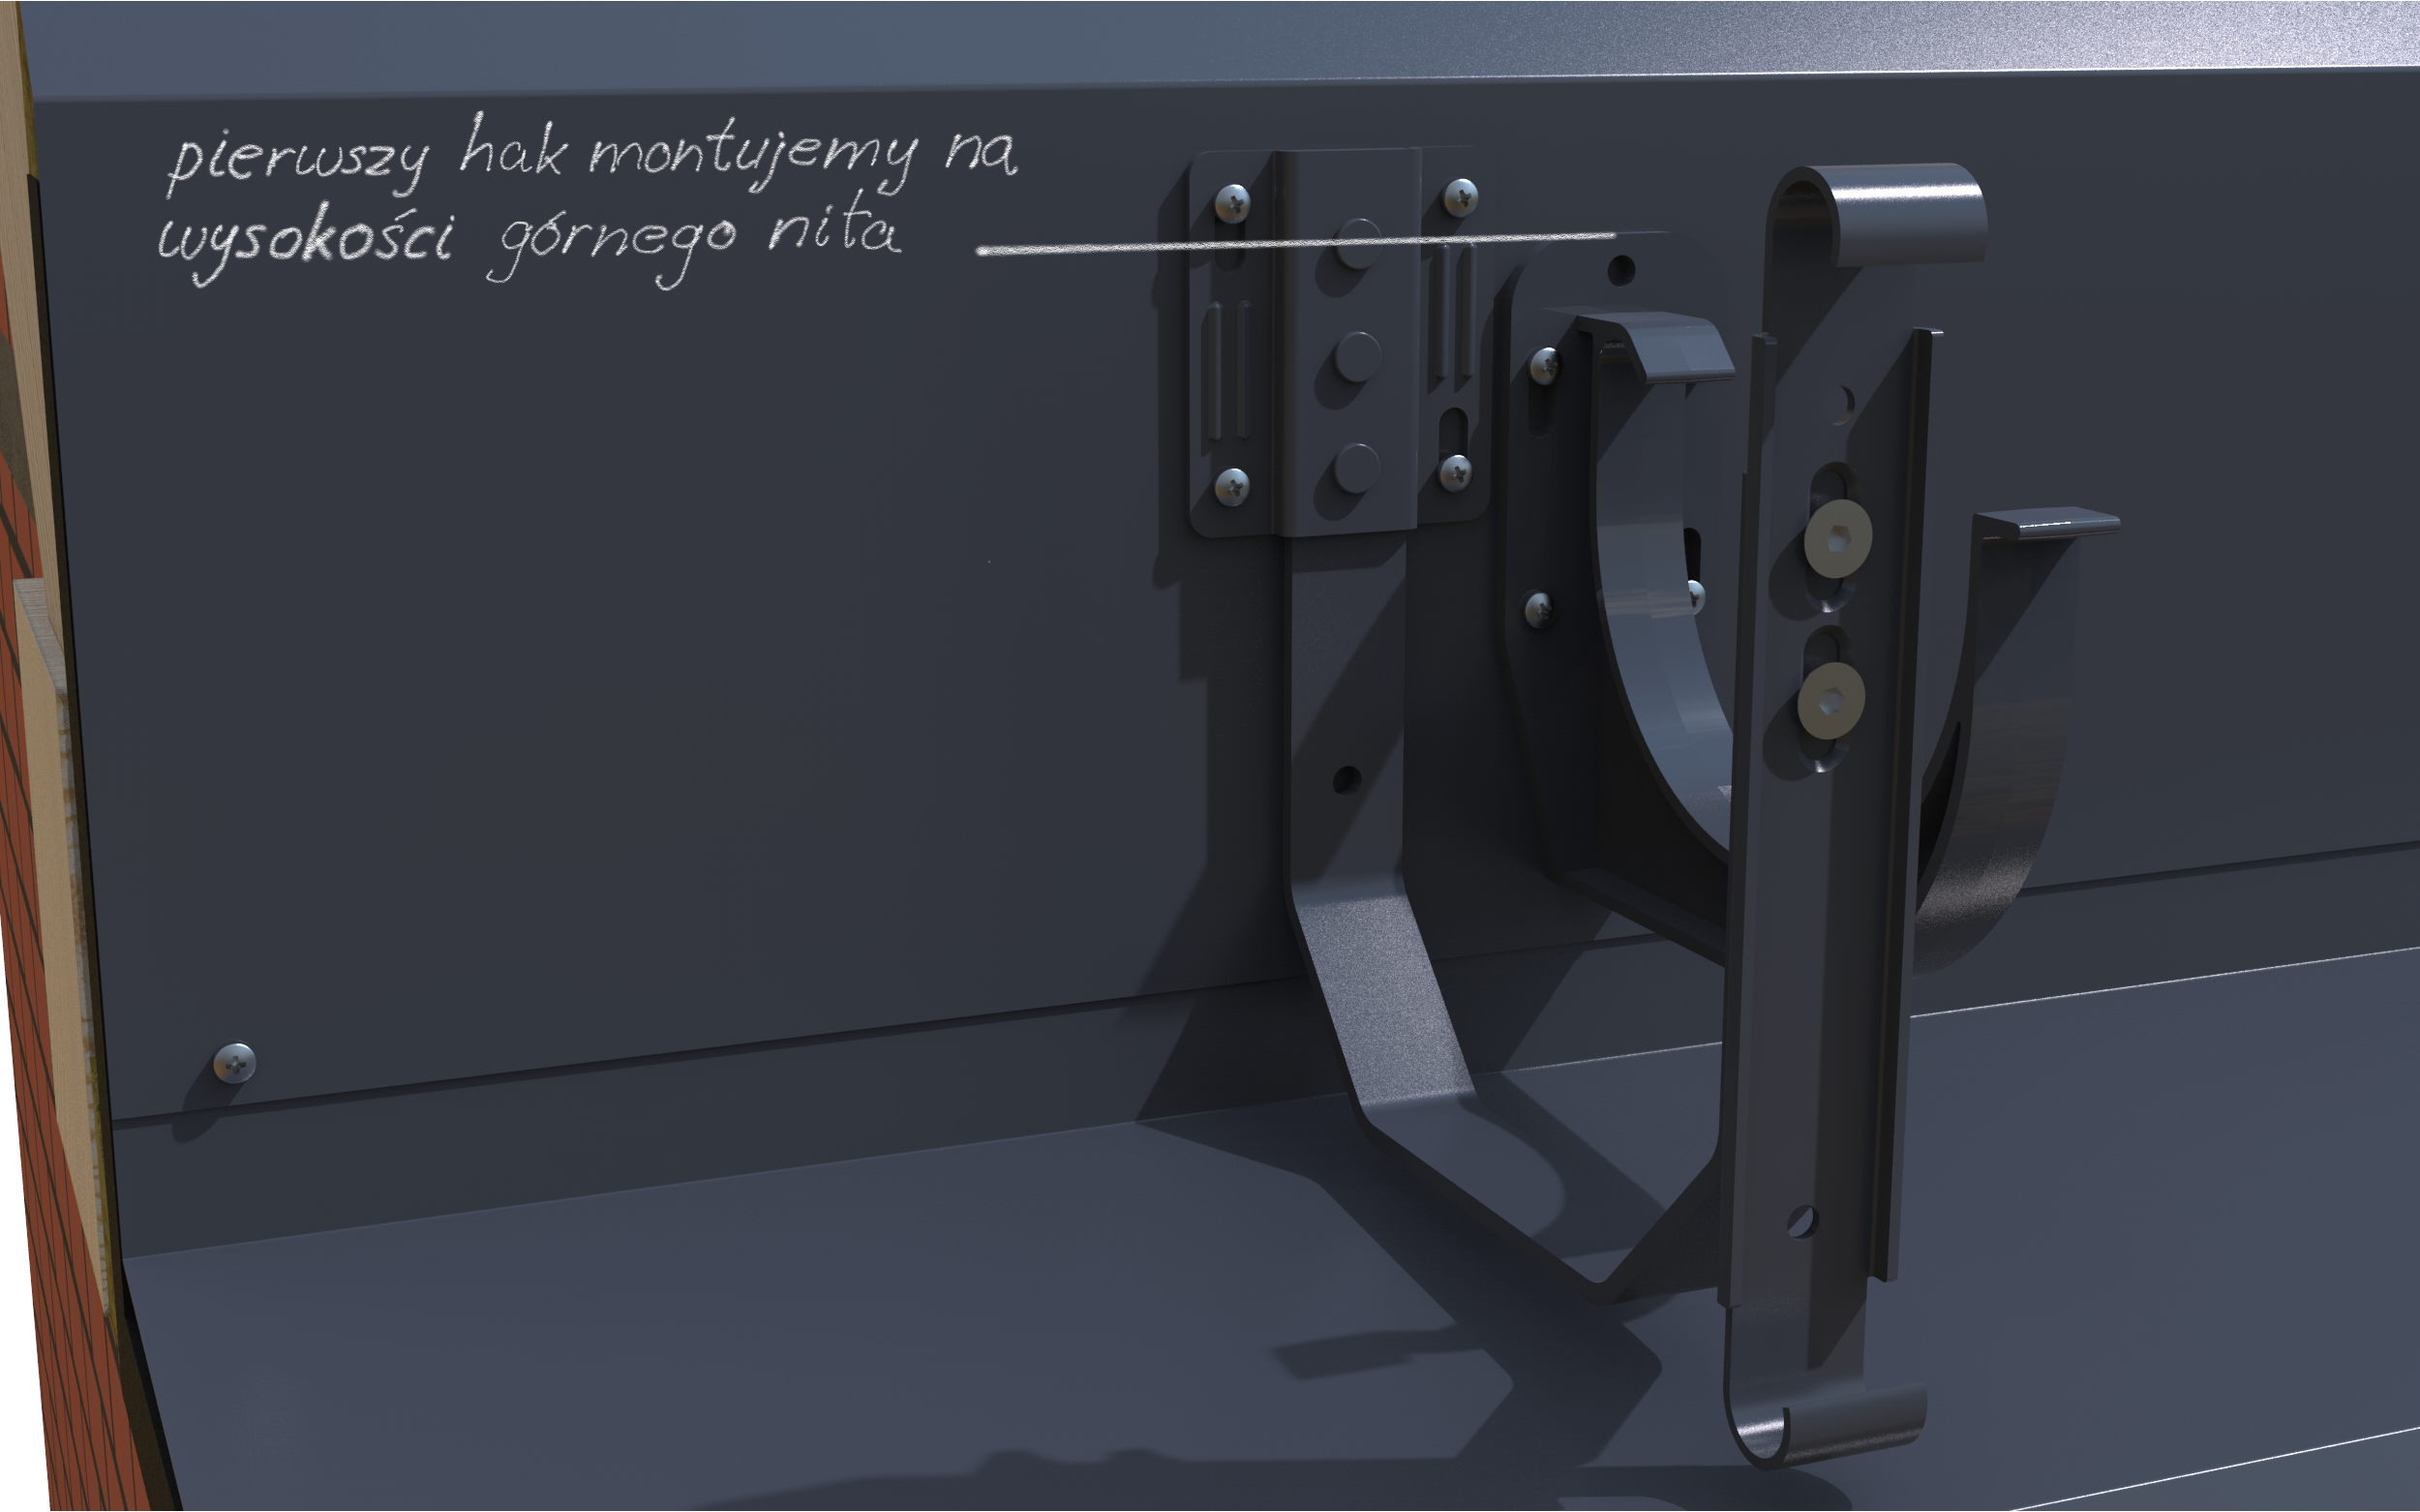
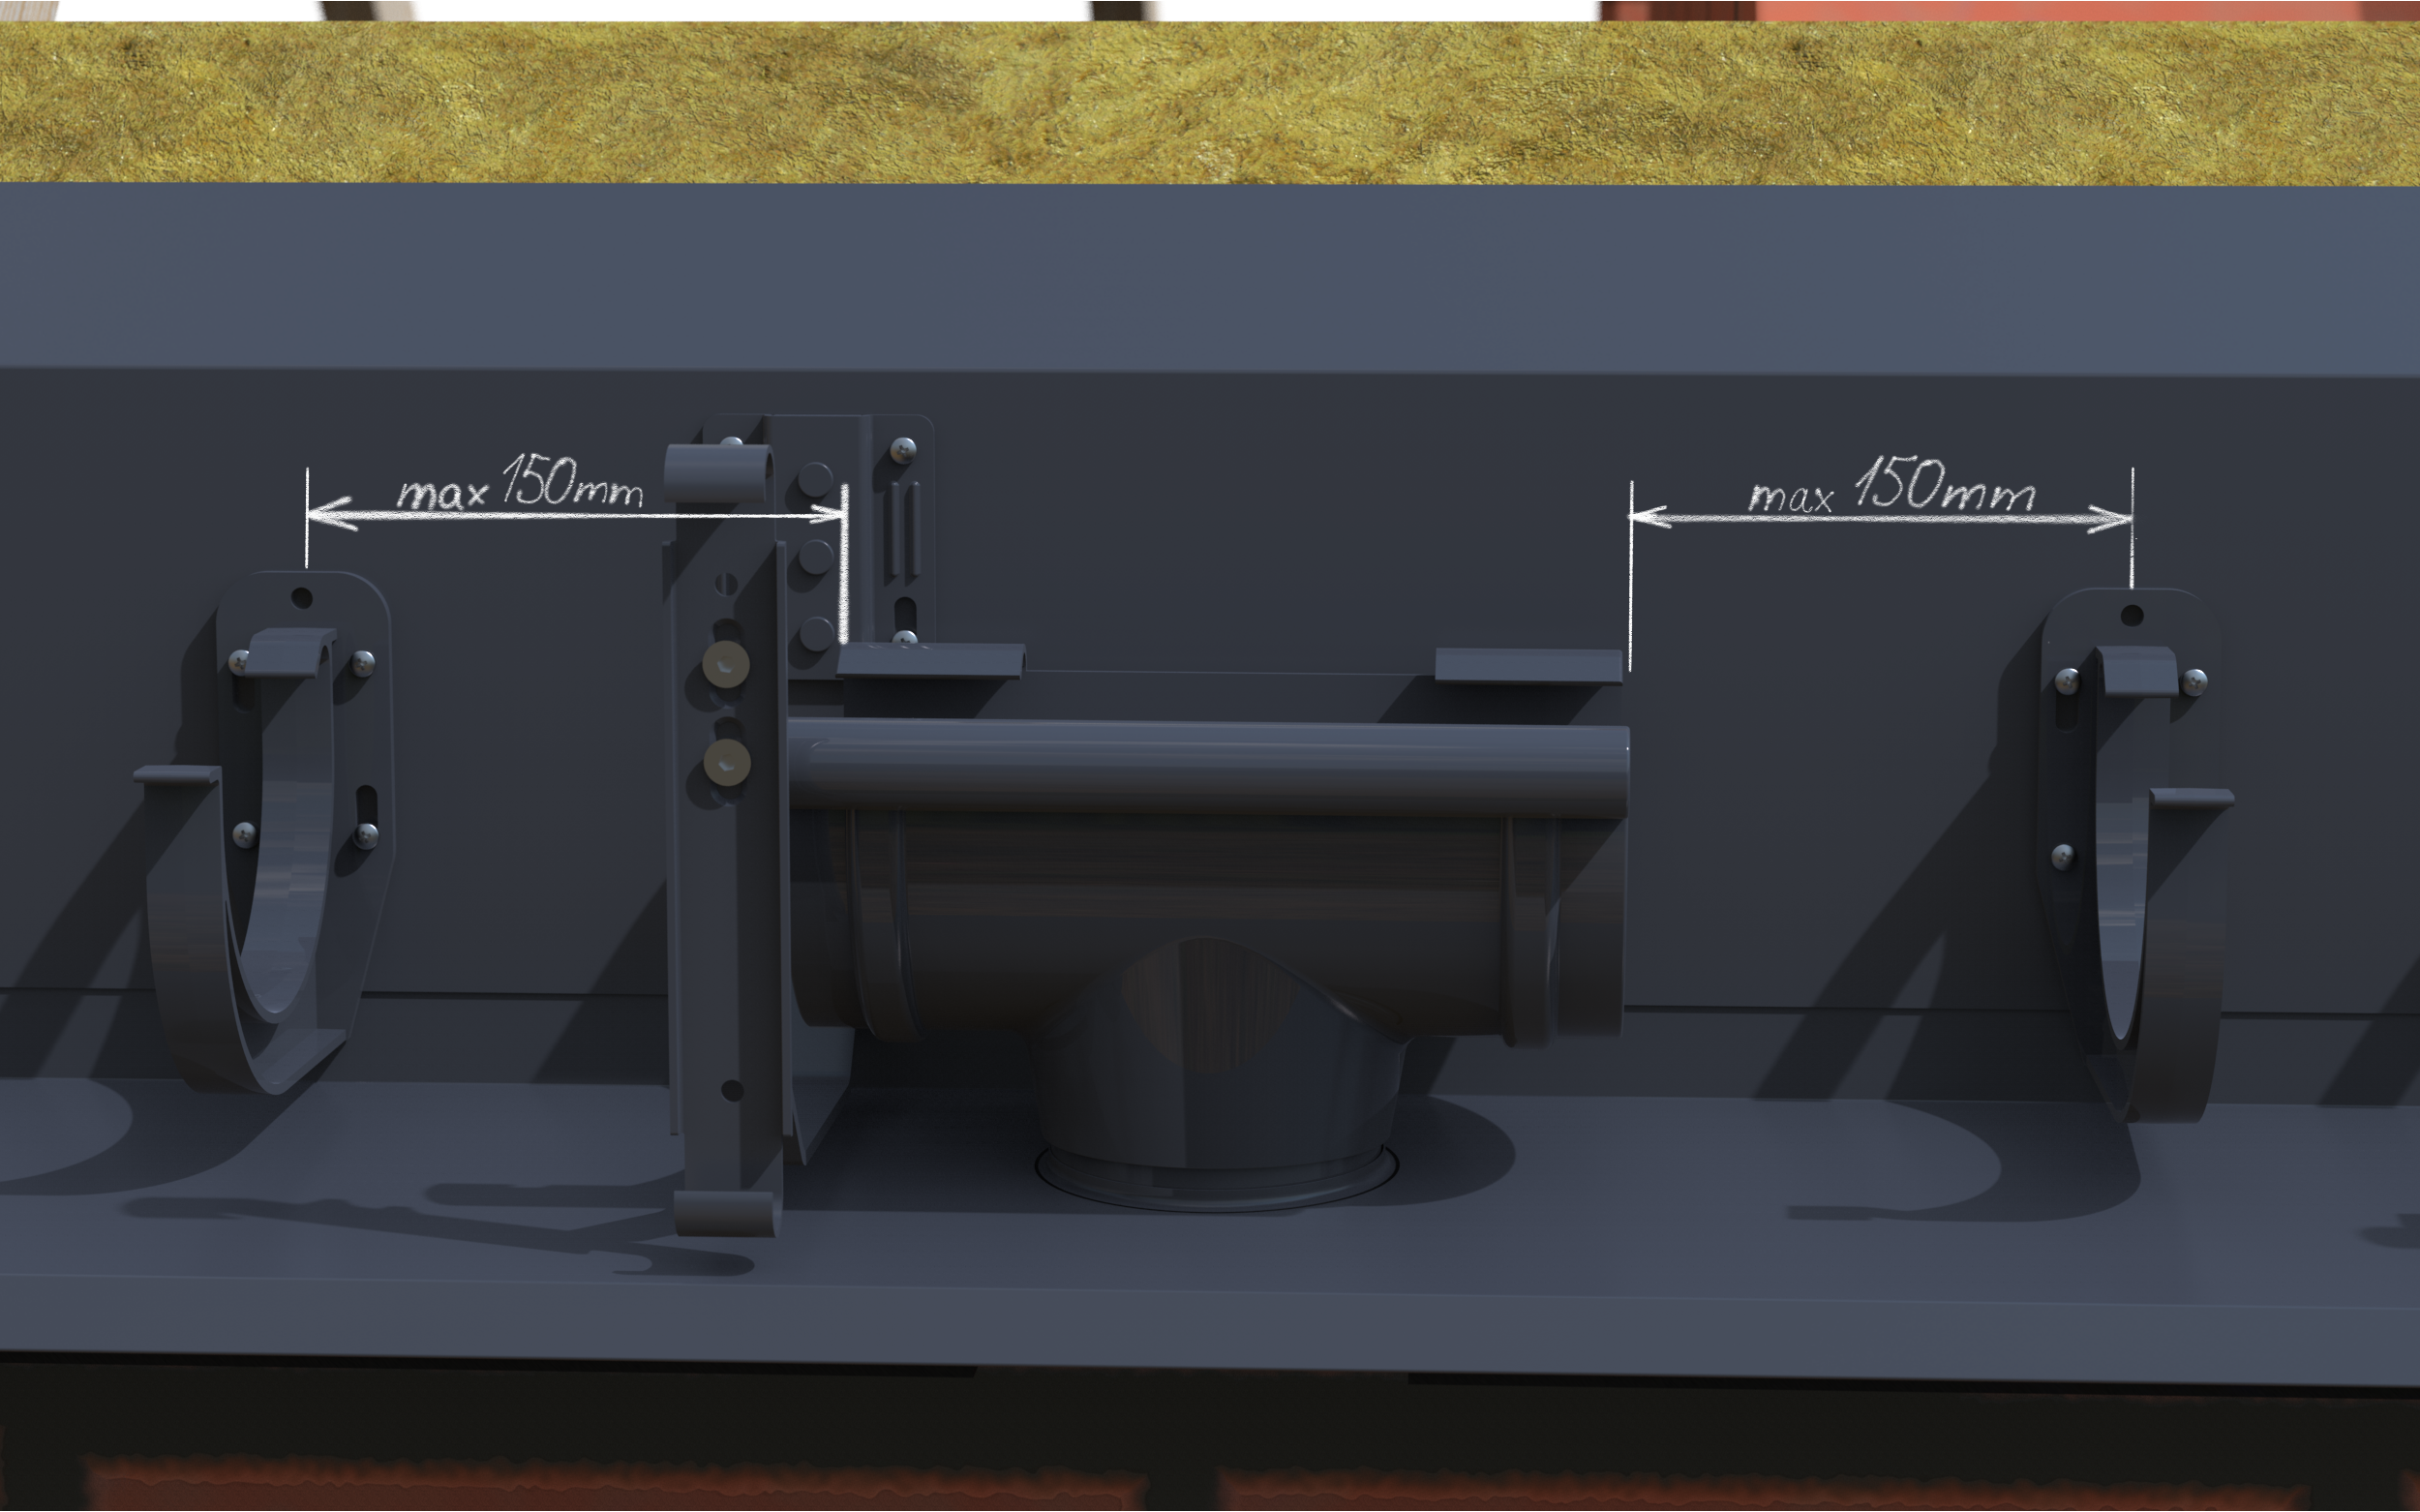
An equally important step in the installation of the STEEL SGS is determining the position of the discharge funnel, which is the lowest point of the system. The hooks must be installed not further than 15 cm from the edge of the discharge funnel and other gutter fittings such as the universal parts, i.e. the connector, the bottom and the corner.
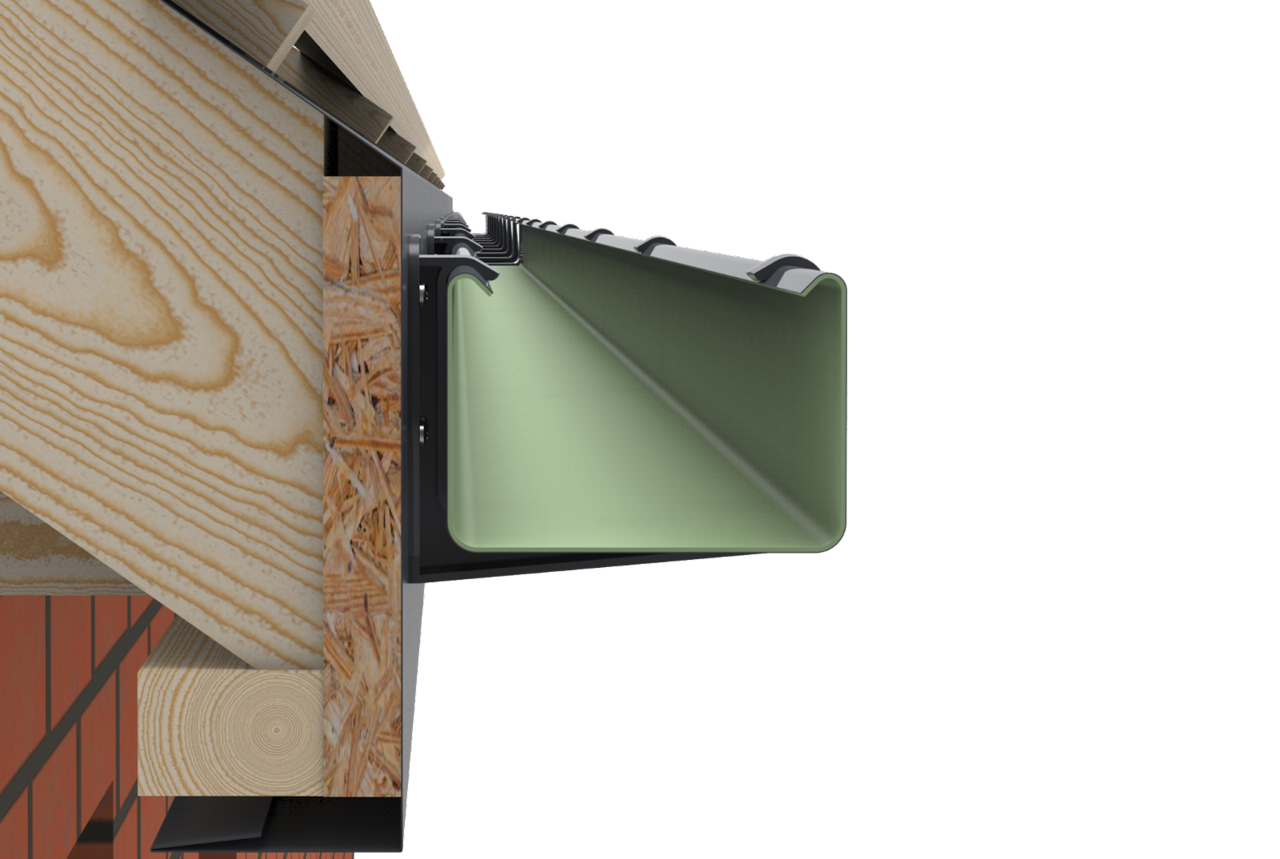
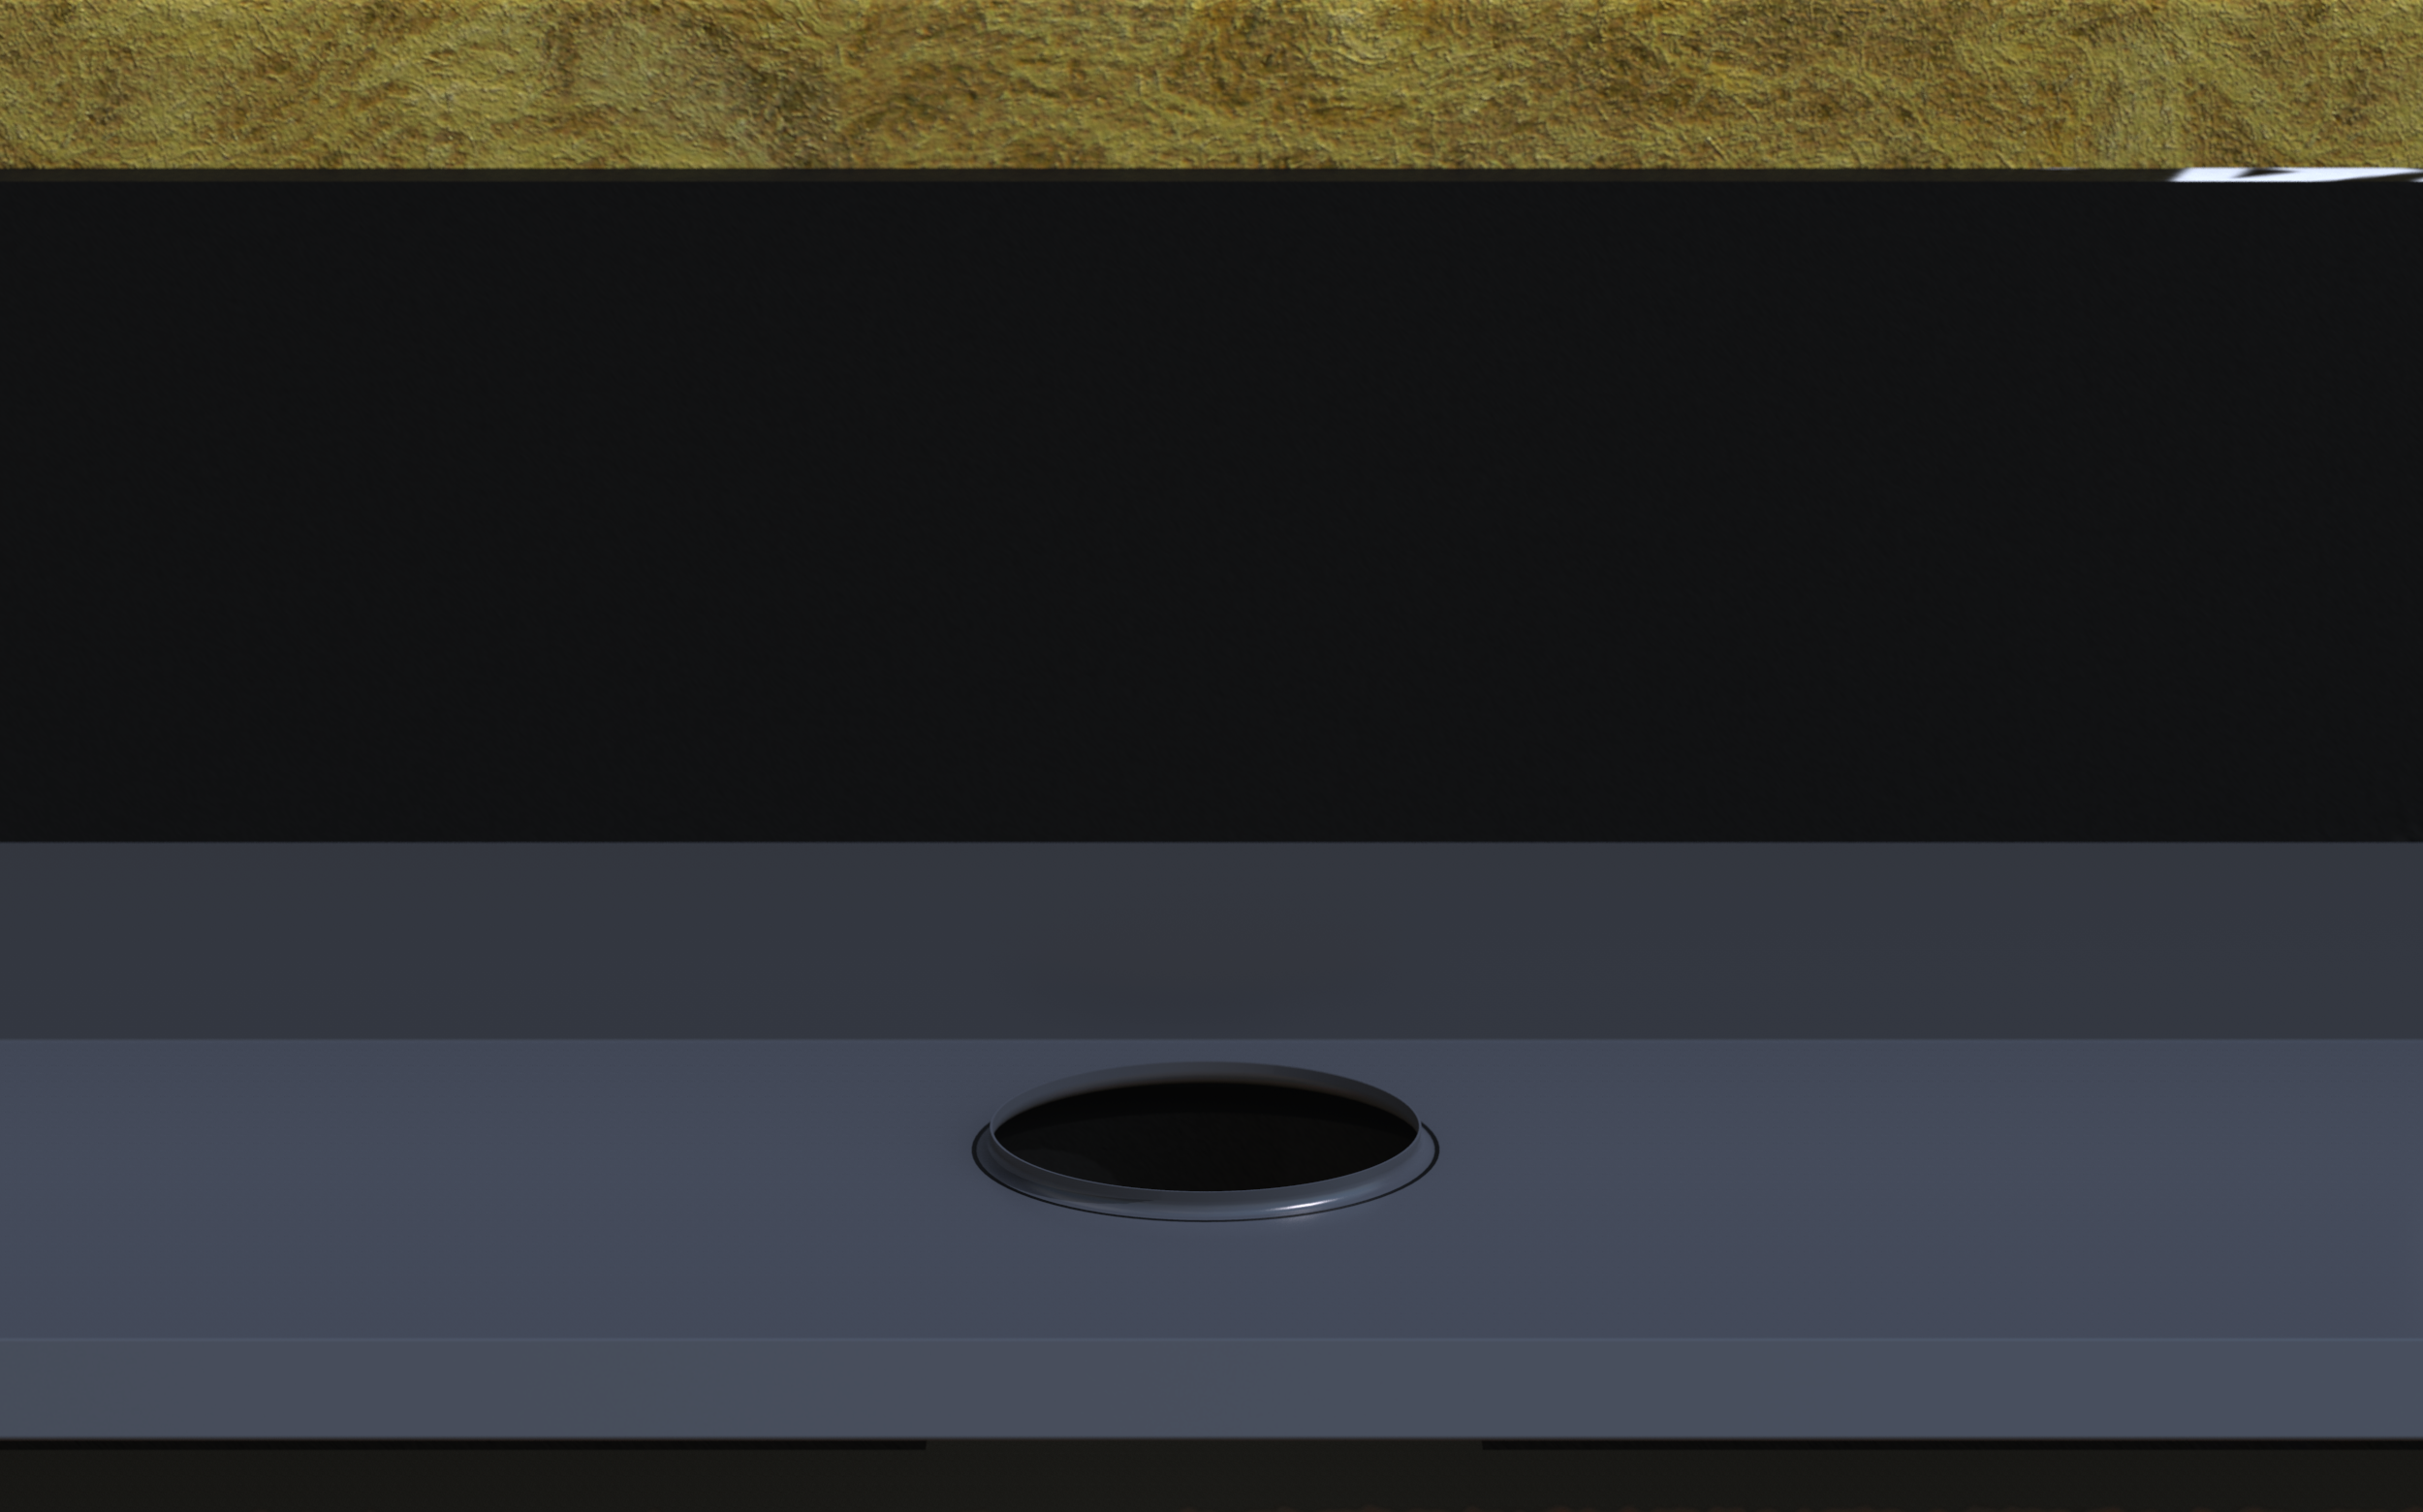
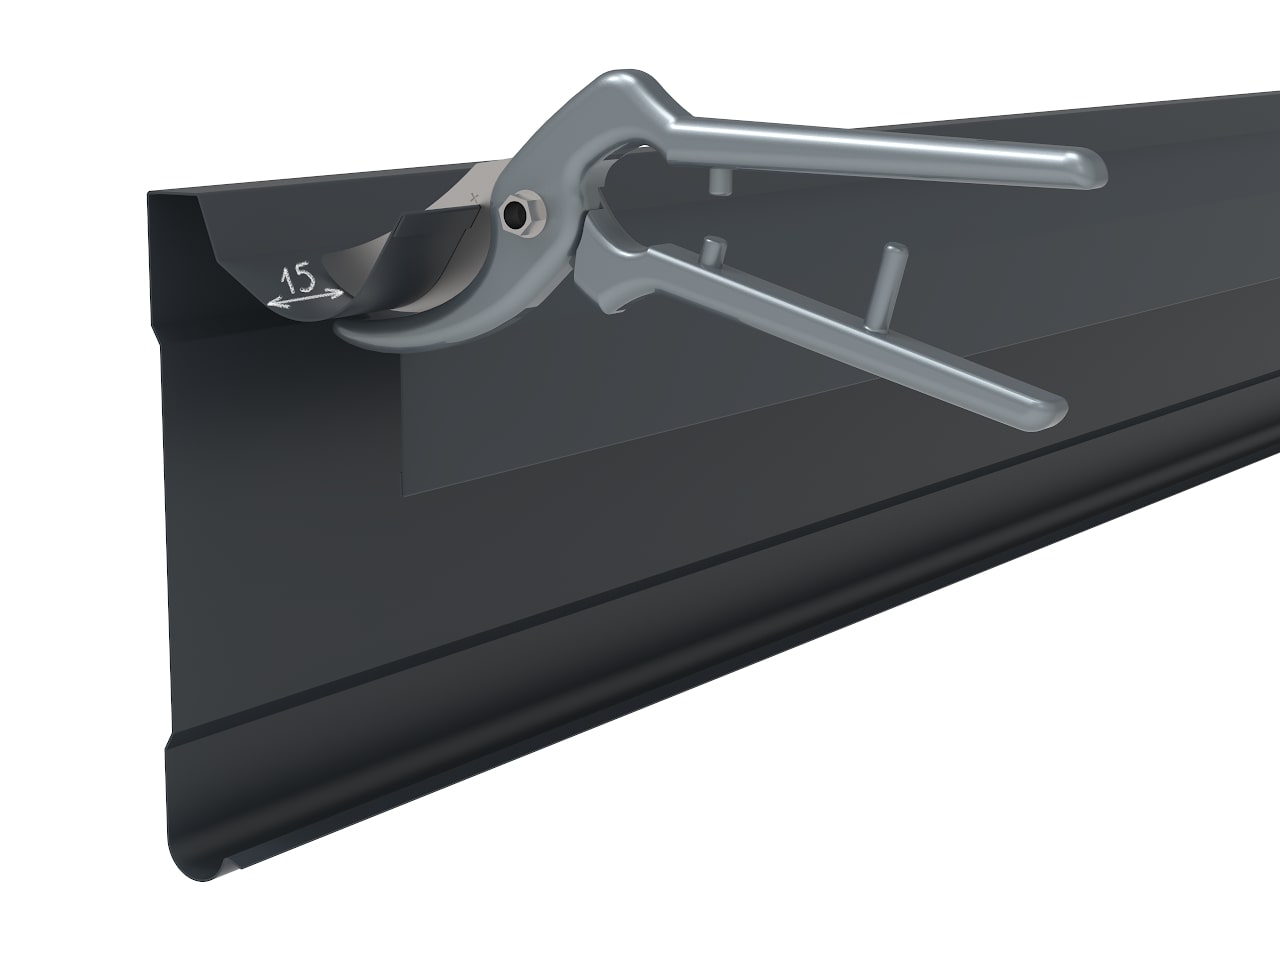
Once the location of the discharge funnel has been determined, a square opening must be cut in the bottom of the gutter, corresponding to the drain pipe dimensions of 80x80 mm. The edges of the opening must be bent according to the direction of water flow.
The discharge funnel must be installed at the location of the cut-out opening, and then the mounting leaves must be bent onto the gutter beads.
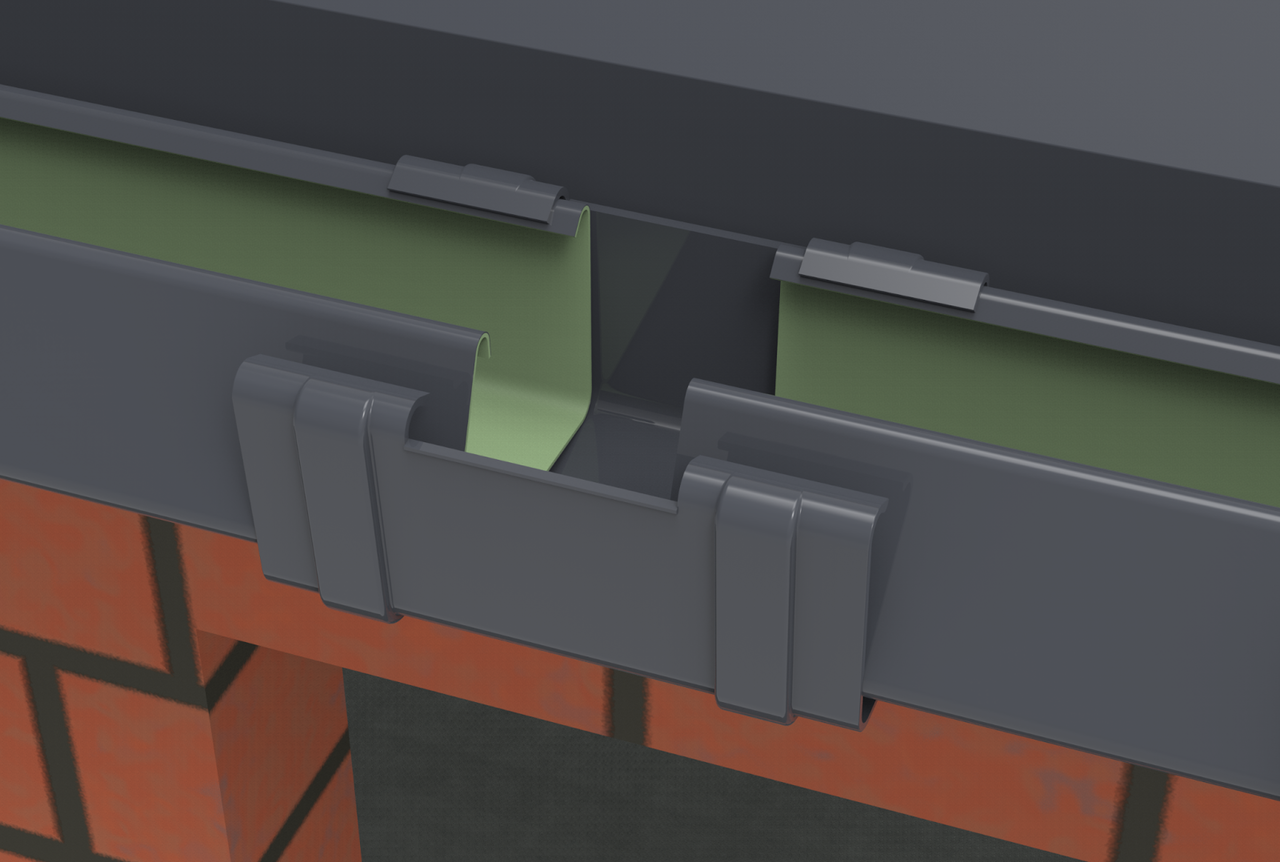
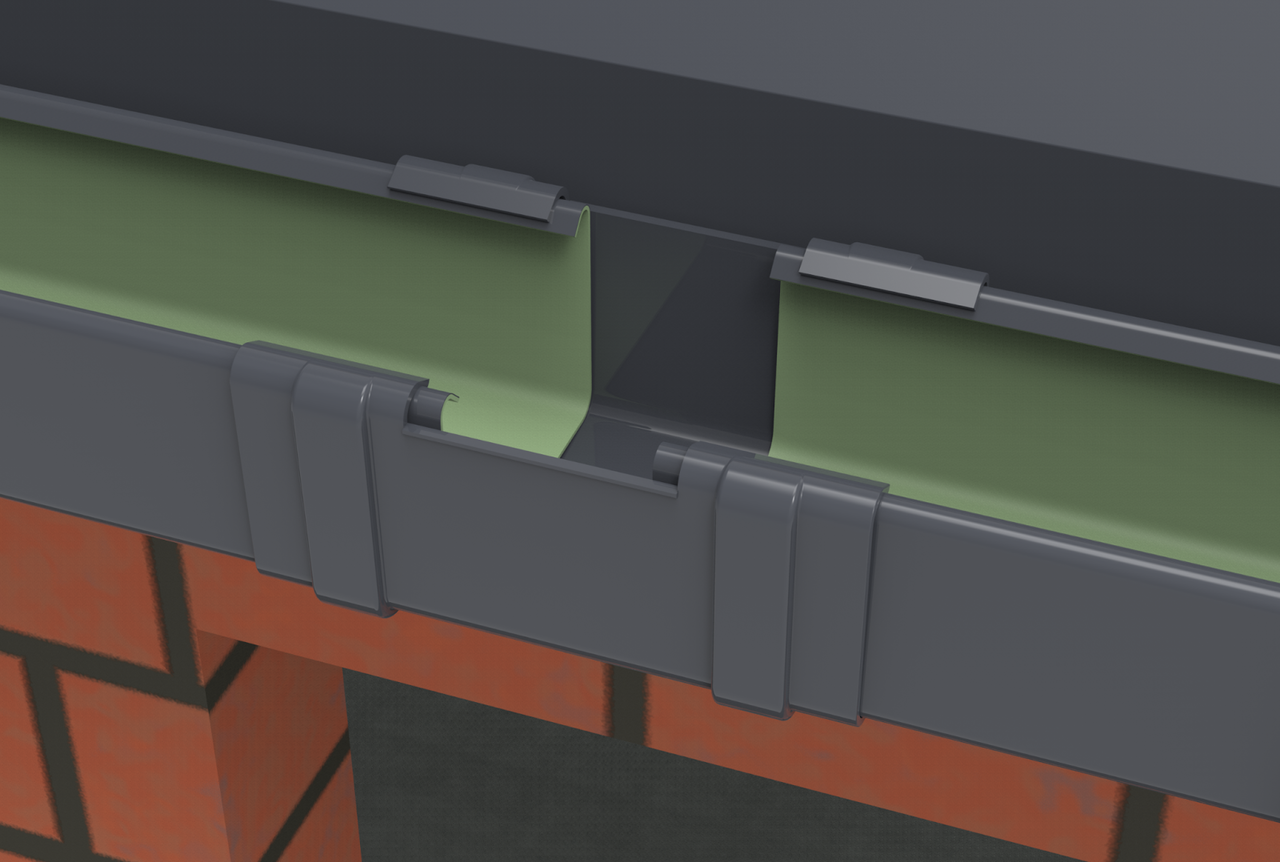
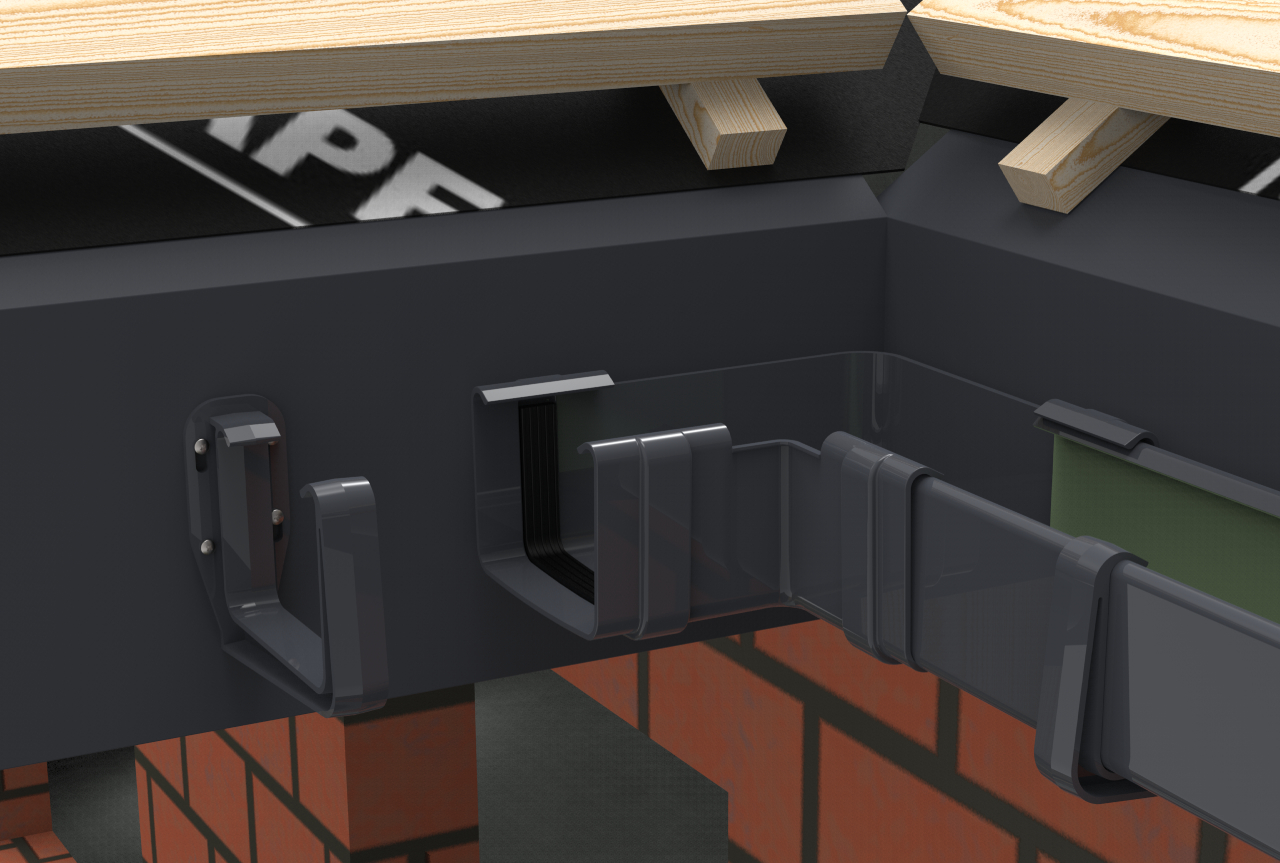
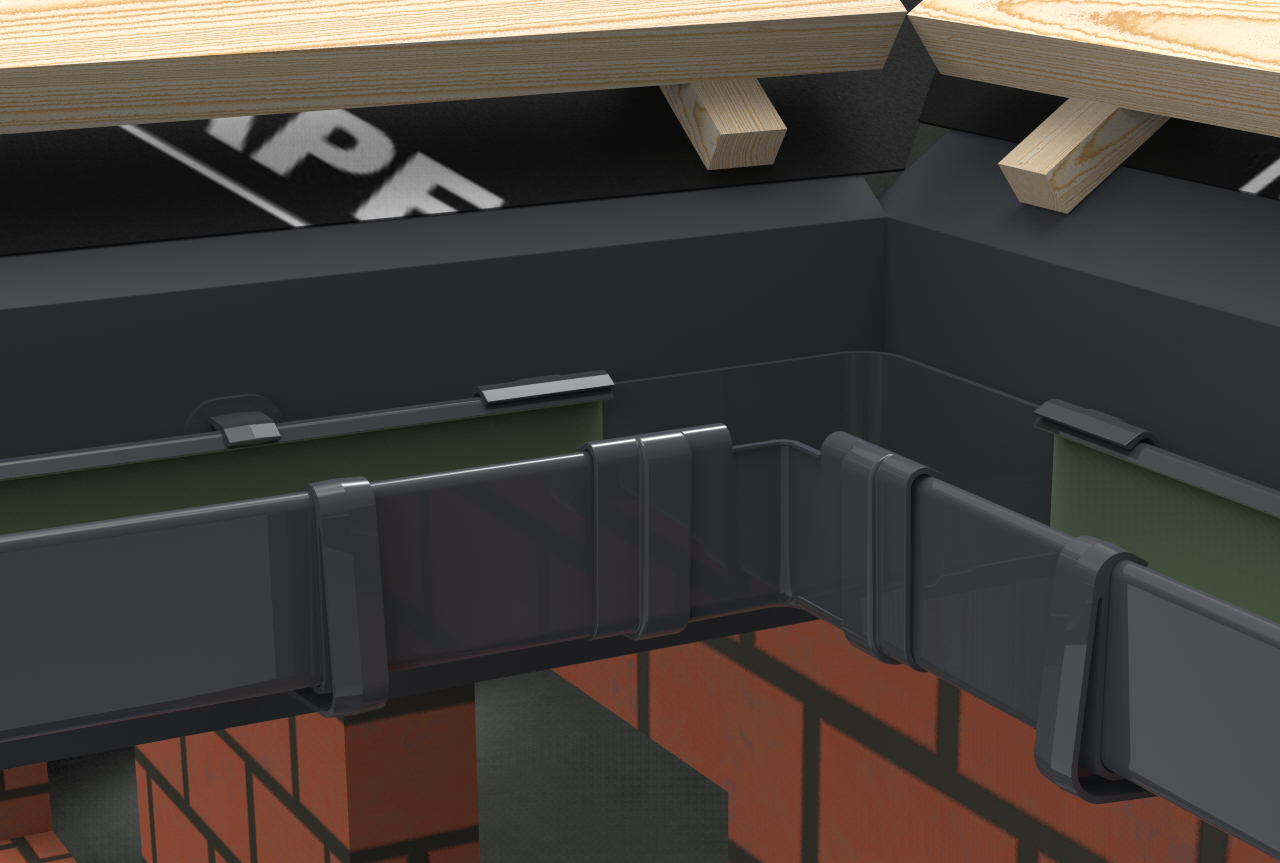
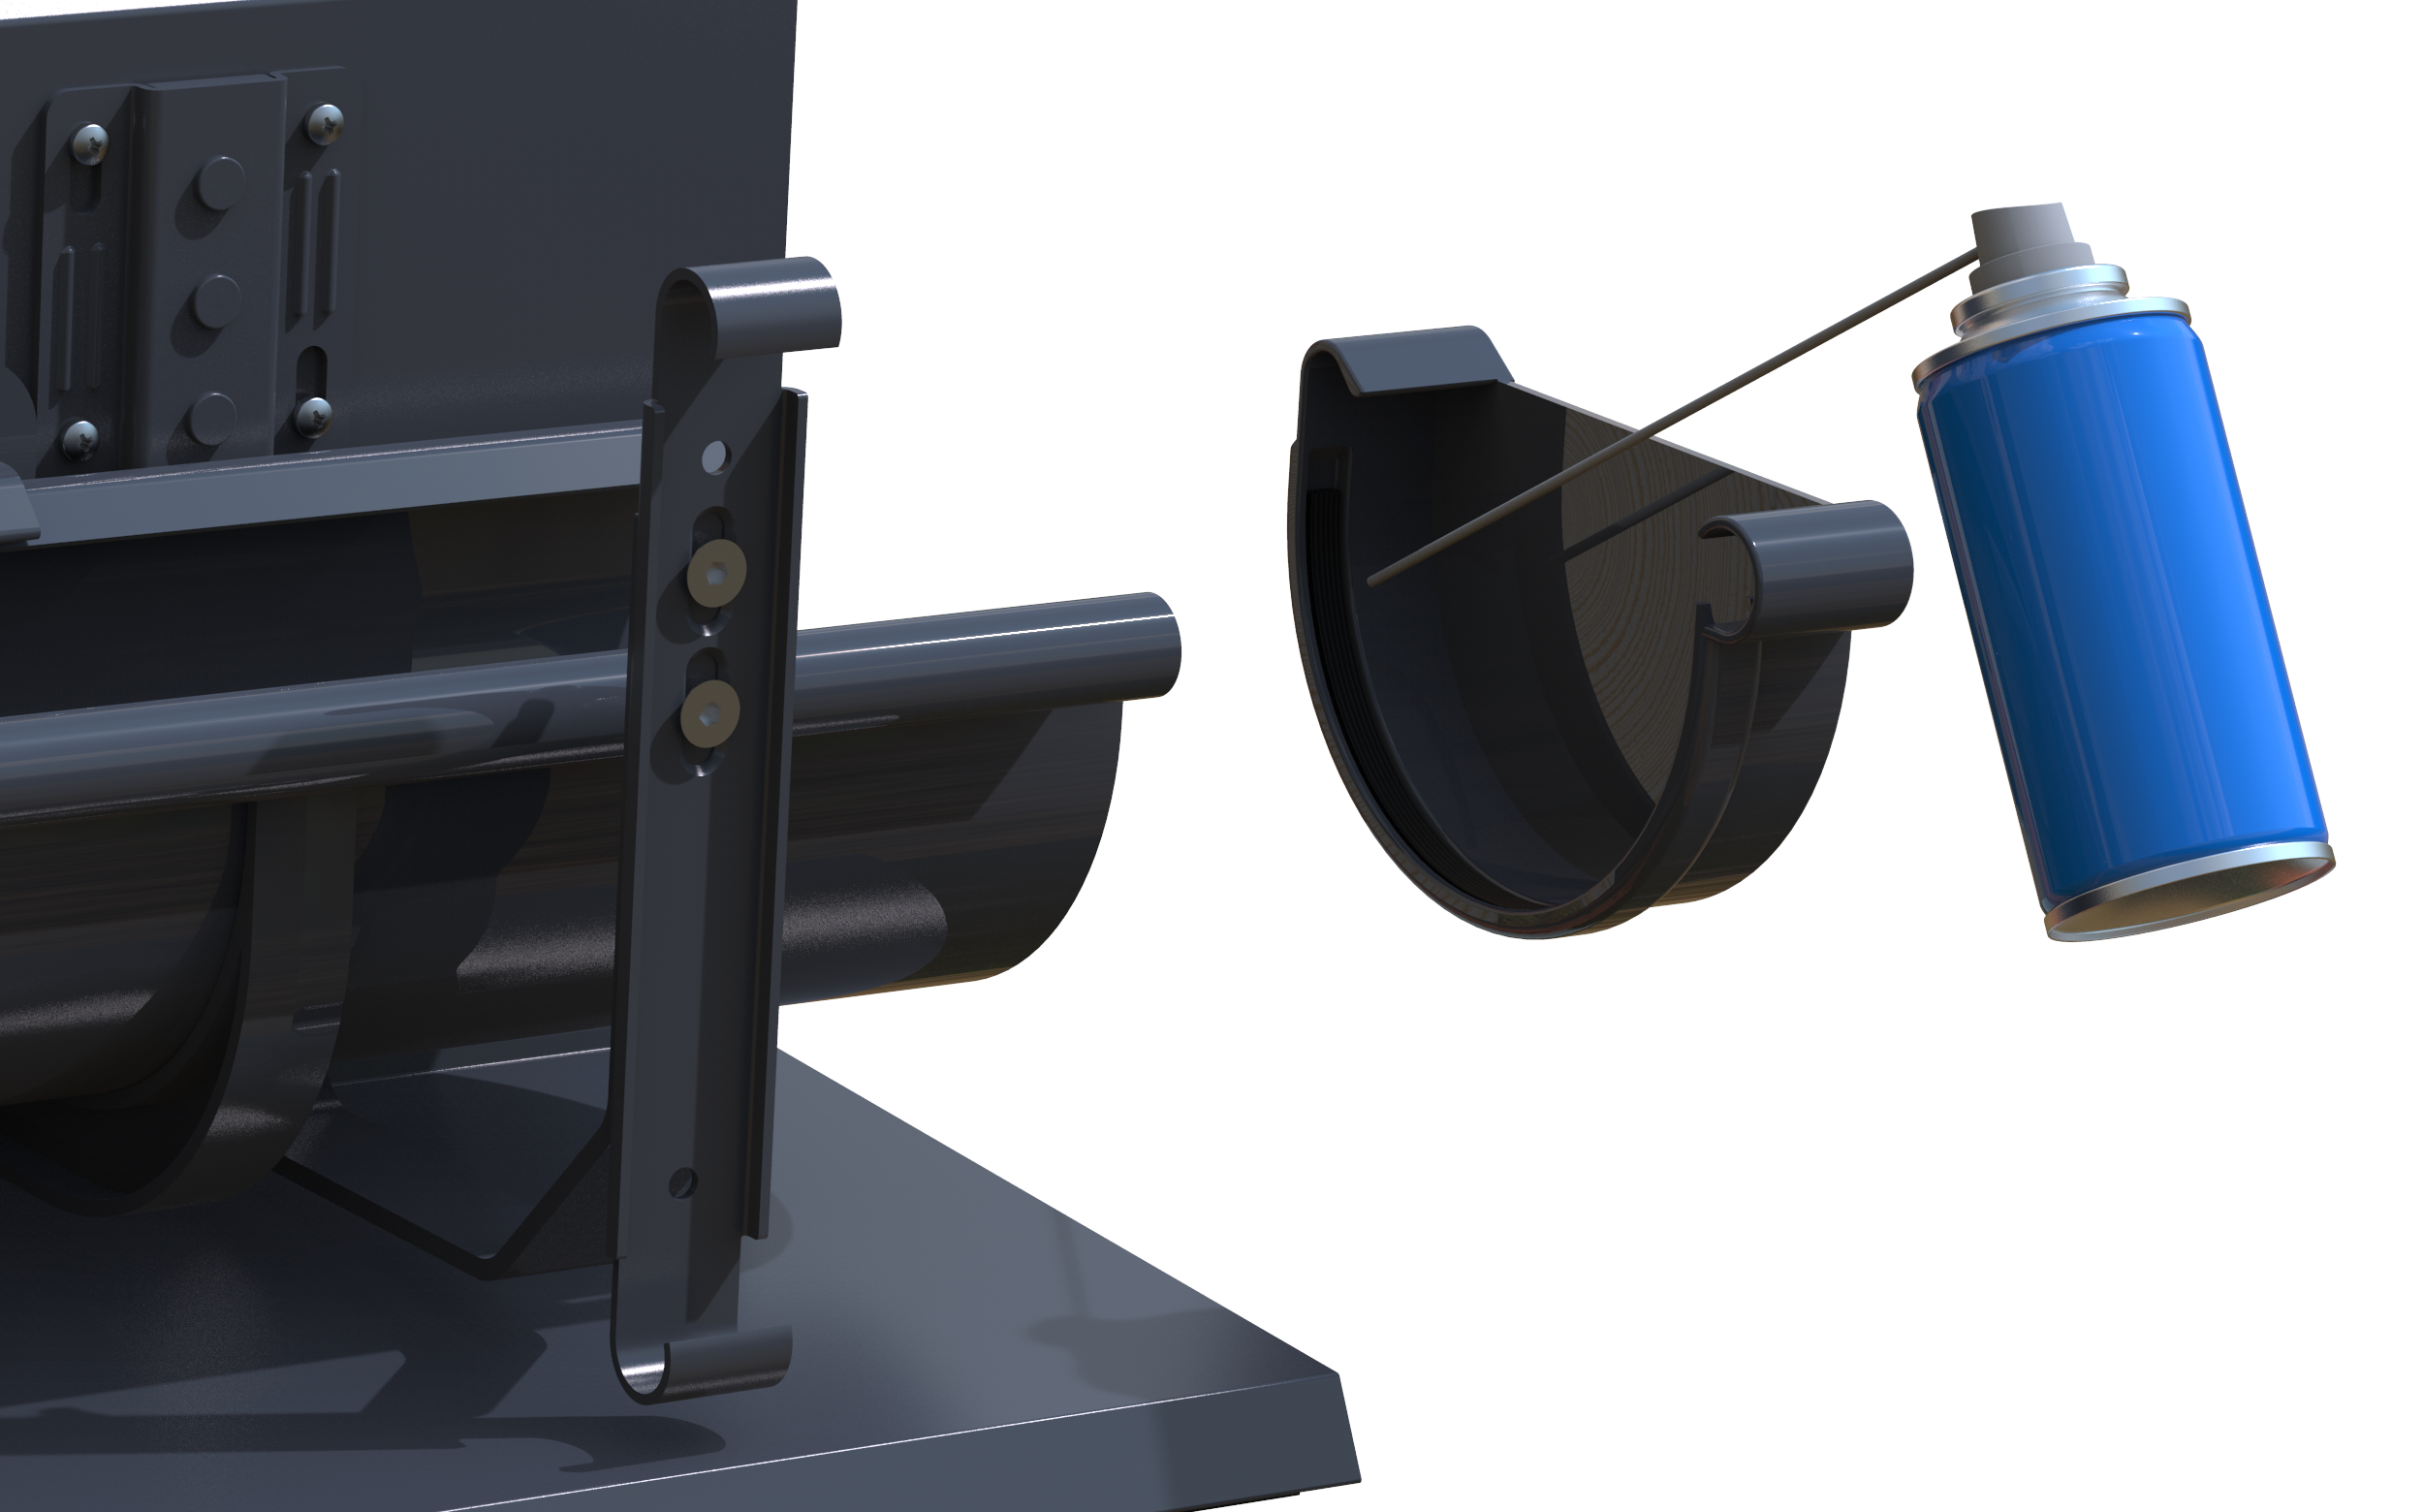
4. Gutter connector installation


Remember to apply gasket spray prior to installing the STEEL SGS gutter fittings. Next, properly trim both ends of the gutter so that their edges fit precisely into each other. This will ensure the stability of the entire structure. Then, place a union on the connected ends of the gutter to form a permanent and watertight connection.
- Fit the connector from the bottom, evenly, so that the gutter radii are firmly in contact with the connector radii.
- Press the rear parts of the gutters so the back sits correctly. The connector must be flush with the rear of the gutter.
- Bend the rear ears of the fitting against the gutter bead.
- Put the clamp onto the front bead of the gutter and bend the leaf on the clamp.
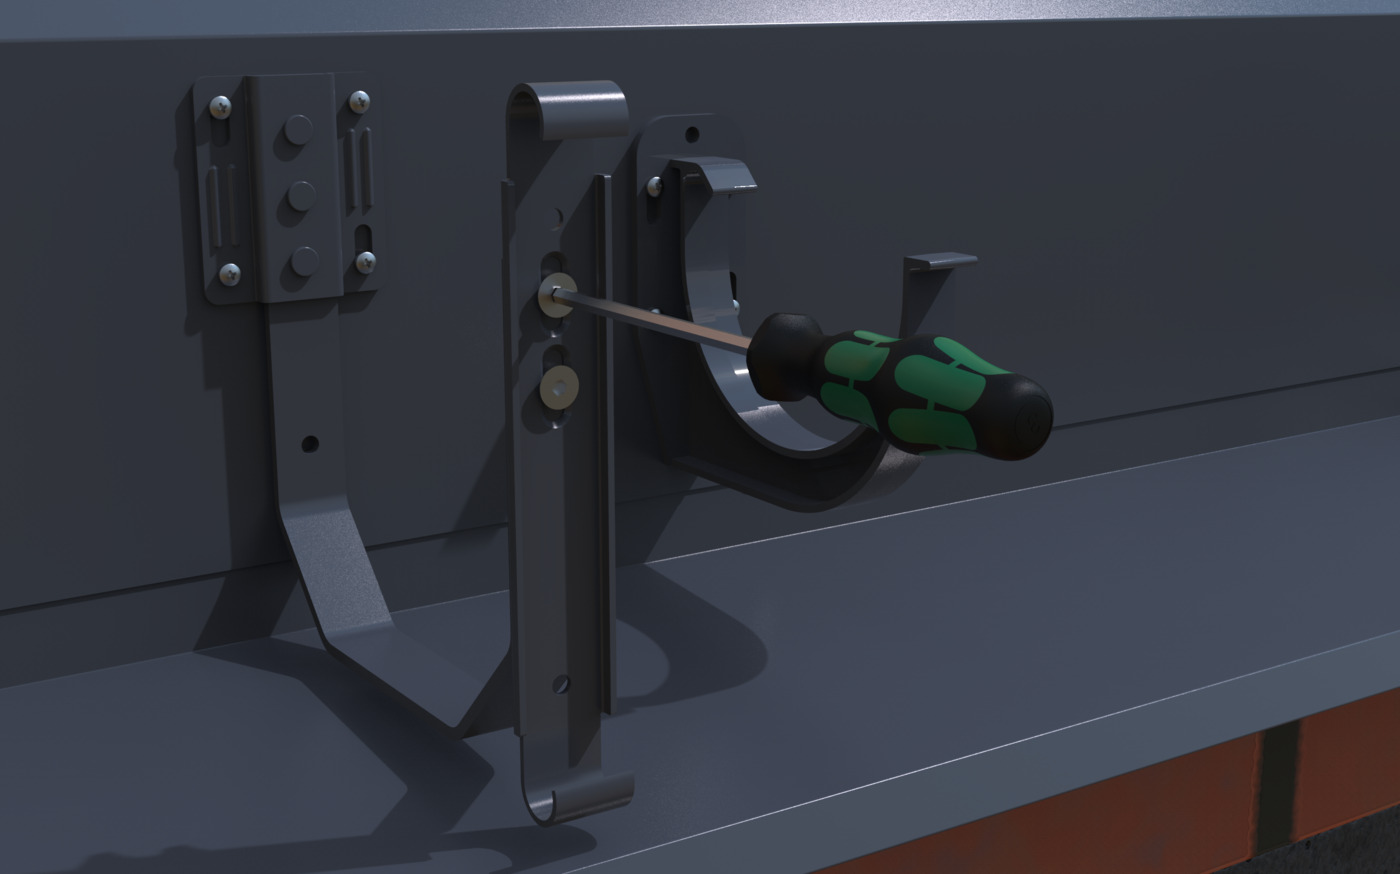
- If necessary, tighten the fitting to the face board at the mounting hole.
5. Installation of the universal bottom


Universal bottoms must be installed at the ends of the gutters, and attention must be paid to the correct positioning of the gasket. Roofing sealant should be used to improve the system’s tightness.
- Bend away the upper leaves of the bottom.
- Insert the lower part first, followed by the upper part.
- Bend the leaves over the gutter bead.
- Screw in the bolt in the mounting hole.
6. Installation of (universal) inner corner


Silicone sealant spray should be applied before STEEL gutter pieces are assembled. Next, both ends of the components should be cut accordingly so that one end fits precisely into the other. Then place a union on the joined ends to form a sealed and secure connection.
- Fit the connector from the bottom, evenly, so that the radii of the gutter and corner are in firm contact.
- Press the rear parts of the components so that they settle properly in the connector.
- Bend the rear ears of the fitting over the gutter bead.
- Put the clamp onto the front bead and bend the leaf over it.
- If necessary, tighten the fitting to the face board.
7. Installation of the (universal) outer corner


Silicone sealant spray should be applied before STEEL gutter pieces are assembled. Next, both ends of the components should be cut accordingly so that one end fits precisely into the other. Then place a union on the joined ends to form a sealed and secure connection.
- Fit the connector from the bottom, evenly, so that the radii match.
- Press the rear parts so they align correctly.
- Bend the rear ears of the fitting against the bead.
- Attach the clamp and bend the leaf over it.
- If necessary, tighten the fitting to the fascia board.
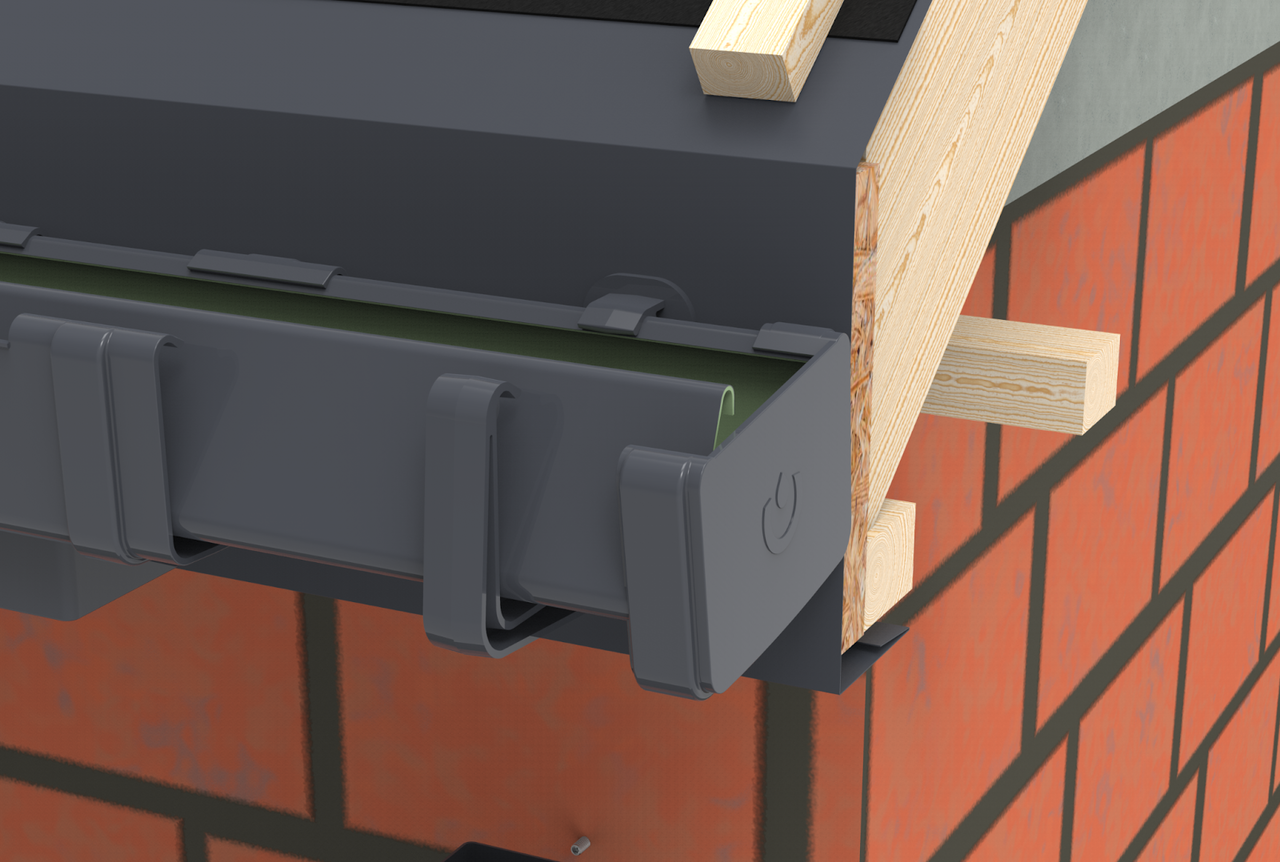
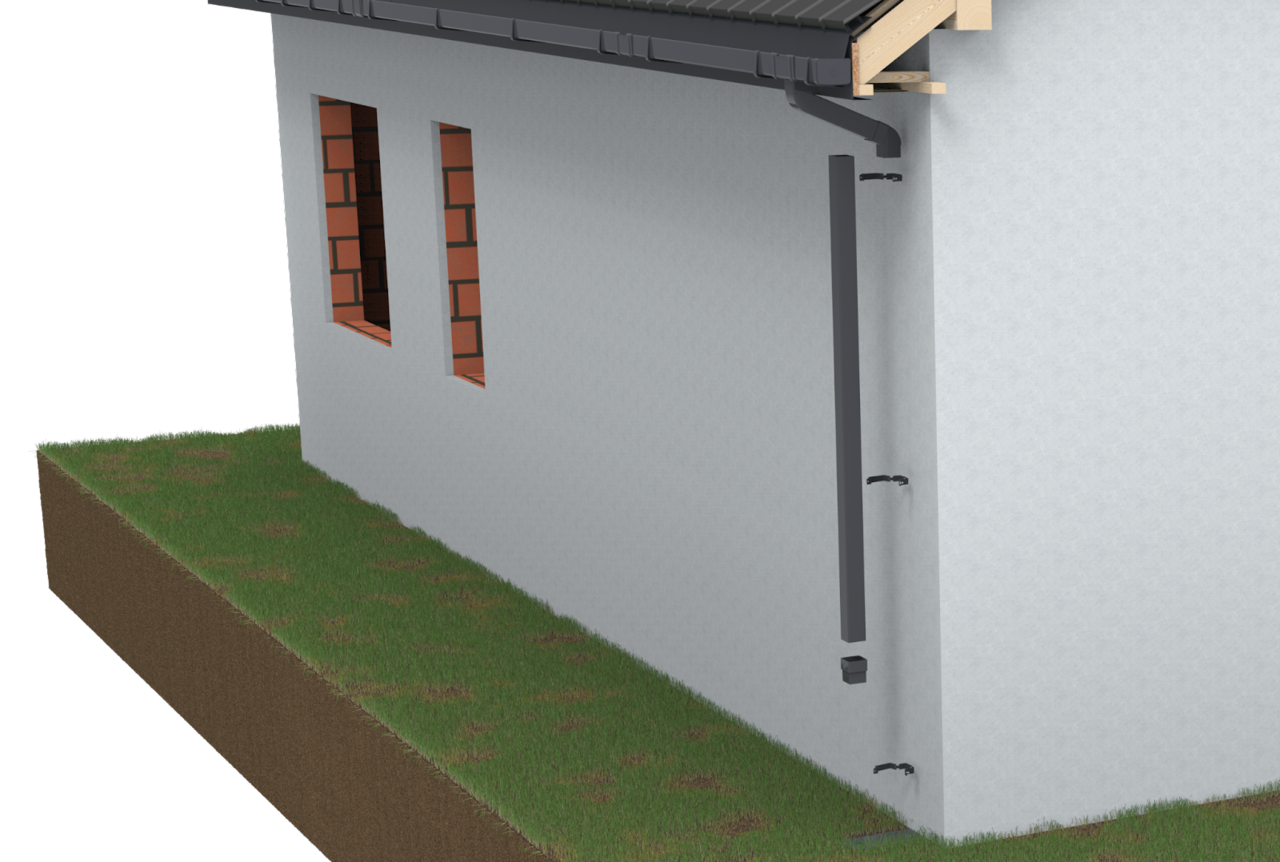
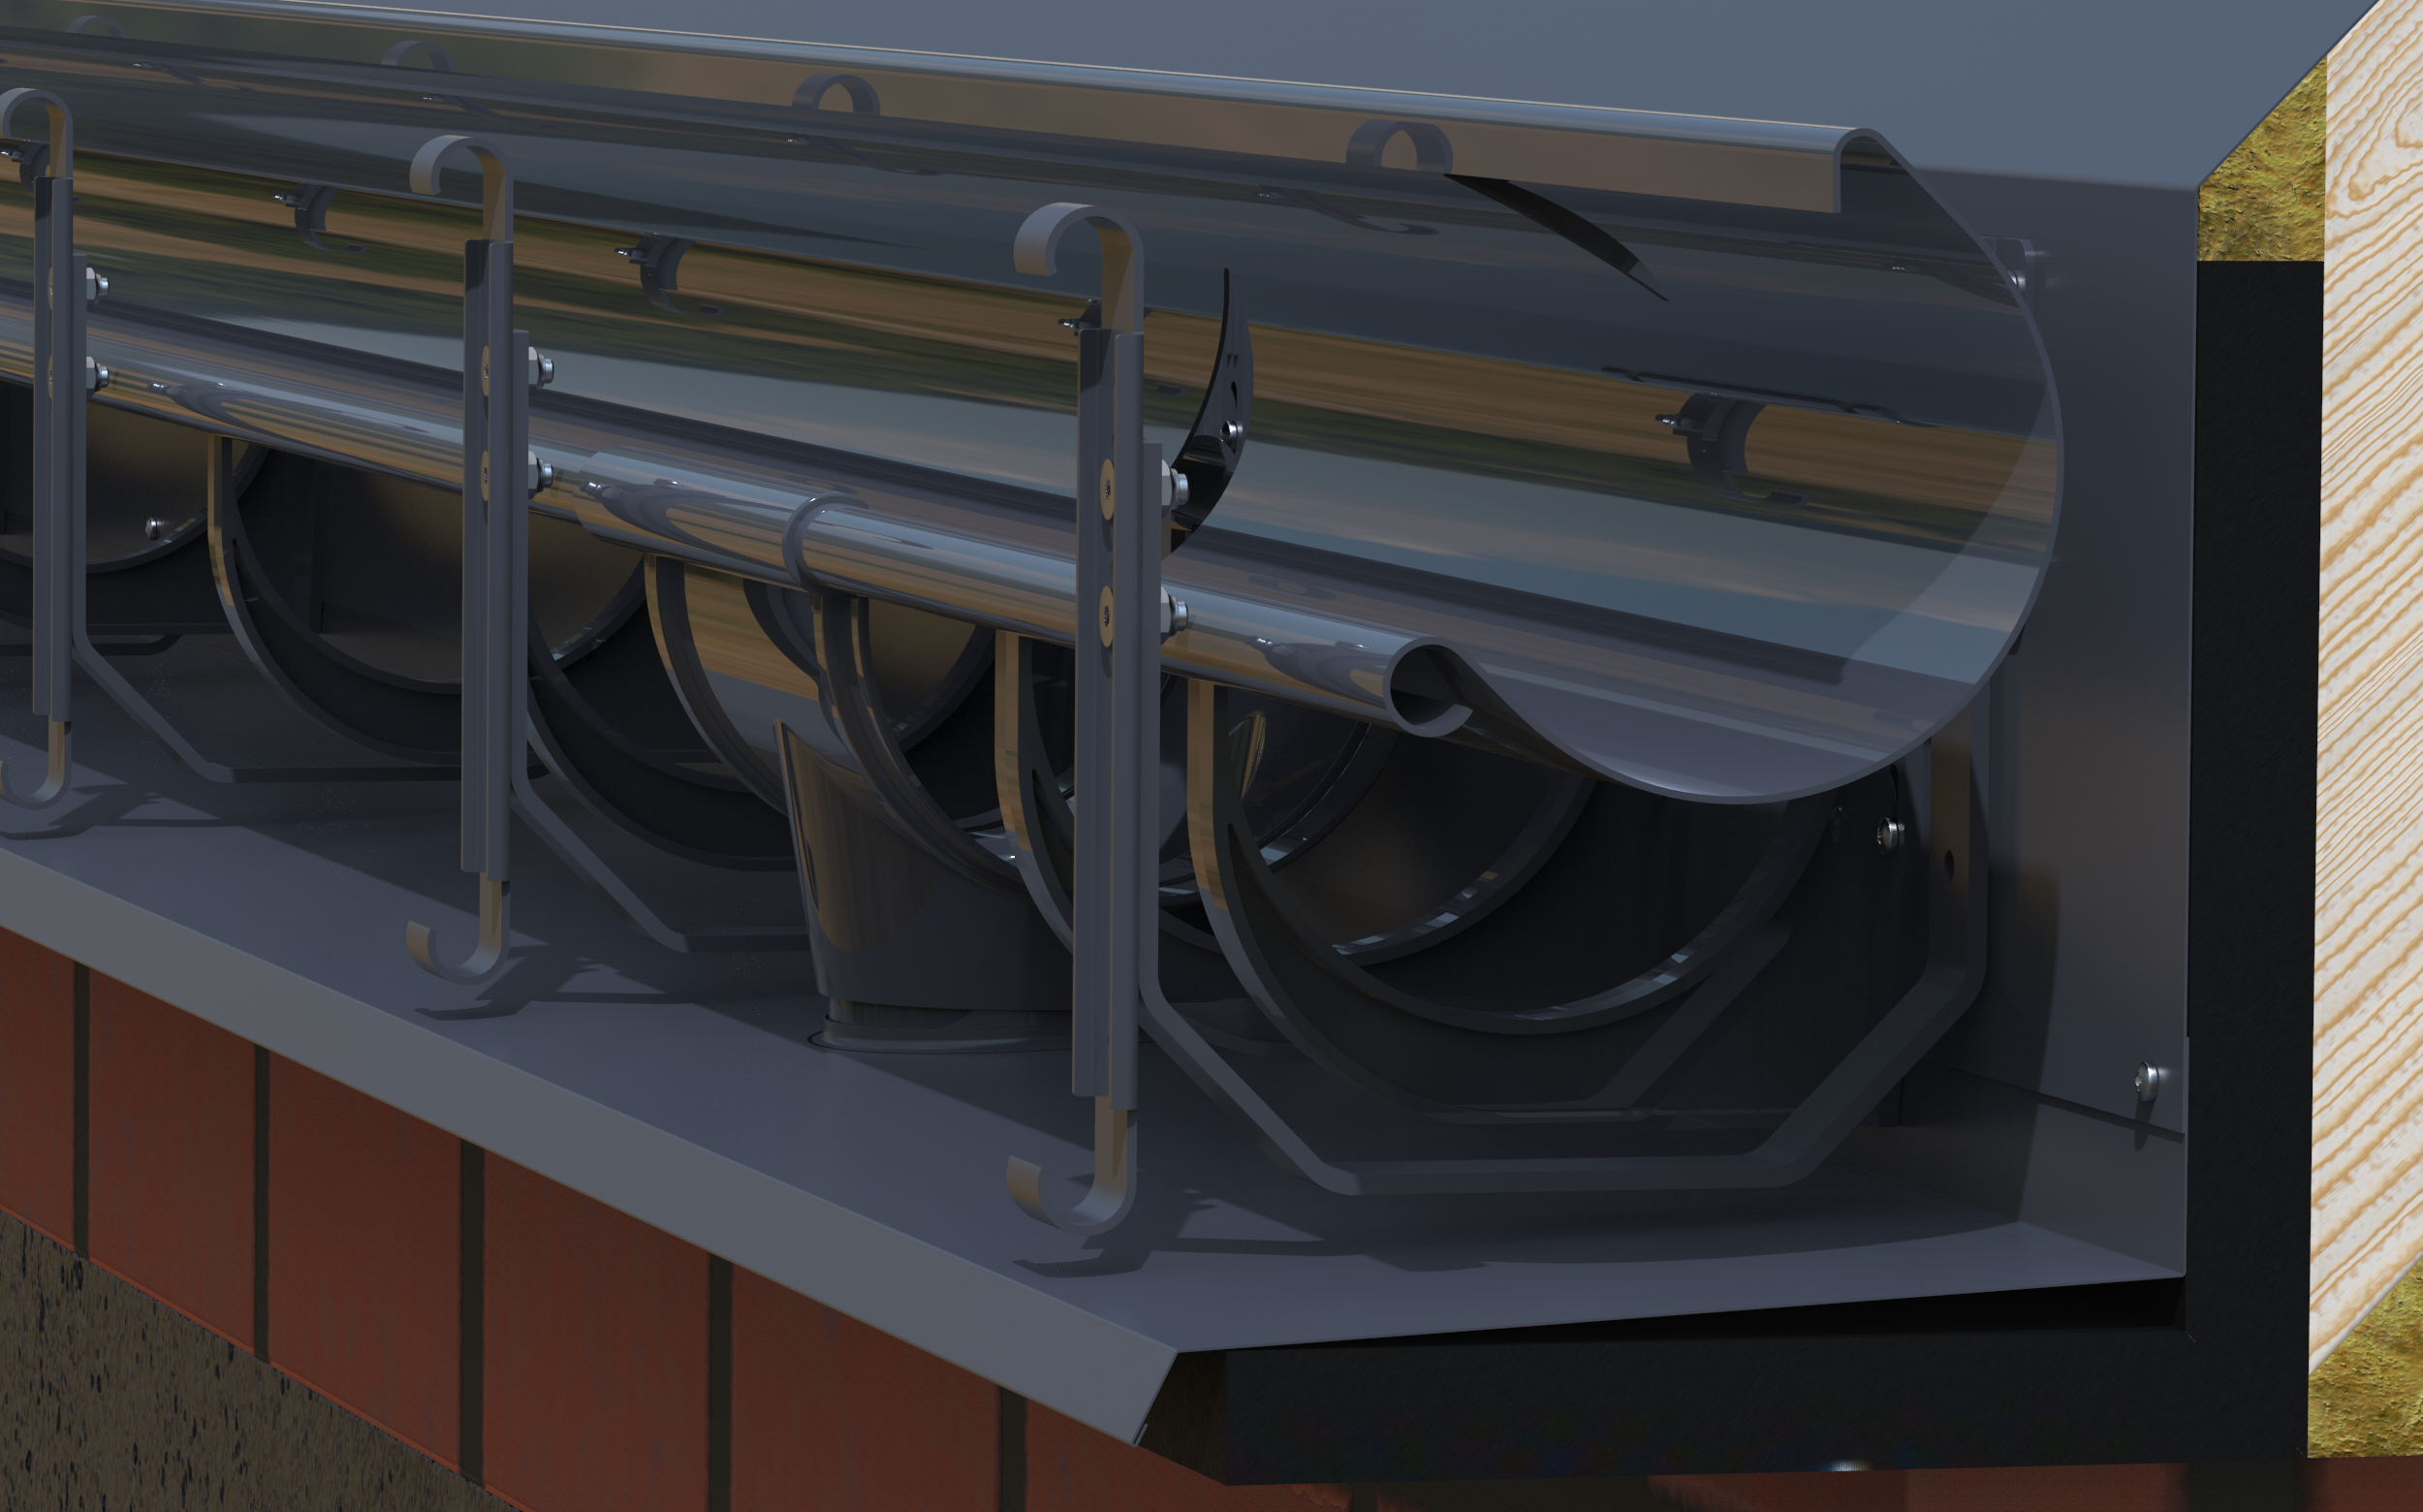
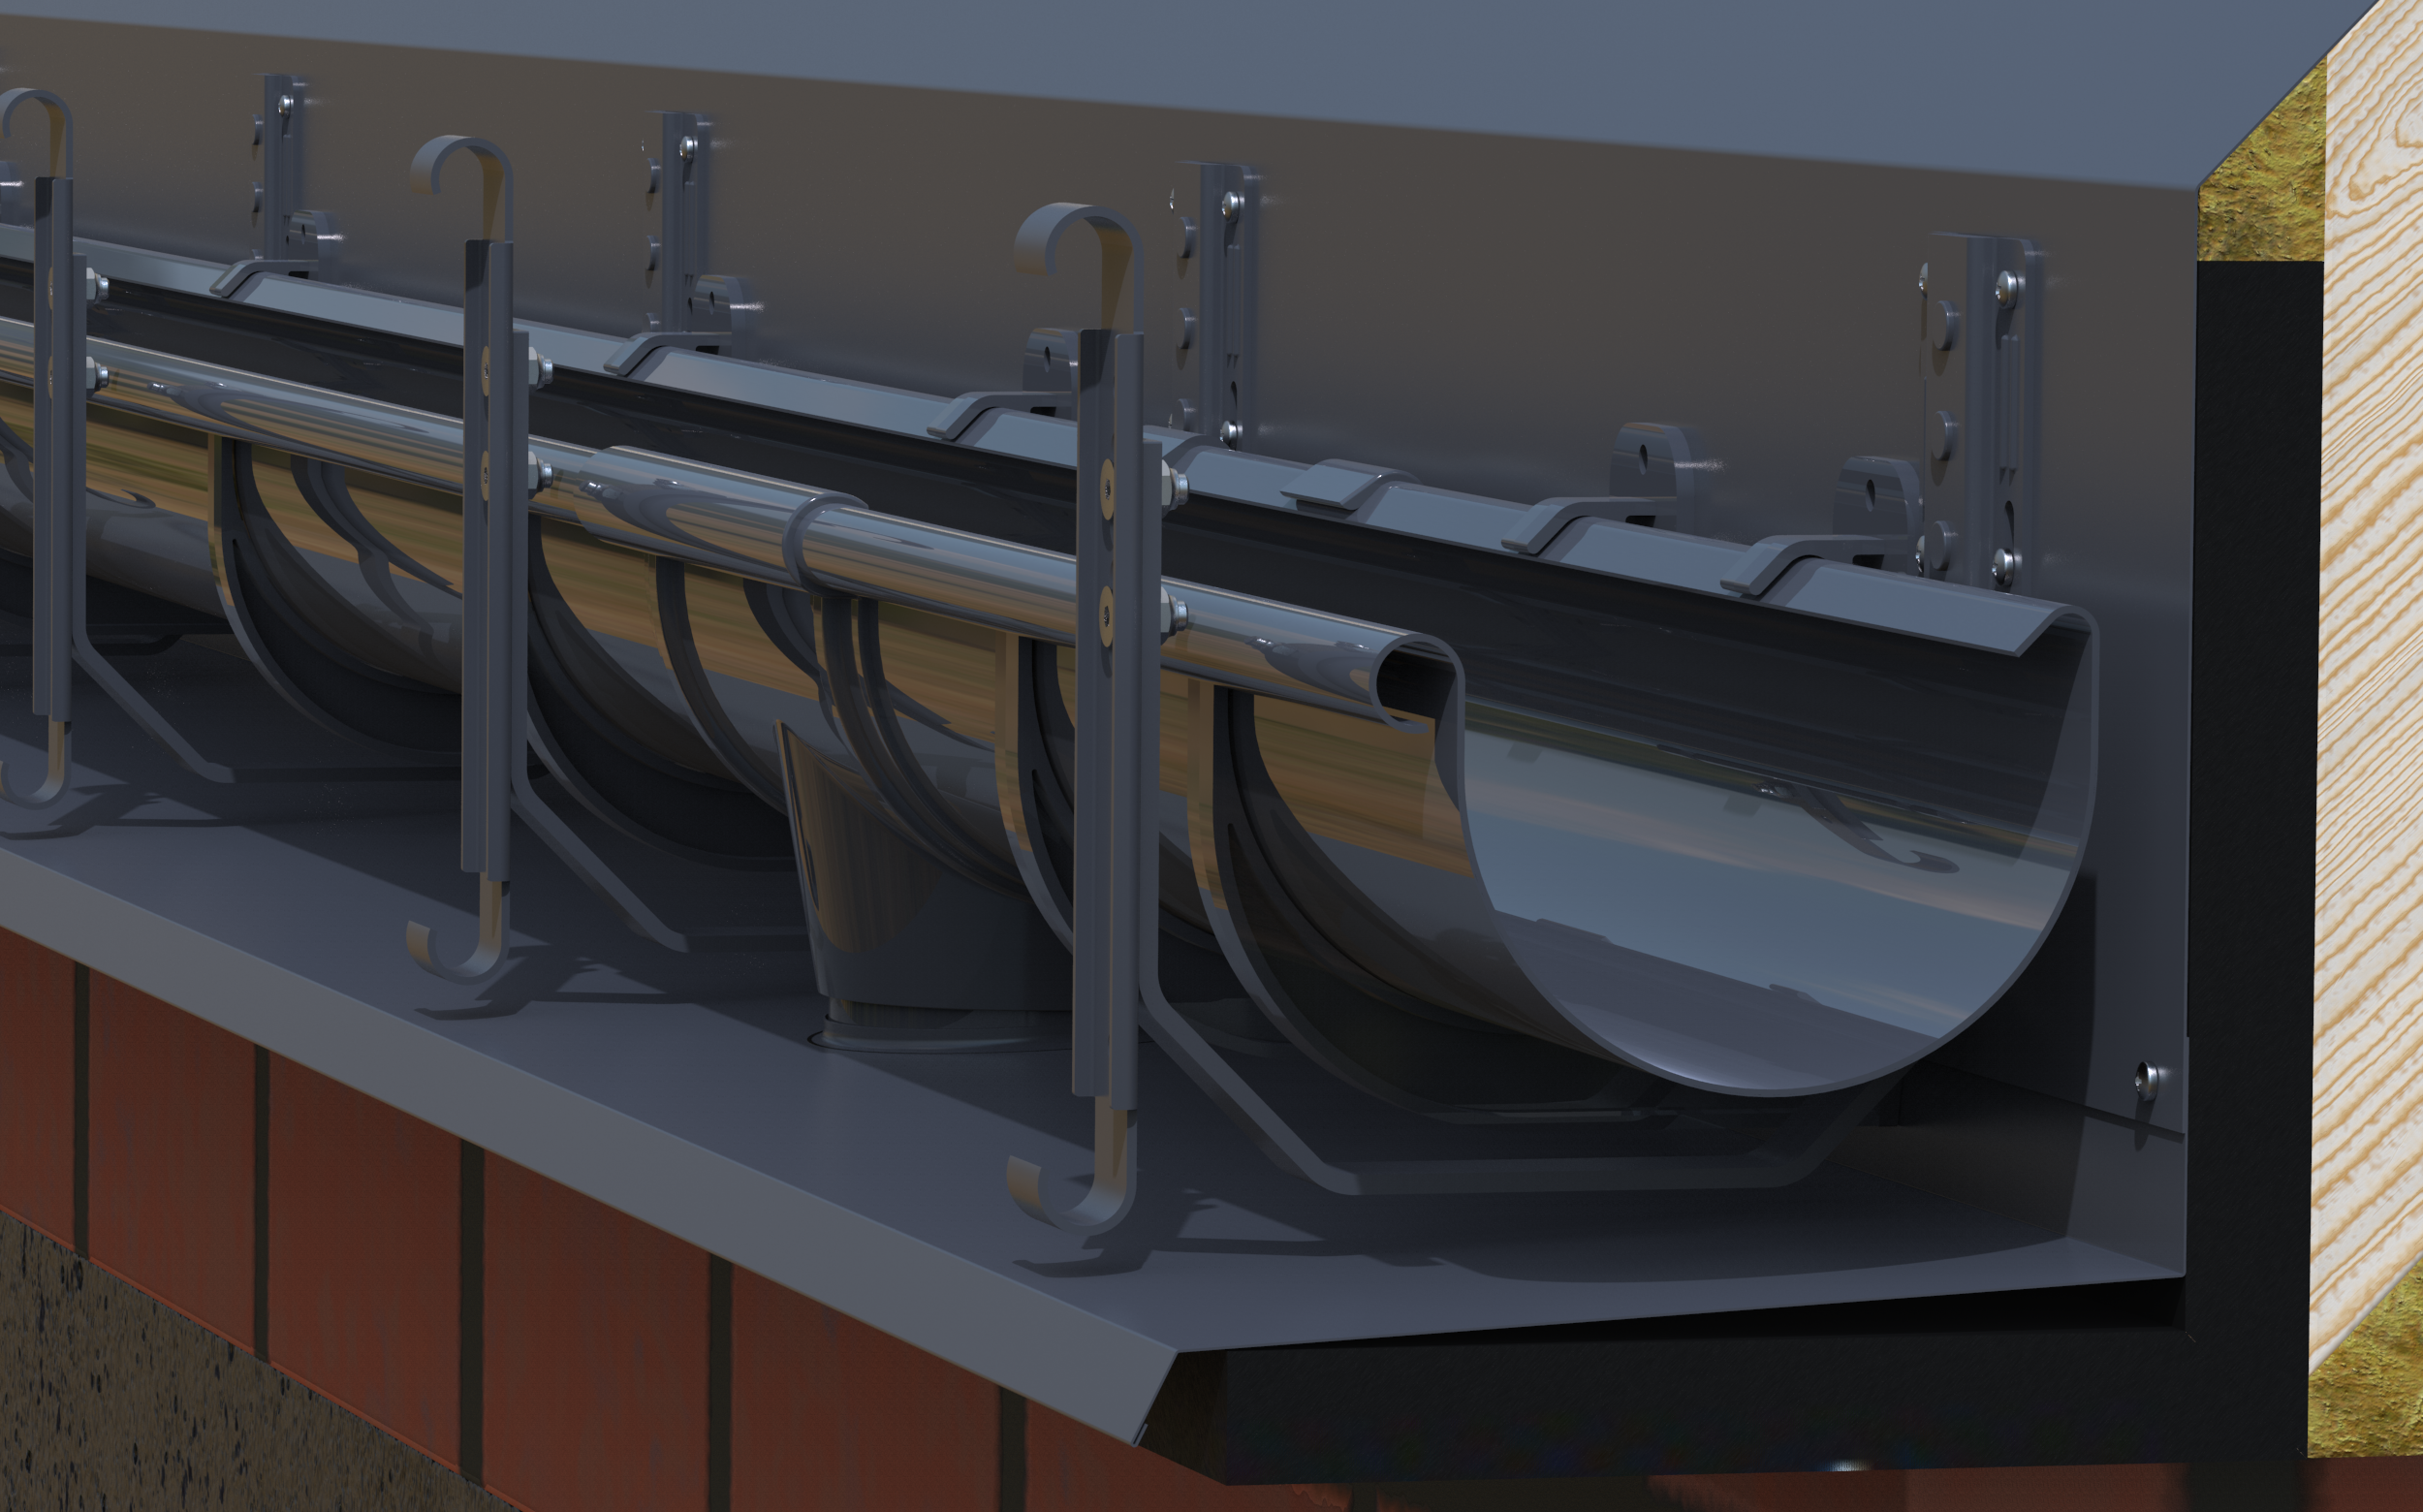
8. Installation of the downpipe


Connect the discharge funnel to the pipe using an elbow joint, or directly to the drain pipe (for eavesless roofs).
To install dowels in the façade, choose dowel length according to insulation thickness. Install clamps on the dowels with a maximum spacing of 1.8 m. If the pipe riser exceeds 4 m, use an additional clamp below the pipe connector.
Place the pipes in the clamps, ensuring enough pressure when screwing to allow free thermal movement.
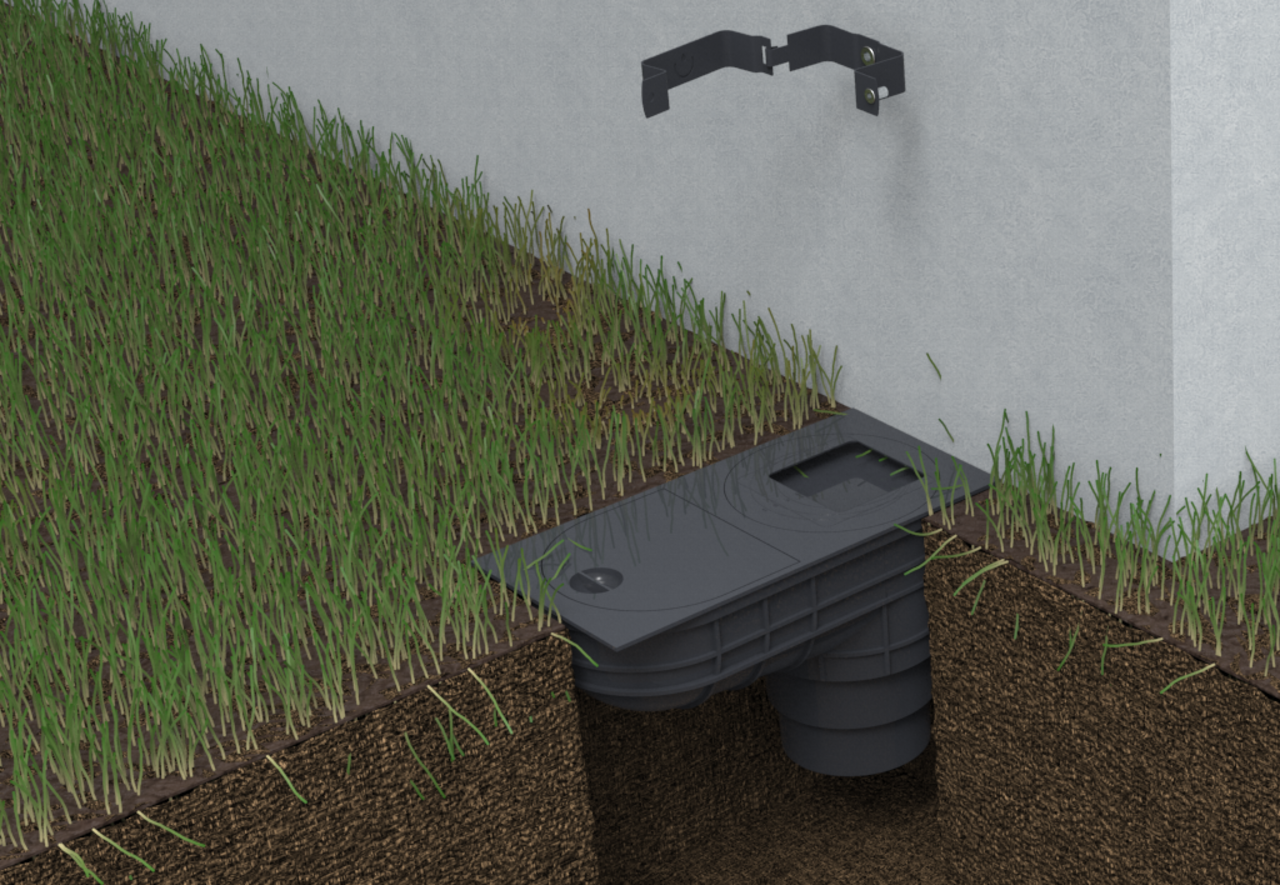
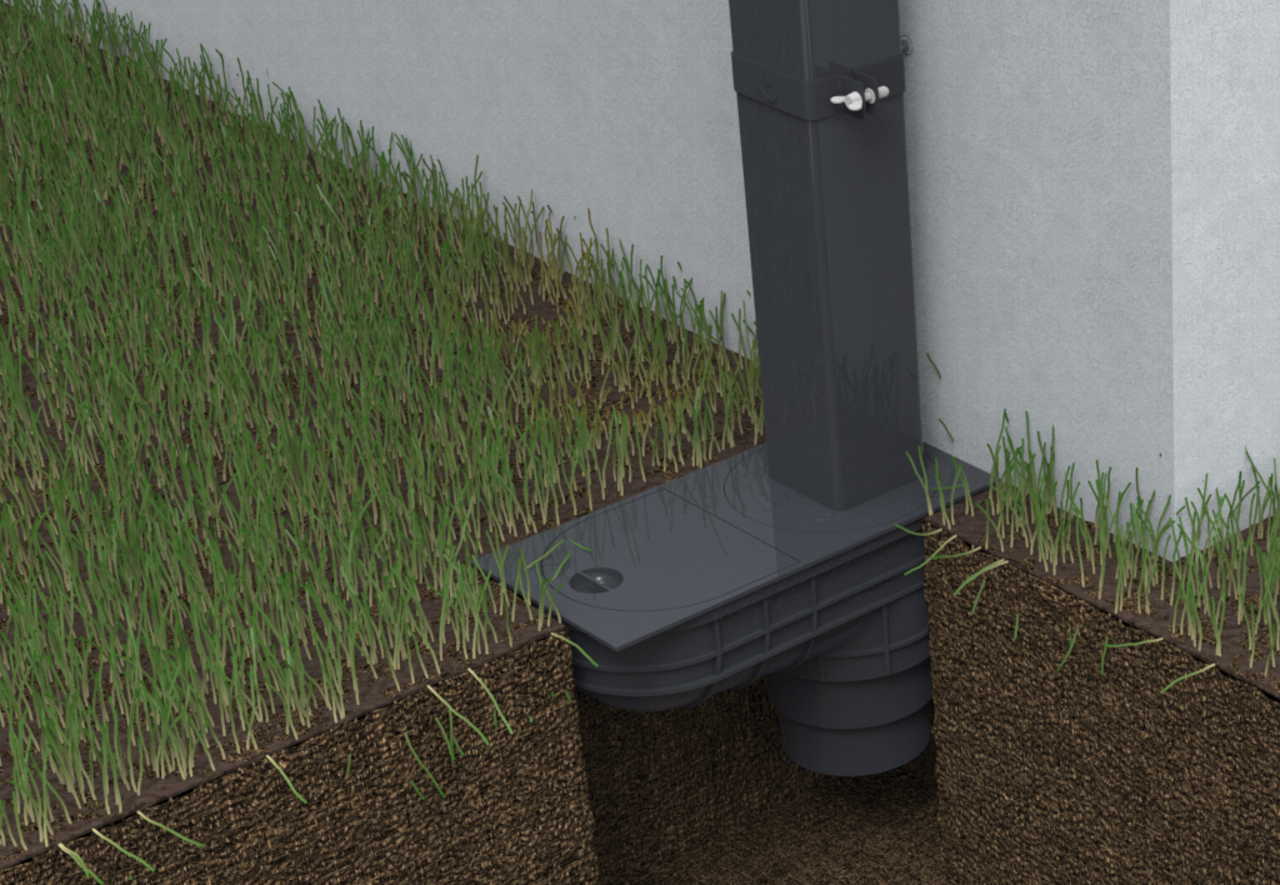
9. Completion of the installation


To discharge water from the STEEL SGS into the sewerage system, a universal settling tank must be placed in the ground under the drain pipe. Cut an opening in the flap of the tank matching the pipe size and insert it. To drain to the ground, an elbow must be installed at the end of the drain pipe.
10. Overlapping installation


The alternative installation of the universal corner starts with notching the gutters and removing the inner gutter folds. The prepared gutter is pushed into the inner profile of the corner. Then place the gutter connector on the formed joint and follow the correct order of assembly steps:
- Fit the connector from below, evenly, so that the radii of the gutter and the corner are firmly in contact with the connector.
- Tighten the rear ends so they align properly.
- Bend the back ears of the fitting against the gutter and corner.
- Attach the bracket to the front and bend the leaf.
- If necessary, tighten the fitting to the end board.
Square Gutter System PVC
Important information
Installation of the system in accordance with the following instructions guarantees the correct and reliable operation of the SAXON STEEL PVC Square Gutter System.
- Before installation, carefully read these Instructions and follow the installation procedures and guidelines of the Occupational Safety and Health Agency (OSHA). It is recommended to use personal protective equipment when moving and working on the roof. Such equipment includes fall protection measures and personal protective equipment such as gloves, safety glasses, safety helmets and safety harnesses, etc. Avoid contact with sharp edges of metal sheets. Metal sheets and PVC products are recyclable. They should be disposed of at a point for separate collection of waste after the end of the product life cycle.
- The SAXON PVC Square Gutter System should not be installed below 5°C.
- The PVC material from which the gutter system is made requires consideration of the phenomenon of thermal expansion of the system components. Properly designed and installed fittings of the system in question ensure proper temperature compensation of long elements.
- The mounting elements of the system (gutter hooks, steel clamp) allow gutters and downpipes to move freely.
- It is recommended to store the system in its original packaging and in a shady place until installation.
1. Preparation of the roof structure and installation of hooks

In order to properly install the Square Gutter System, cut the rafters correctly.
It is necessary to plan the alignment of the gutter with respect to the roof end so that the line drawn as its extension is 10–20 mm from the outer edge of the gutter. This positioning should protect the gutters from the impact of sliding snow. If this guideline cannot be followed, snow fences should be installed on the roof to reduce the risk of gutter damage from sliding snow.
The recommended hook spacing for the square gutter system is 50 cm.
2. Determining the correct slope of gutters
When placing the hooks for the SGS, it is important to maintain the correct slope of the gutter. The gutter should have a slope towards the drain funnel of about 0.3% (i.e. 3 mm per 1 metre of gutter). To achieve the correct slope, first install the hook furthest from the funnel, then the hook at the drain funnel. When determining the location of the remaining hooks, we recommend using a string.
Properly installed hooks will prevent the system from leaking at gutter joints.
3. Determining the position and preparing the opening for the drain funnel

An equally important step in the installation of the SGS is to determine the position of the drain funnel, which is the lowest point of the system. The hooks should be installed at a distance of 15 cm from the edge of the drain funnel and other gutter fittings such as the connector, bottom and corner.
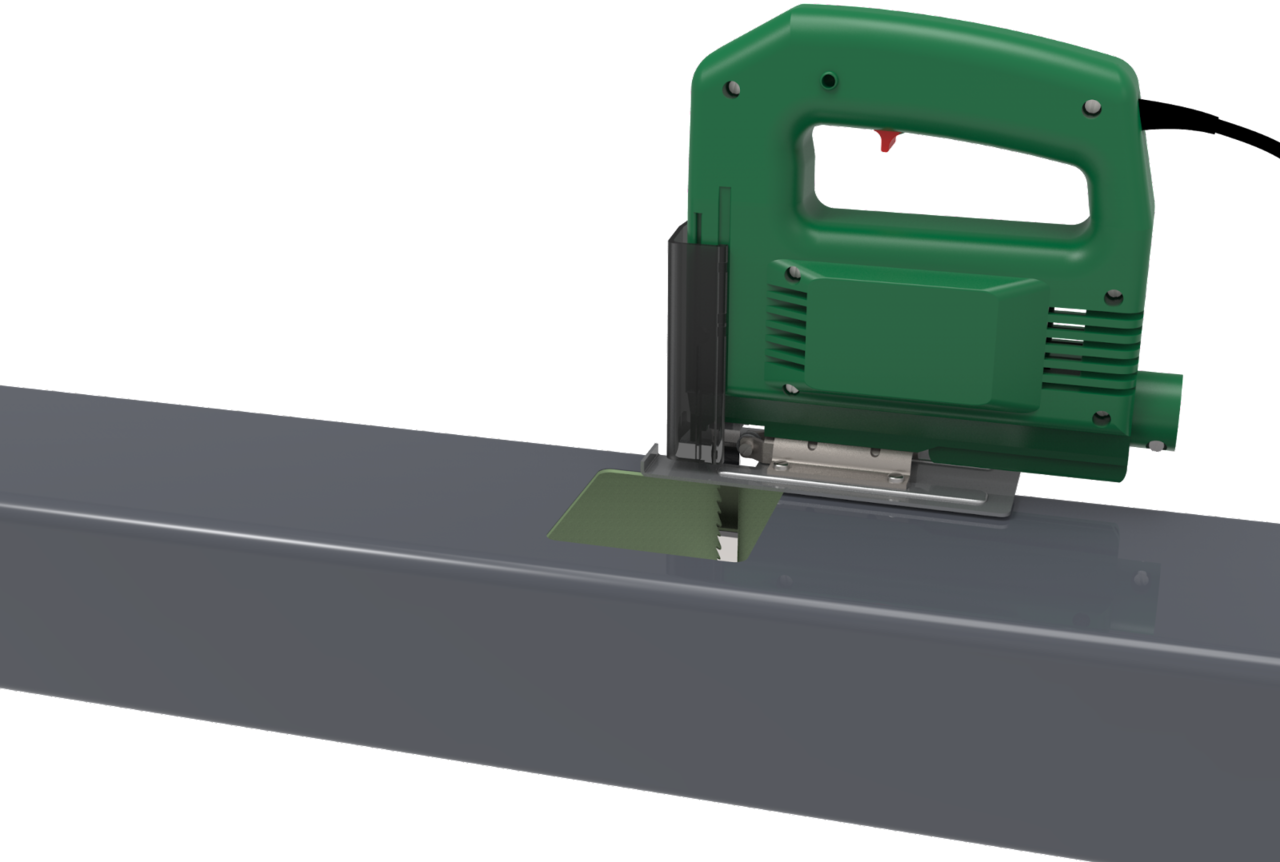
Having determined the location of the drain funnel, a square hole should be cut in the bottom of the gutter, corresponding to the dimensions of the drain pipe. Use a jigsaw or scissors to cut the hole.
4. Installation of the gutter connector
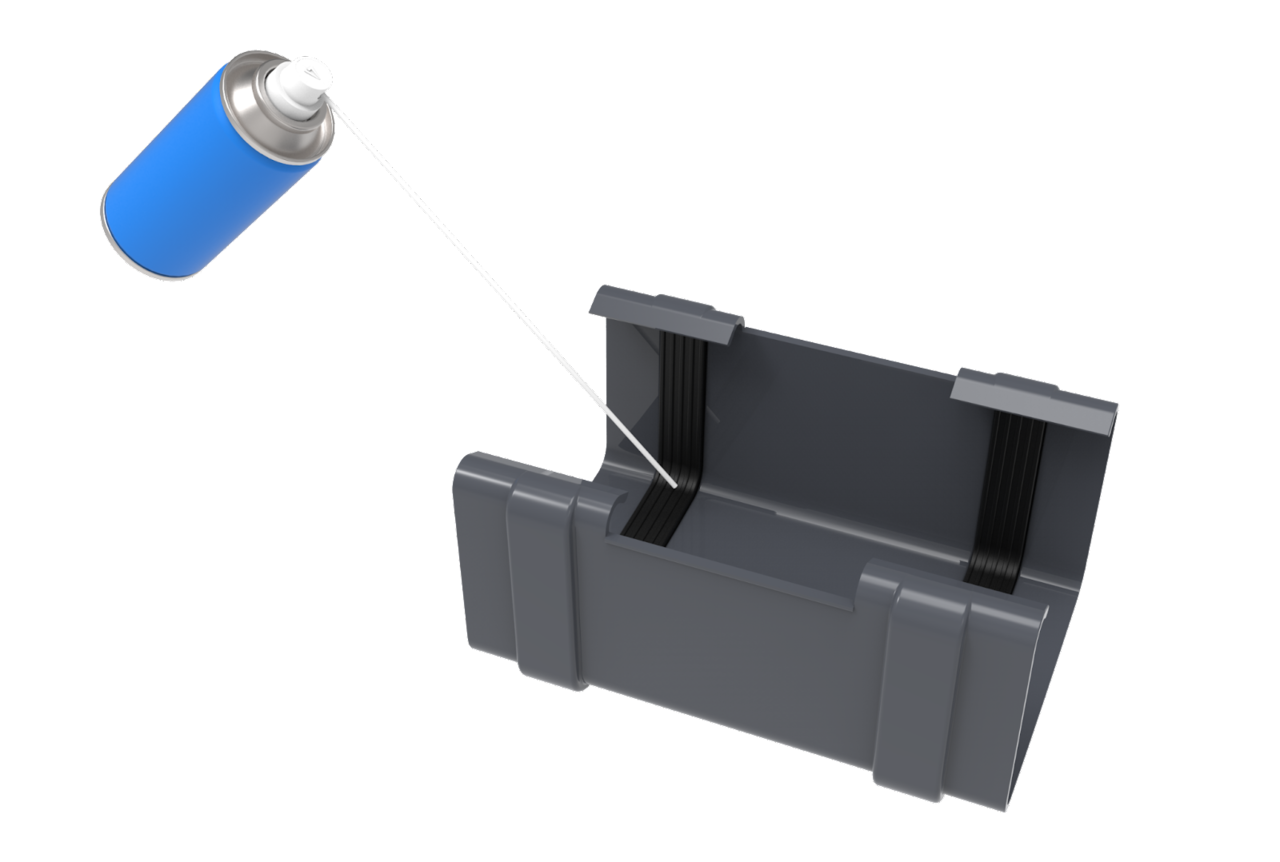
Before installing SGS gutter fittings, be sure to apply gasket spray. Following this recommendation allows easier installation and ensures proper thermal movement during temperature changes. When installing fittings such as the connector, drain funnel or universal corner, the end of the gutter should be about 1 cm from the end of the edge of the fitting, so that the gutter edge spacing in the fittings does not exceed 5 cm.
5. Installation of the universal stopend
Universal stopends should be installed at the ends of the gutters, ensuring correct gasket positioning. Use gasket spray to improve sealing.
First, install the rear part of the stopend, then wedge its front part against the front overhang of the gutter.
6. Installation of the universal corner

Installation of the universal corner begins by sliding the gutter into the rear overhang of the corner and then snapping the front of the gutter into place.
Ensure correct gasket alignment and use gasket spray if necessary.
7. Installation of a soil pipe

The soil pipe is connected to the pipe with an elbow or pipe fitting.
When installing dowels in the façade, select their length according to the thickness of the building insulation. Next, install the clamps on dowels with a maximum spacing of 2 m.
Place the pipes in the clamps, ensuring enough pressure when tightening to allow free thermal movement.
8. Completion of installation

To discharge the SGS into the sewer system, a universal settling tank should be placed in the ground under the drain pipe. Cut a hole in the flap of the settling tank equal to the pipe size, then insert the pipe into it.
To drain the square gutter system to the ground, install an elbow at the end of the drain pipe.
Half Round Gutter System PVC
START
Before installation, read these instructions carefully and follow the installation procedures and guidelines for occupational health and safety agencies (OSHA). It is recommended to use personal protective equipment when moving and performing work on the roof.
This includes, among others, protection against falling and personal protective equipment such as gloves, protective glasses, protective helmet and safety braces, etc. Avoid contact with sharp edges of metal sheets. Tin and PVC products are recyclable. Utilisation should be made at a selective waste collection point after the product life cycle is completed.
The installation of the system in accordance with the instructions below guarantees the correct and reliable operation of the PVC gutter system.
The PVC SAXON STEEL Gutter system should not be mounted below 5°C. The PVC material from which the gutter system is made requires taking into account the thermal phenomenon of extending the system components. Properly designed and installed fittings of the system ensure proper temperature compensation for long elements. The assembly elements of the system (gutter hooks, steel clamps) allow free movement of gutters and drain pipes. It is recommended to store the system in the original packaging and a shaded place until assembly.
1. Preparation of the roof structure and bracket installation


In order to properly install the PVC gutter system, cut the rafters correctly.
It is necessary to plan the gutter position so that the line marked as its extension is located 10–20 mm from the outer edge of the gutter. This position should protect the gutters against sliding snow. If this guideline cannot be followed, you should install a snow stop on the roof to reduce the risk of gutter damage by sliding snow.
Recommended hook spacing is 50 cm centre to centre.
2. Determining the correct fall for the gutters
When locating the brackets for the PVC gutter system, remember the correct slope of the gutter. The gutter should fall towards the drain funnel by about 0.3% (i.e. 3 mm per 1 metre of gutter).
To achieve the correct slope, first mount the hook furthest from the funnel and then the hook nearest to the drain funnel. When determining the mounting position of the remaining hooks, we recommend using a string. Properly installed hooks will prevent system blockage.

3. Determining the position and preparation of the hole for the funnel
The next stage of assembly of the gutter system is determining the position of the drain funnel, which is the lowest point of the system. Brackets should be mounted 15 cm from the edge of the drain funnel and other gutter fittings such as the universal connector, stopend and corner.
After determining the funnel position, a hole should be cut in the bottom of the gutter, corresponding to the dimensions of the drain pipe. Use a jigsaw or scissors to cut the hole.


4. Installation of gutter connector
Before installing gutter fittings, remember to use gaskets. Following this recommendation will allow easier installation of fittings and facilitate thermal movement of the gutter during temperature changes. When assembling gutter fittings such as the connector, the gutter end should be set according to the temperature scale located on the detail.


5. Installation of the universal stopend


At the ends of the gutters, universal stopends should be installed, paying attention to the correct arrangement of the seal. Use a gasket spray (silicone spray) for this purpose.
6. Installation of universal corners


7. Installation of the downpipe


To mount the downpipe clamps in the façade, choose their length according to the thickness of the building insulation. The next step is to install the downpipes, maintaining a maximum distance of up to 2 m.
Place the pipes in the clamps, ensuring that when tightening the clamp on the pipe you apply enough pressure to allow free thermal movement of the pipe.

8. Completion of the installation
To drain the PVC gutter system into the sewage system, a universal settler or leaf gully should be placed in the ground under the drain pipe. In the flap of the universal settler, cut a hole equal to the dimension of the drain pipe and then insert it into the hole of the trap flap.

Hidden Gutter System
SAXON STEEL Hidden Gutter Installation Manual
Introduction
Read this manual carefully before installation and follow installation procedures and HSE guidelines. Use PPE (e.g., gloves, safety glasses, hard hat, harness) when working on roofs. Avoid sharp metal edges. Metal and PVC products are recyclable; dispose of at designated recycling points after use.
For non-eaves systems, prepare the roof at the design stage. Set the wall plate as far back as possible from the outer wall to allow efficient insulation between it and the HG (Hidden Gutter) base. If the building is already designed, inform the client and contractor about potential wall plate adjustments.
1. Roof Structure Preparation

Prepare rafters for HG installation. For 200 mm insulation, cut rafters so their edge is 15 mm recessed from the wall. Ensure the wall plate’s vertical section allows connection of external wall insulation to loft insulation (traditional or over-rafter). Alternatively, design a recessed ring beam.
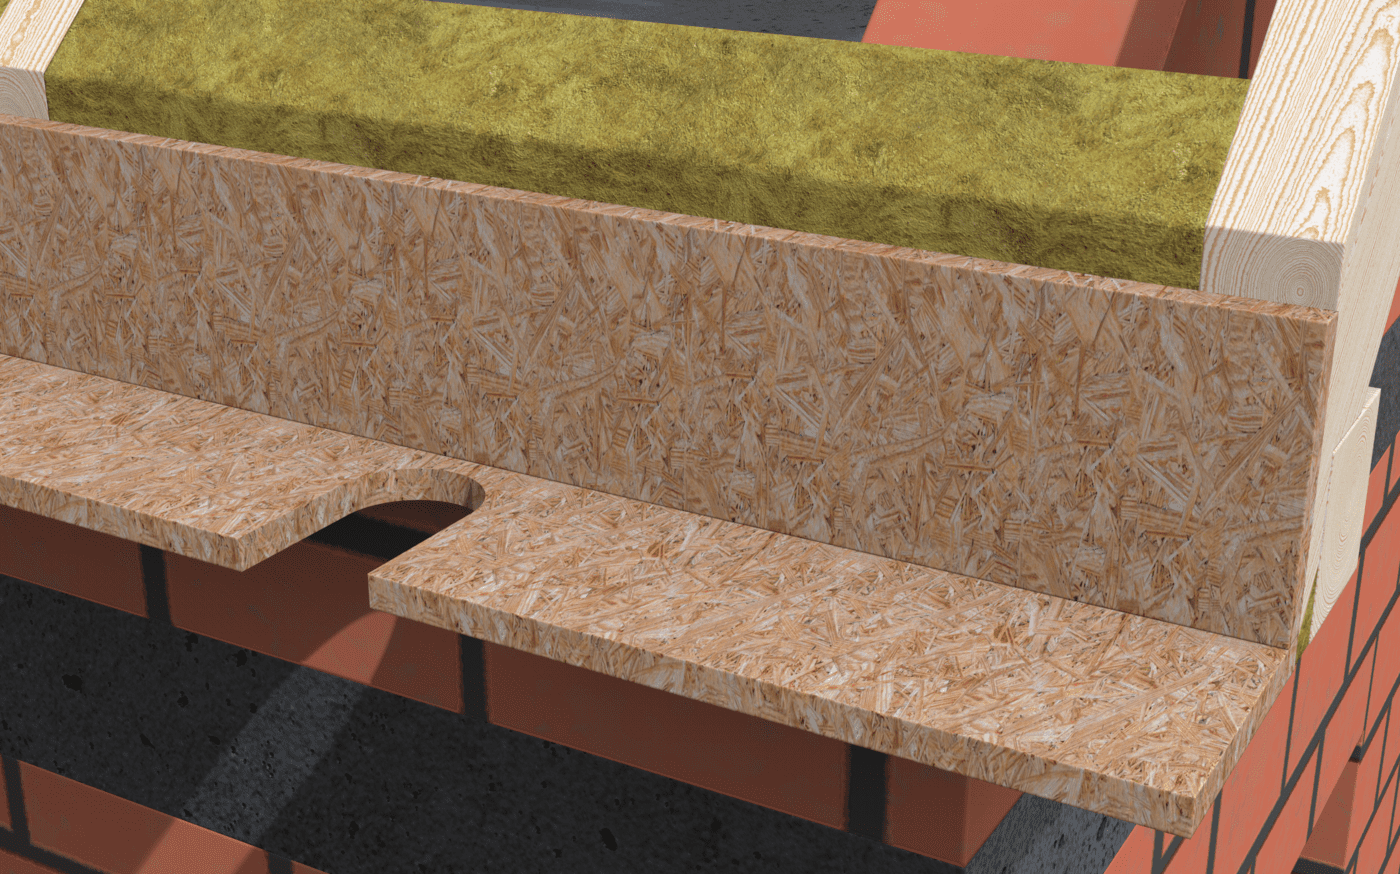
2. Base Panel Preparation
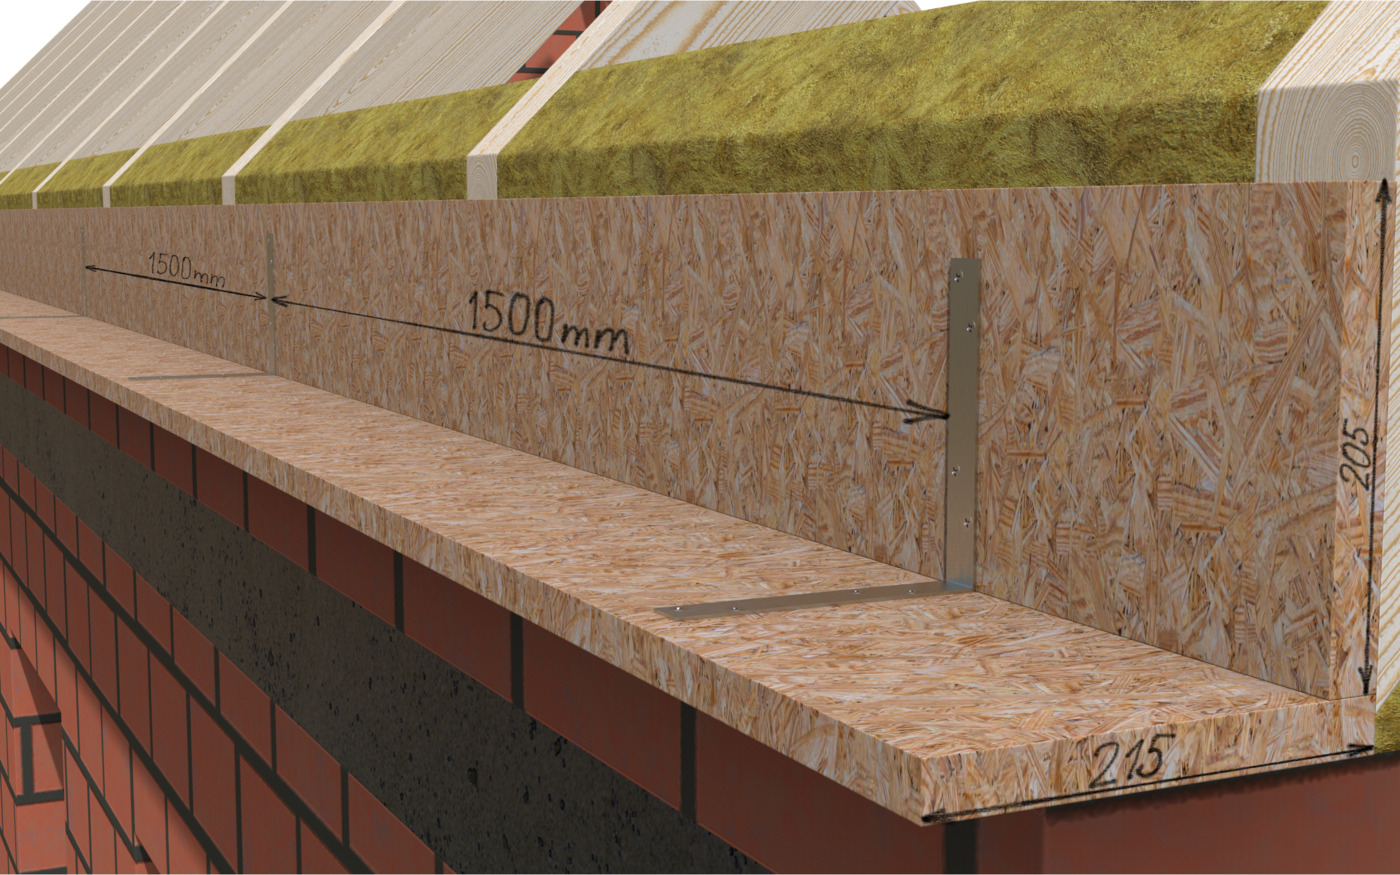
Use 25 mm MFP panels for the system base. Create an L-shaped structure with vertical panels (205–215 mm) and horizontal panels (215 mm or calculated via calculator). Join panels with an overlap, secure with screws after levelling, and fix to pre-cut rafters with screws. Reinforce with flat brackets every 1500 mm. To prevent snow damage to the fascia, ensure the roof extends above its top edge. Install snow guards.
3. Downpipe Outlet Preparation
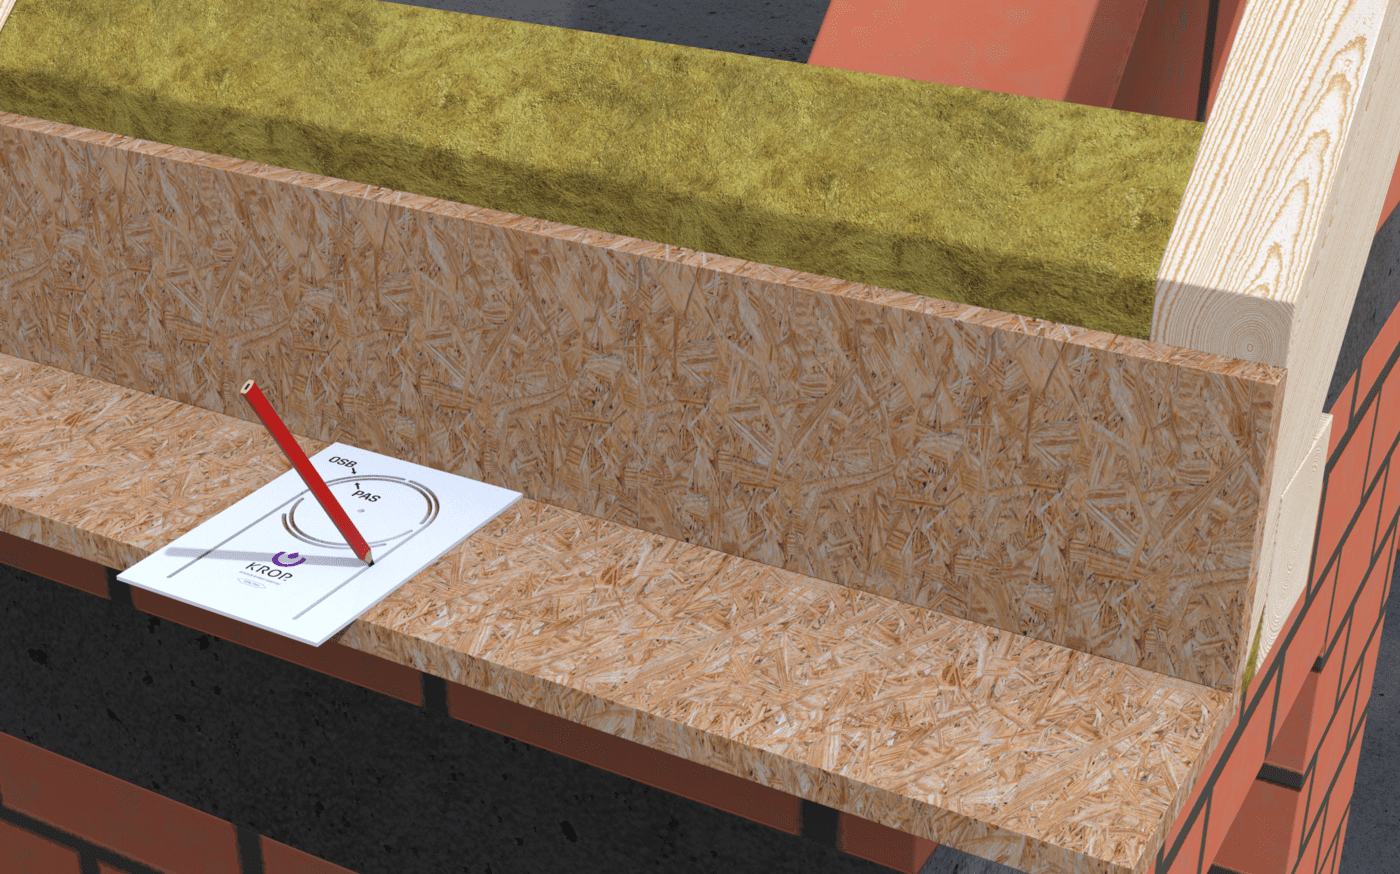
Use a template to mark the outlet hole on the MFP panel and gutter apron. Cut using a hole saw and jigsaw.
Calculate Gutter Installation Data
Use the online calculator to determine distance Z (height between panel edge and batten top edge).

4. Additional Membrane Protection
Cover the structure with SAXON STEEL breathable membrane, secured with staples and membrane tape. See point 14 for vertical downpipe installation.
5. Gutter Apron Hole Preparation
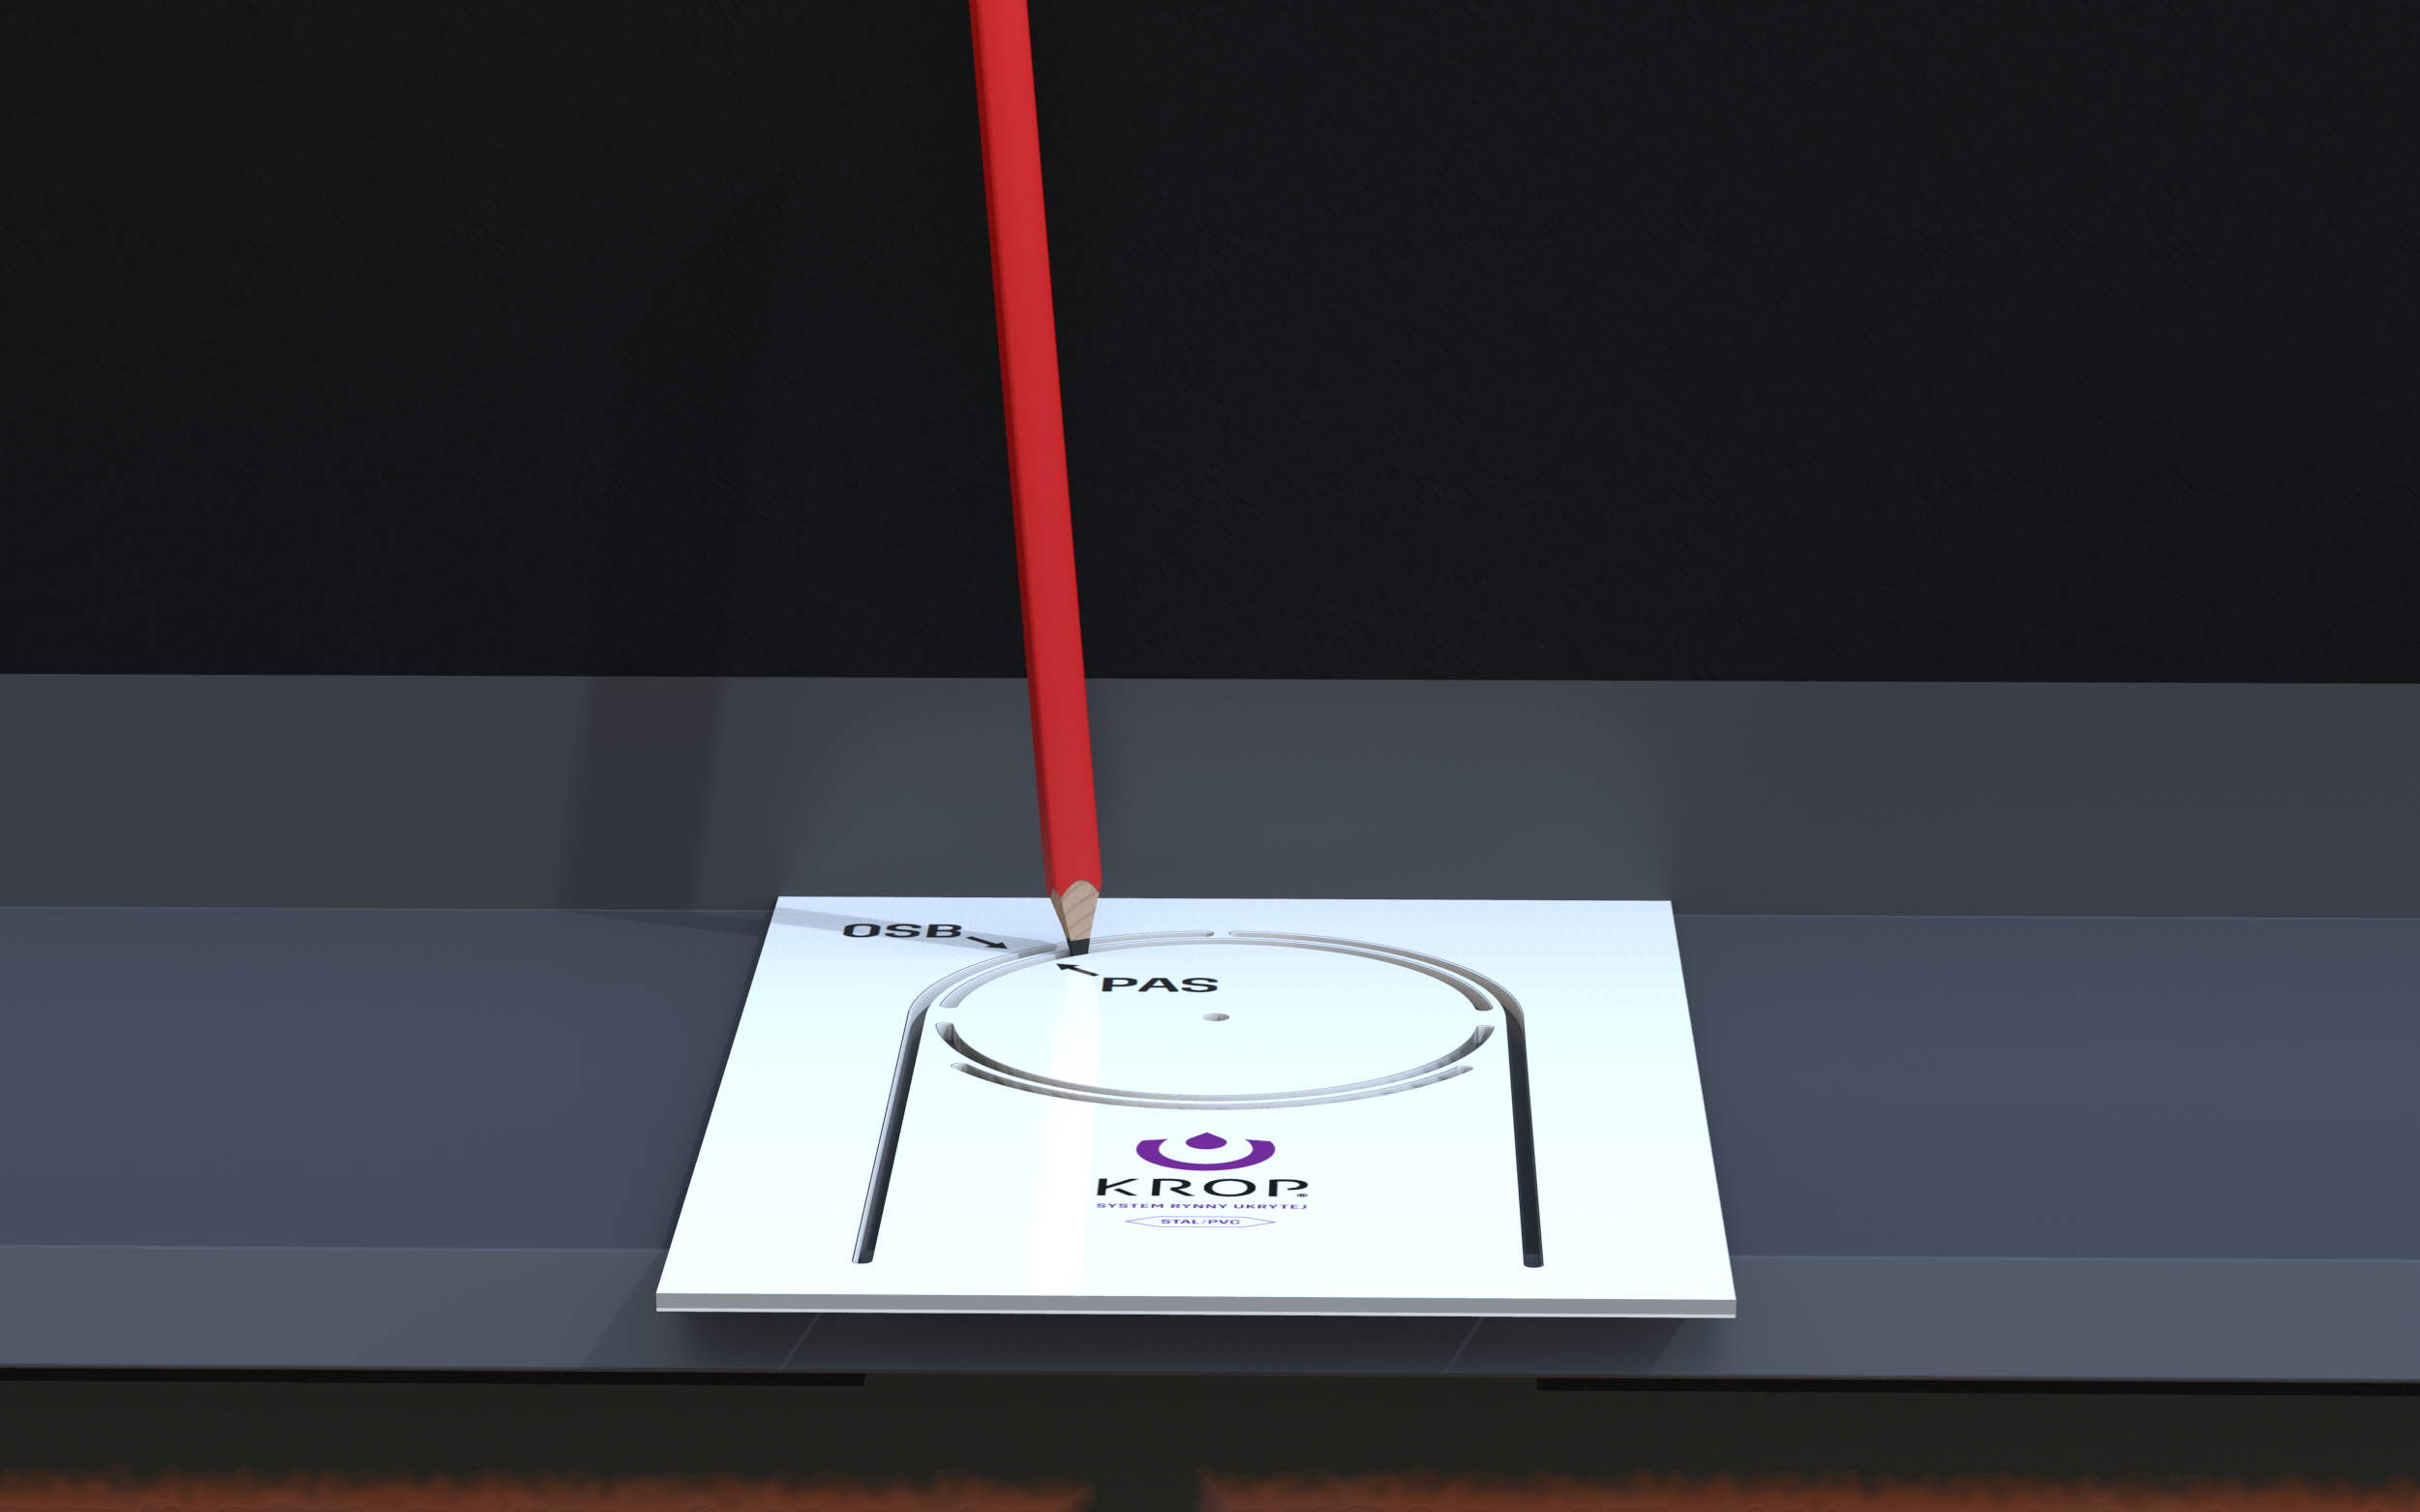
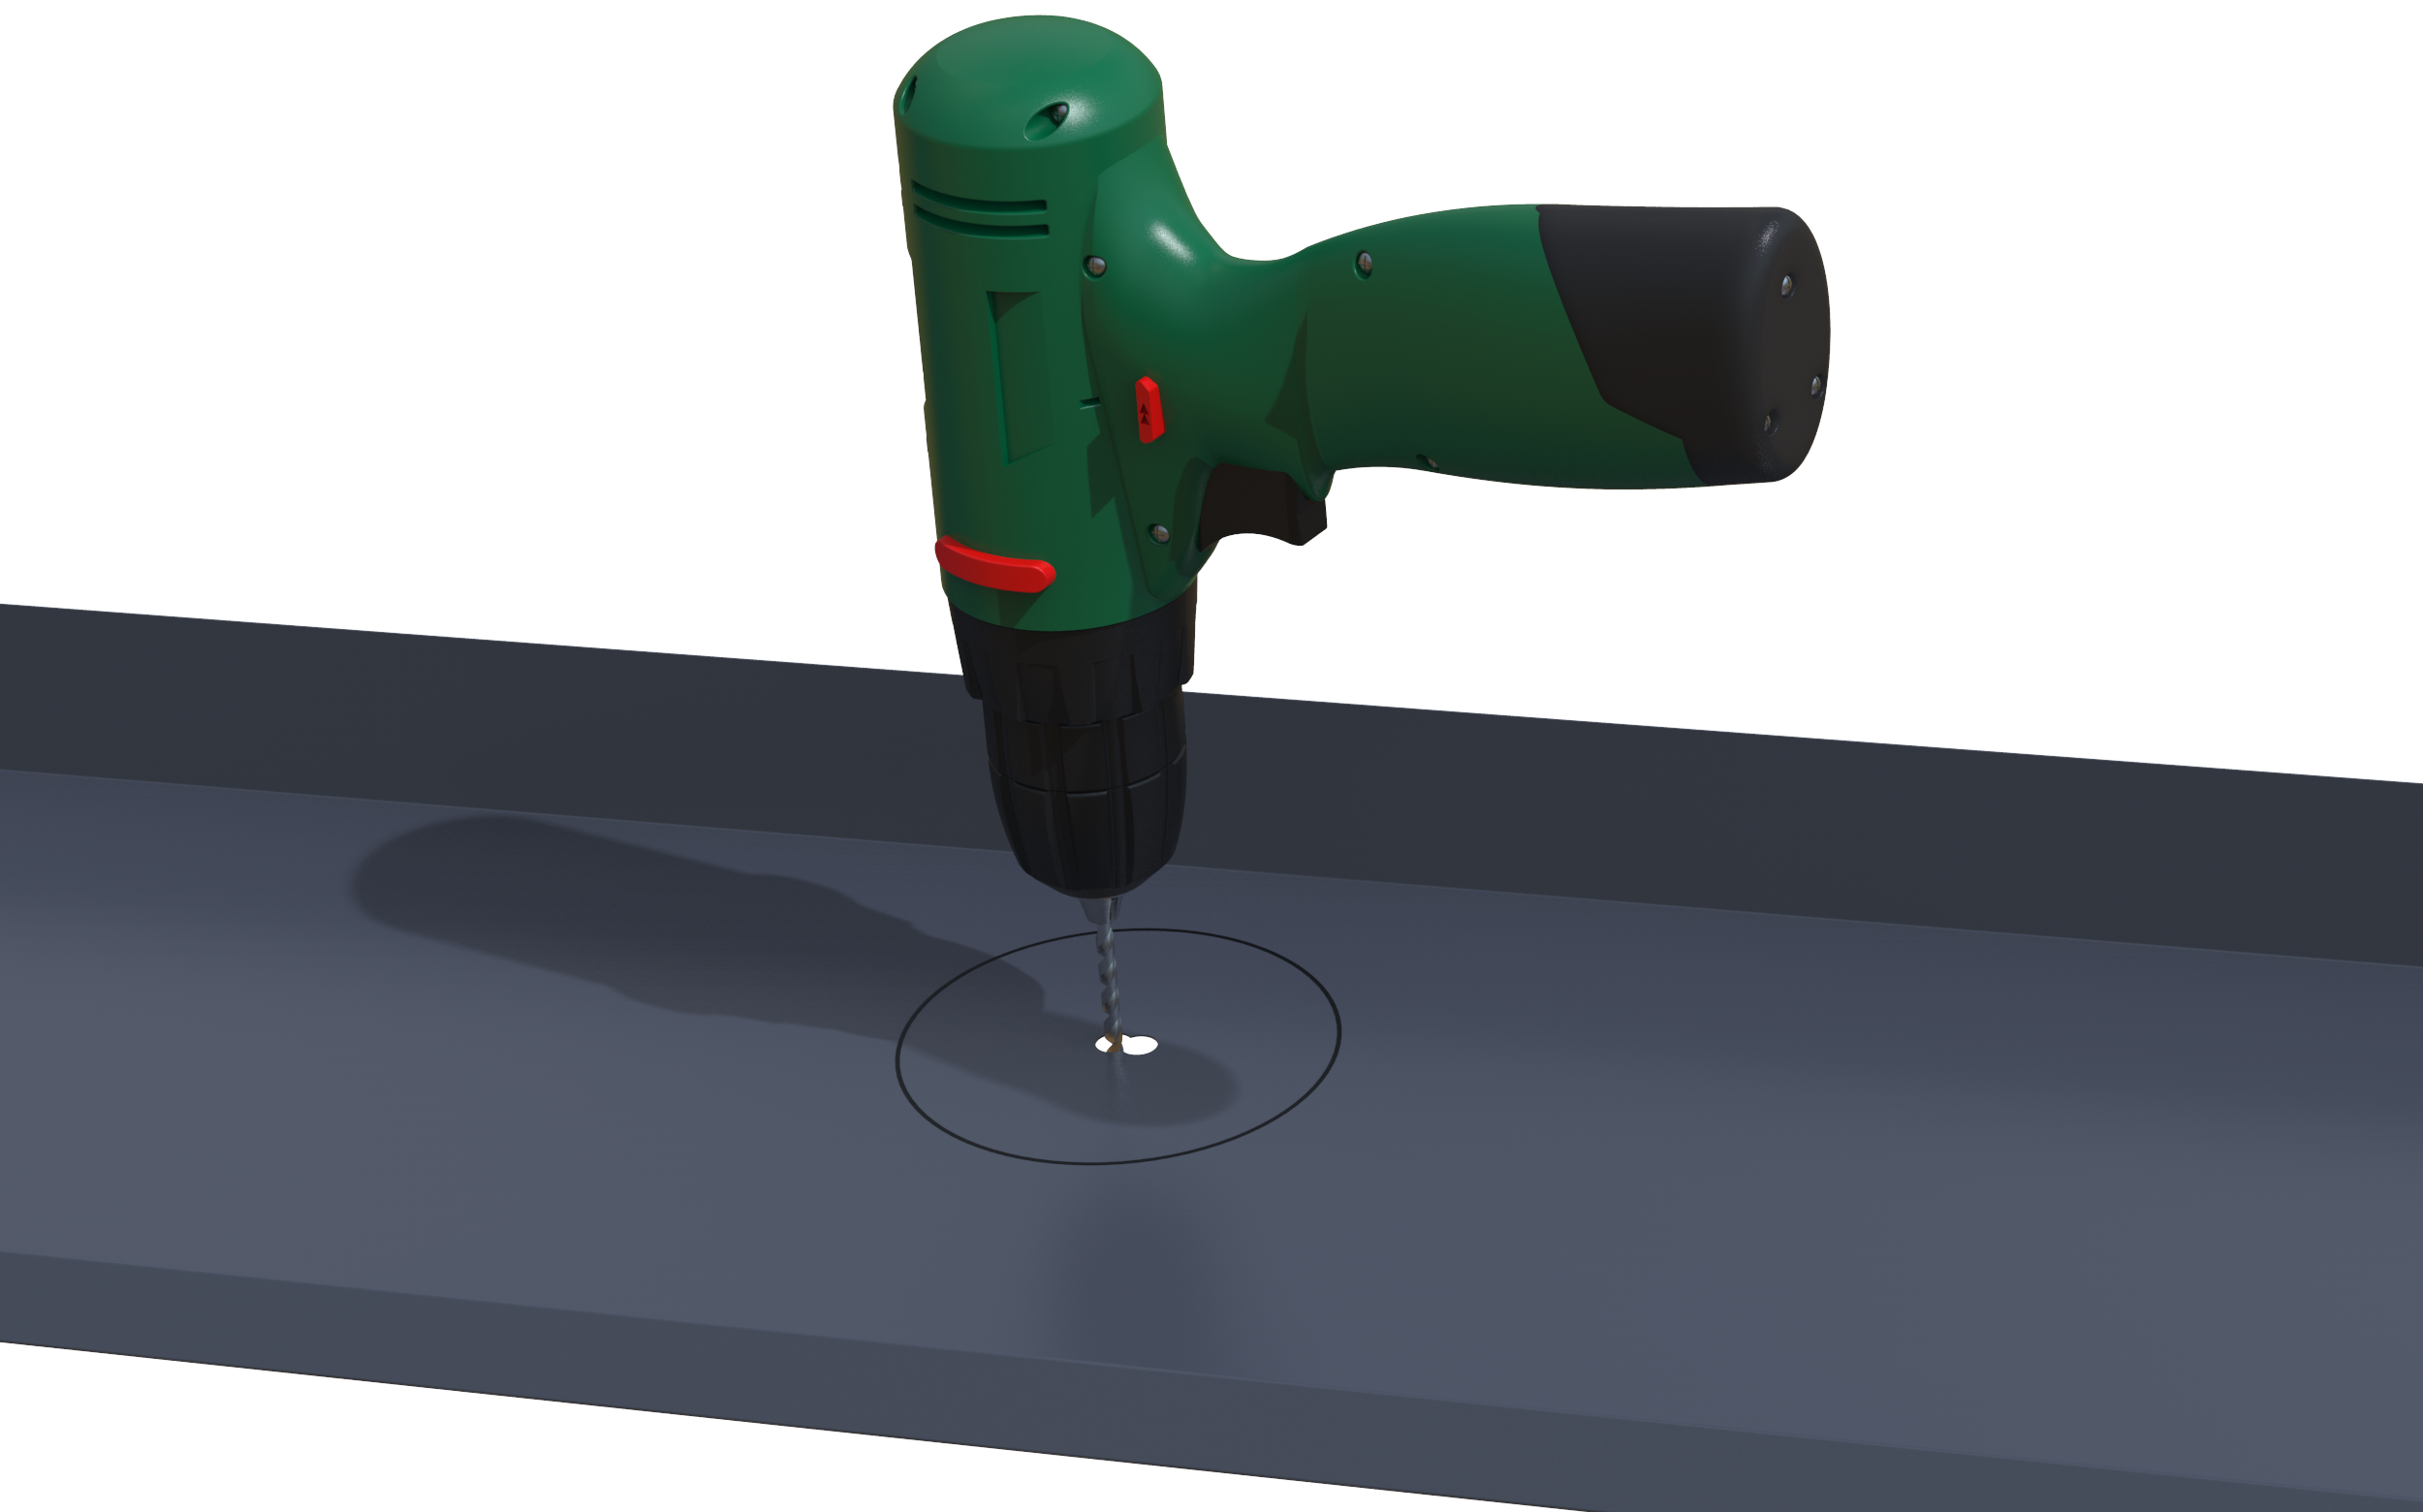
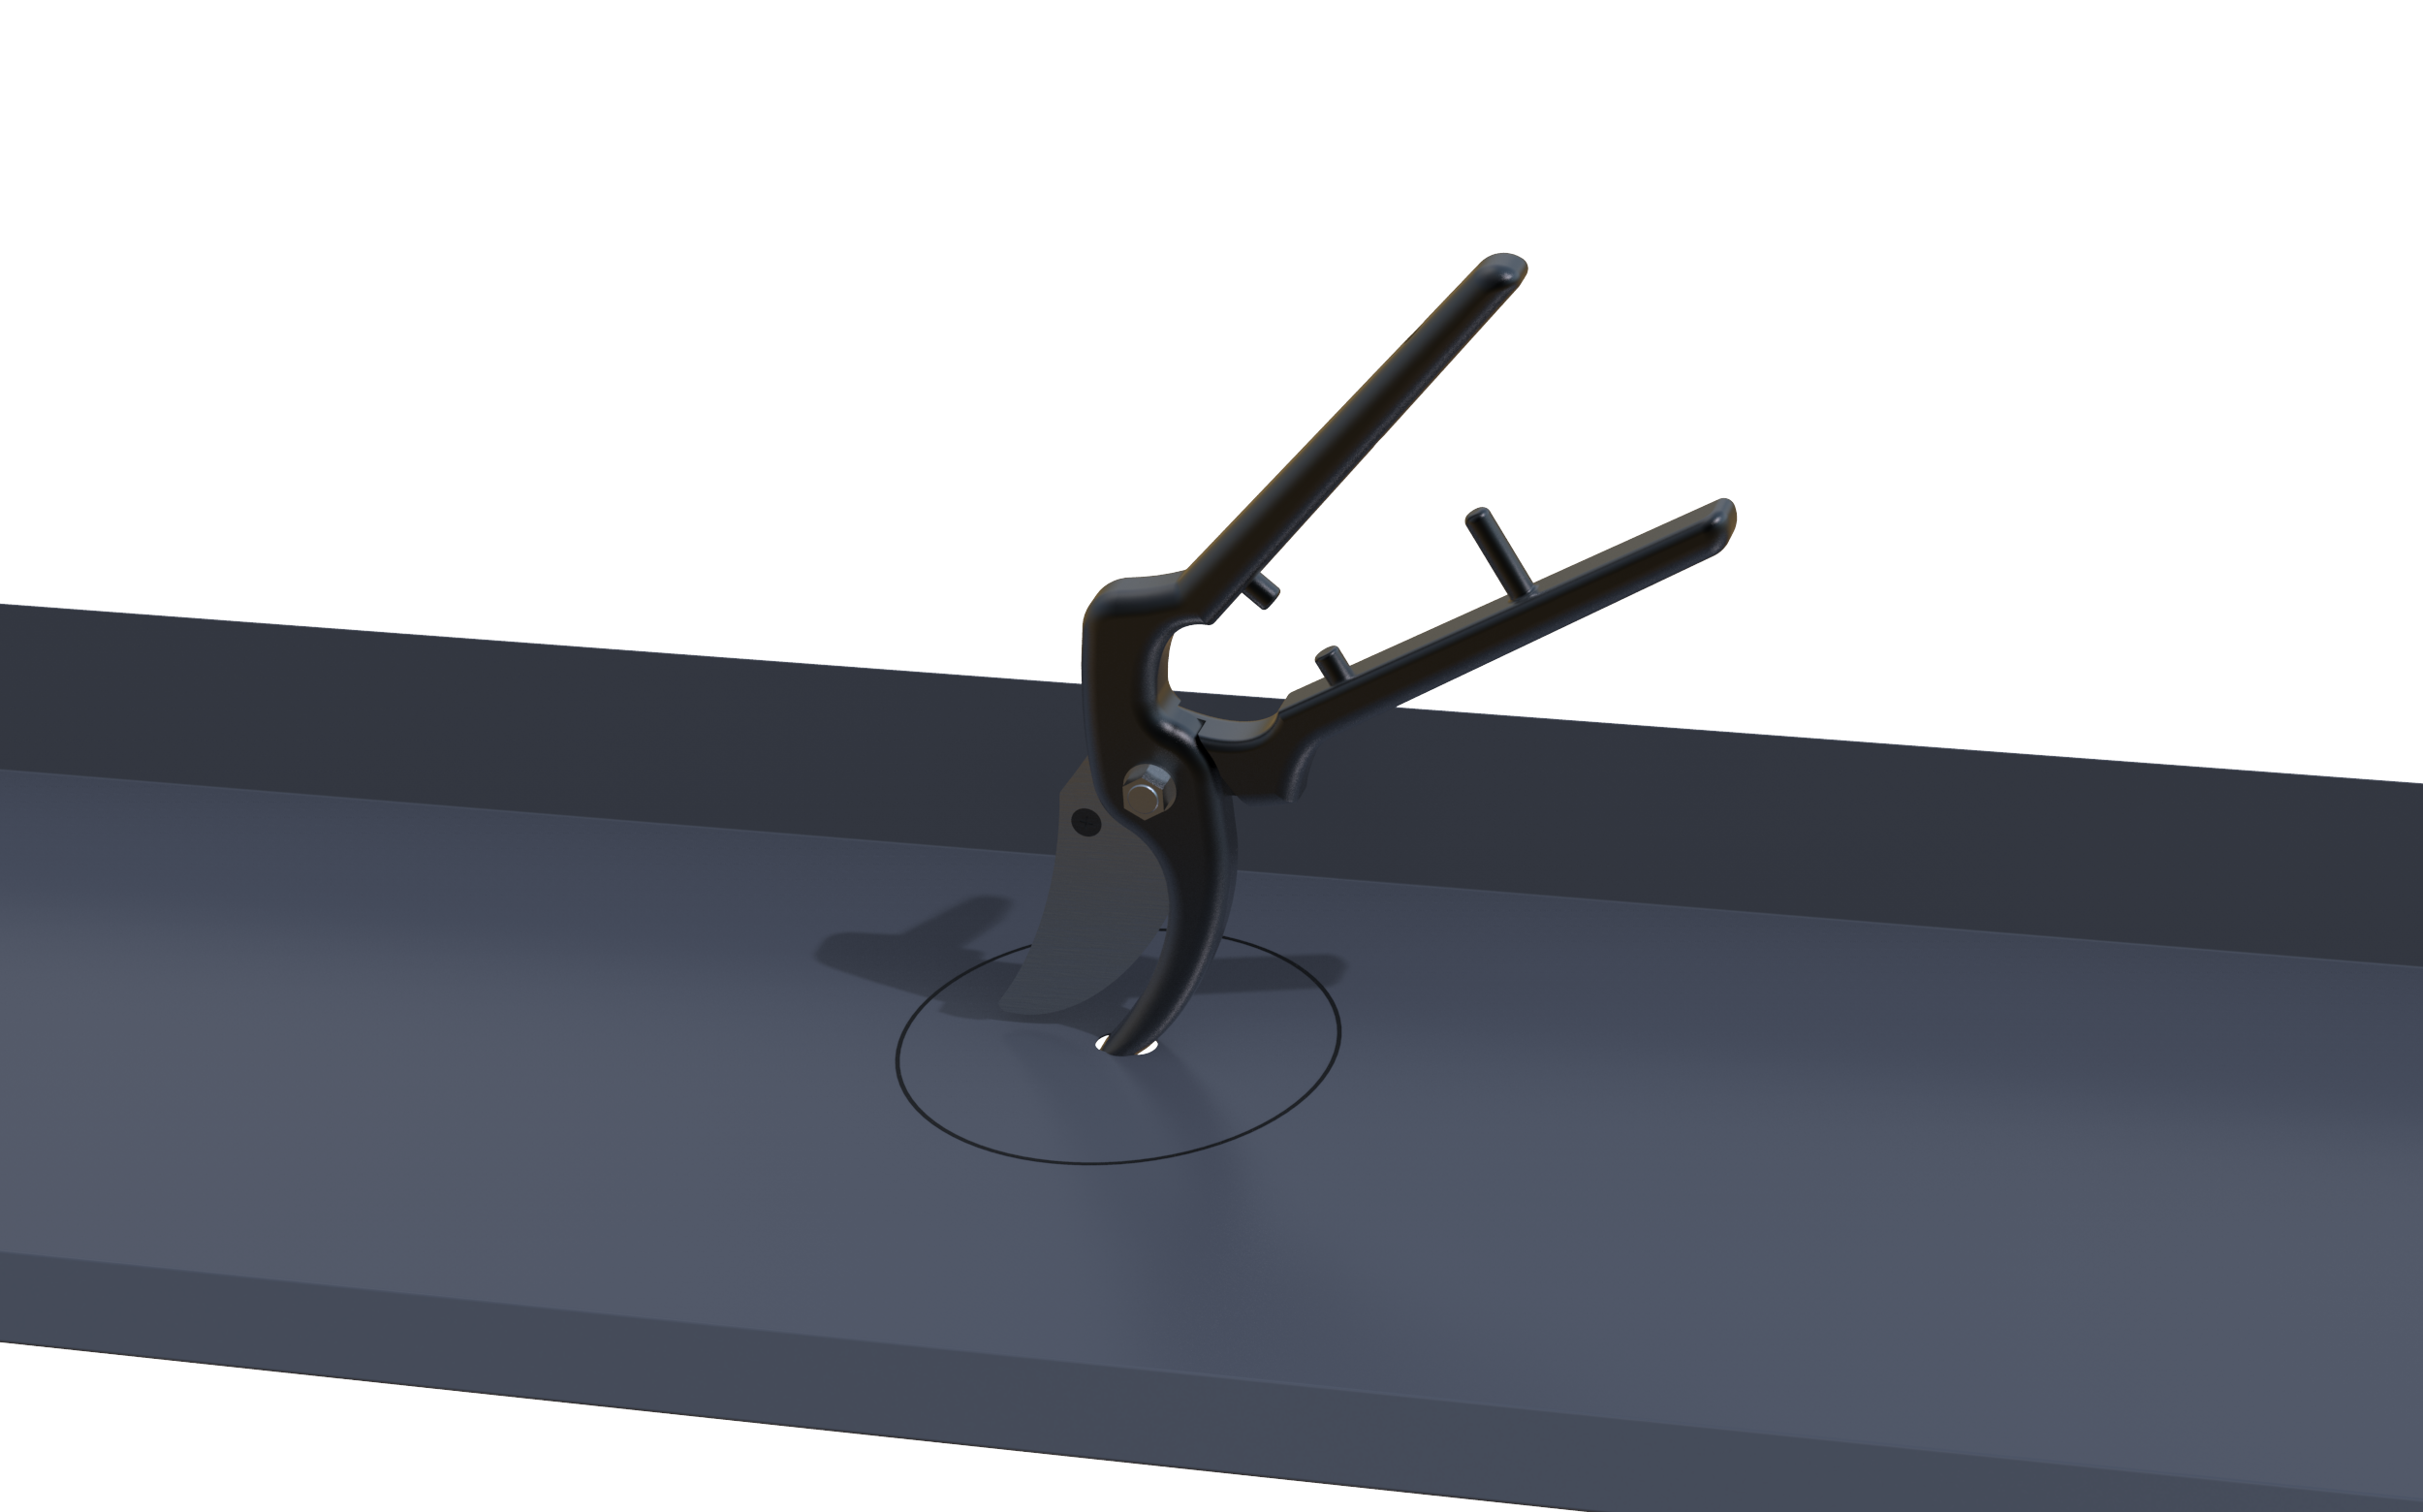
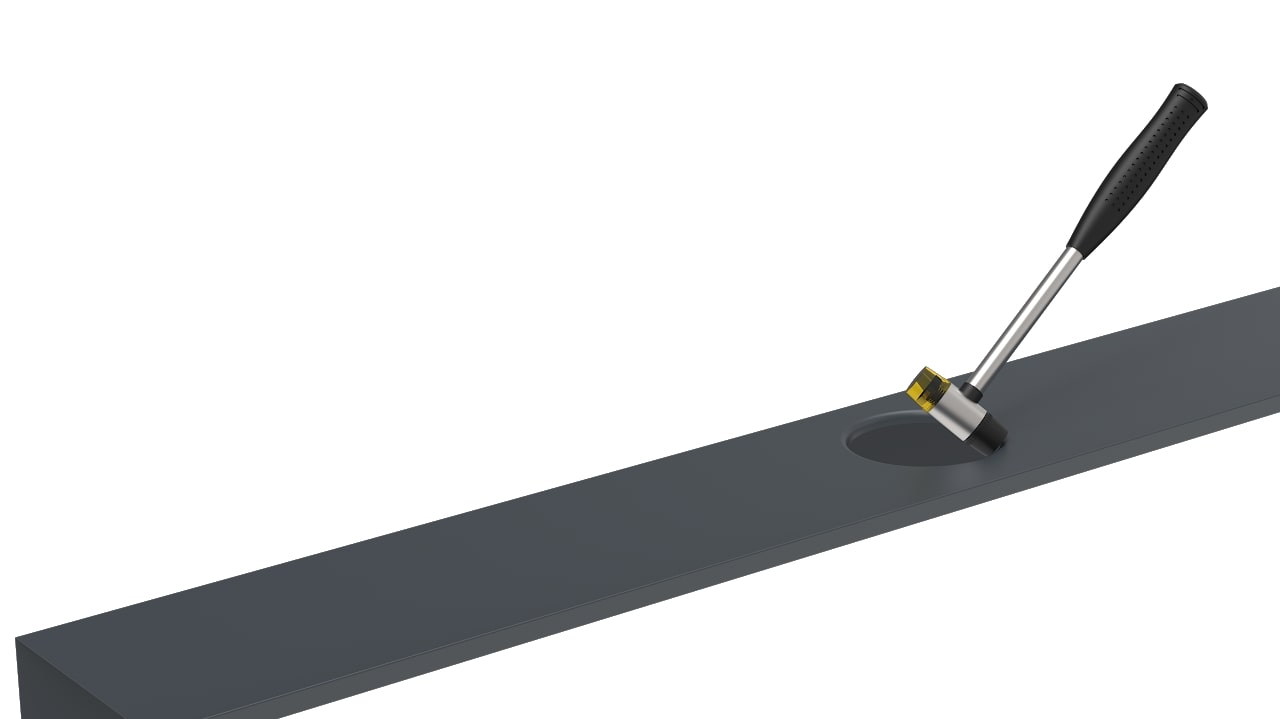
Mark the outlet hole on the gutter apron using the same template (inner PAS circle). Drill the centre with a screwdriver, then cut the circle with tin snips. Fold the circle’s edges upward to prevent condensation entering the downpipe insulation.
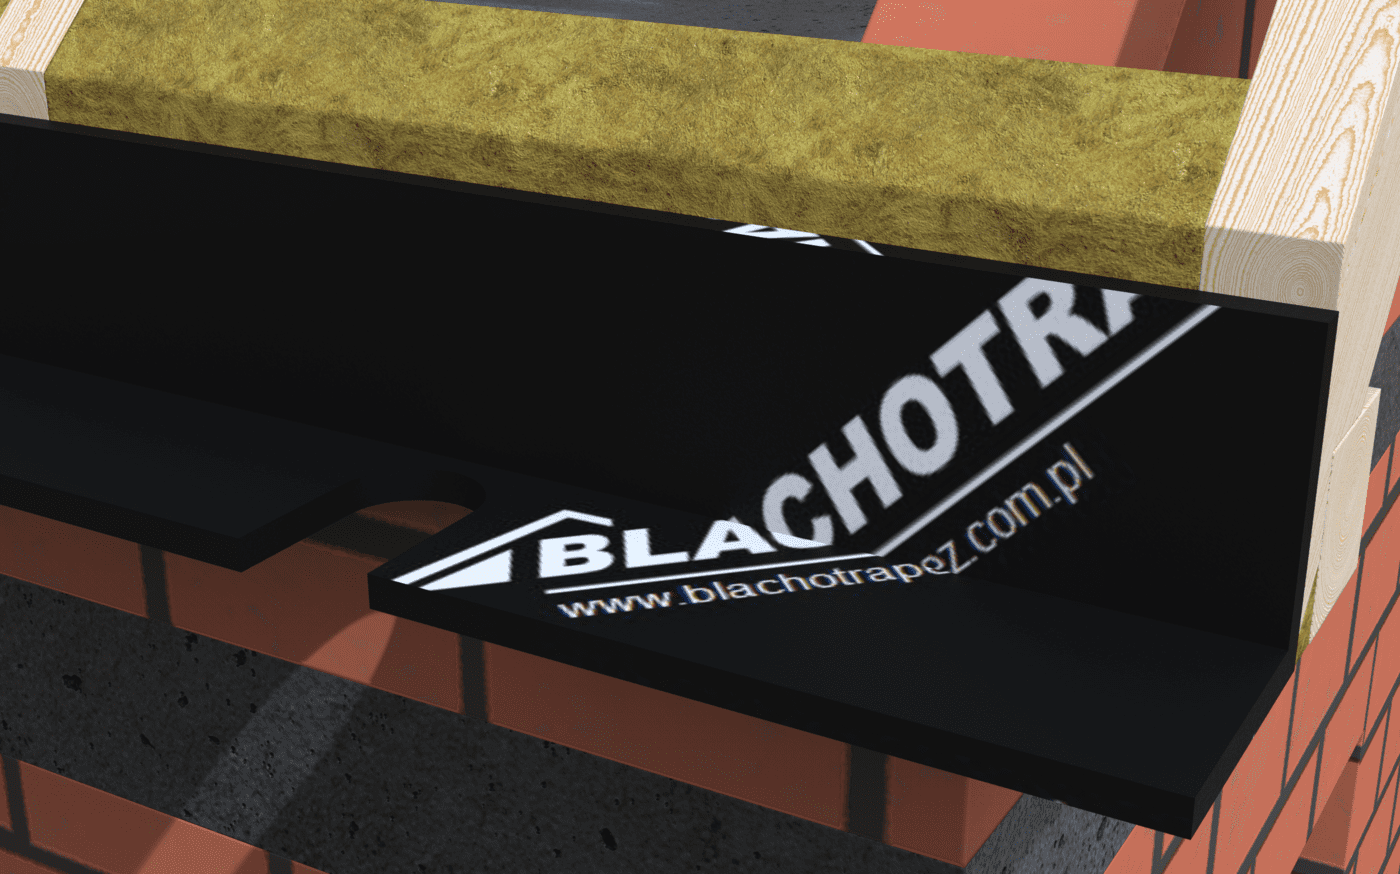
6. Gutter Apron Installation

Fix the gutter apron to the MFP panel with stainless steel screws, at least 10 mm from the panel edge. Maintain the apron’s 3° slope (10 mm gap between apron and panel). Join apron sections without glue/sealant, using a slide or standing seam. Fabricate and fit the vertical eaves metal independently, connecting it to the membrane with double-sided tape.
7. Fascia Hook Installation
The SAXON STEEL Hidden Gutter System conceals the 130 mm PVC gutter’s slope. Install the first fascia hook 10 cm from the MFP panel’s side edge, level with its top edge. Space subsequent hooks every 50 or 66 cm (depending on roof pitch), keeping them level with the panel’s top edge. Adjust hooks using slotted holes if needed. For hipped roofs, space hooks individually within maximum distances. Ensure 1–1.5 cm gap between fascia and gutter apron for ventilation.
8. PVC End Hook Installation
Highest hook: Align with the first hole of the fascia hook.
Lowest hook (with downpipe outlet): Align with the second hole of the fascia hook. Space end hooks max 60 cm apart. Maximum gutter slope: 0.3% (3 cm per 10 m).
9. PVC Downpipe Outlet Installation
Position the outlet in the hole, then fit the gutter.
10. PVC End Cap Installation

Spray the end cap with gasket spray. Apply silicone sealant at the joint for extra sealing. Follow the online installation guide for additional accessories.
11. Fascia Installation
Trim the fascia end 15 mm to avoid clashing with the PVC end cap. Fit the fascia from the top, clicking it